Here is the text from a tutorial I did on making minis.
Mini Knife Making Tutorial
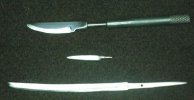
Making a miniature knife is not much different than making a full sized knife. The main differences are in holding on to the parts, and seeing what you are working on.
Plans/Drawings:
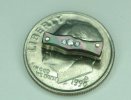
You will need to have an idea what you are going to make. Draw up a full sized drawing of the knife. For instance a bowie with an 10” blade and a 6” handle. The bowie would be ¼” thick at the spine. Now, figure the scale you want to work in. For a first project 10:1 is a good place to start. That means that every inch is now .1 inch. Using a cheap HF digital micrometer, you can easily (mentally) move the decimal point and see that the mini is 1.6” long with a 1.0” blade and .6” handle and you will want the blade to be .025” thick.
If you are going to try a really small scale, use the millimeter readings, and use 1MM equals 1 inch. That is approx. 25:1.
Make all the parts of appropriate scale. It shows poor planning when the guard works out to be about ½” thick when you factor the scale in. Keeping the handle width and sizing to scale is one of the hardest parts. Often the wood/ivory is only a few thousandth of an inch thick over the tang hole.
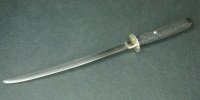
On most minis, scaling the hardware isn’t too much of a problem, but on some things, like a habaki with walls that are only .005” thick, it can really be hard to keep to scale.
Tools:
Besides the measuring devices mentioned, an assortment of small tools are required. Some sort of holding device is a necessity. A pin vise works well, as do several other small clamping tools. When making a blade, leave the piece of parent stock on to hold as a handle for as long as possible. Tweezers, scalpel/Exacto blades, modeling saws, a jeweler’s saw with size 1/0 blade, needle files, a Dremel tool or flex shaft, size 60-80 drill bits, and clamping tweezers are all handy things to have. The same adhesives used in other knife work will work on the small scale knives. I use a lot of slow set cyanoacrylic glue.
Good lighting and magnification are needed. An optivisor, or similar hood is nearly a requirement, but a good hand magnifier will do.
Place all the tools and parts you are using on a small tray, like a lunch tray. This keeps the tiny things from rolling off the table into never-never land. It makes putting it aside to answer the phone or quit for the night much easier, too.
Materials:
You can use any piece of metal you wish to make a mini, because it doesn’t have to perform like a real knife…….but if you use steel, and make a real miniature knife, the effect ( and fun) is much greater. Any tiny scarp of knife steel, even damascus scraps, can be used. Other metals to use for the handle hardware are brass, nickel, precious metals, and of course -iron/steel.
Handles can be made from any dense and very fine grained material. - ebony, rosewoods, ivory scraps, bone, antler, even leather.
Procedures:
Shaping the profile is best done with small files or with the Dremel, using sanding drums, small abrasive wheels, and Cratex wheels. Keeping a good grip is important, because finding a ½” long blade on the floor can be hard. Holding the tang or the blade tip in a pin vise while working on it is the best way to go. Once the profile is set, proceed just like you would on any knife, by setting the plunge lines ( if this applies) and then making the bevels.
If you are going to harden the blade, do so now. For carbon steels, getting it above non-magnetic and quenching in water or brine is usually no problem. You can use oil, too. Stainless steel minis should be heat treated in a foil bag. Just stick them in with a regular knife. Temper as the steel requires. I usually give carbon steel minis a one hour temper at 400F. The tang can be drawn down softer with a small butane hobby torch if needed.
Sanding can be done with abrasive strips held ( or glued) on a popsicle stick.. Scratches look much worse on a mini, so get it smooth to at least 1000 grit. Buffing can be a trick, so until you gain good skills with the Dremel ( never try to buff a mini on a full size knife buffer), buffing with a felt/leather rouge stick is the best way to get a mirror polish.
Guard:
Once the blade is finished, it is time to fit a guard…if the style has one.
One common mistake is to make the guard too large and thick Use your micrometer and your scale drawing to determine how thin and wide the guard should be. Make the piece a bit oversized to start, and after drilling/sawing the tang slot file the profile to shape and scale.
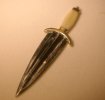
Handle:
Select the material and cut off a piece about 50% bigger than you need. For a hidden tang ( the easiest to start with), drill the tang hole and fit it to the tang. Then start removing the excess material and shaping the handle. Trust me, if you shape the handle first, the tang will end up off center. Faux stag can be made by using ivory, bone, or antler, and carving in the texture with minute ball burs. Stain the stag and rub/sand/buff the highlights white.
Detail work:
While any mini draws good comment from observers, a few tiny details can make one really pop. A few strokes with the jeweler’s saw blade and a needle file will add file work. A tiny hole or two drilled in the handle with fake rivets ( or real rivets) glued in adds a lot. If your skill level increases enough, you can make threaded tangs and tap pommel nuts, or just make fake pommel nuts and glue them in the rear tang hole.
")
 Are you a very very tiny person, jumping from key to key on the computer?