- Joined
- Jul 6, 2024
- Messages
- 18
Yeah I’ve already cut myself and I have extensive fire precautions in place. LolBeing a former firefighter and a EMT will both come in handy if you forge and make knives

The BladeForums.com 2024 Traditional Knife is available! Price is $250 ea (shipped within CONUS).
Order here: https://www.bladeforums.com/help/2024-traditional/
Yeah I’ve already cut myself and I have extensive fire precautions in place. LolBeing a former firefighter and a EMT will both come in handy if you forge and make knives

Thanks! I sold that one a while back but it kicked over pretty easy. I also kept the electric start on it because people like that option. Not everyone likes kicking a bike over. LolWhen I read "Yamaha 650" I thought, "Chopper?" Turned out that engine is perfect for a chopper. Makes me think a bit of a knuck. And a suicide shift and rat trap, too, nonetheless! How hard is it to kick? Compression release??
VERY neat build!
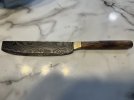
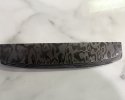
Thanks for all that info! Yeah, once I realized that I actually forge welded the 9 layers successfully on my first blade ever, I was too chicken to cut and restack the billet (even though that was my plan I felt it was too risky to ruin the billet with possible cold shuts or delams on the next forge welds.) so I just decided to leave it alone.At 9 layers it isn't exactly damascus. It is a laminated steel blade. It could be called a kyu-mai blade. (nine-layer blade).
Here is how to make damascus that will show a pattern:
Start with your 9-layer stack.
Forge weld it and draw it out until it is 1/4" thick.
Cut into four pieces.
Soak in pickle (Ph-down solution) overnight and then grind both sides to clean and flat metal.
Re-stack.
Forge weld and draw out again. You now have 36 layers, and it would be called a low layer damascus. This will look OK, but not really show much more than strata layers.
Repeat the clean-grind- stack-weld again and you have a medium layer damascus of 144 layers. This will look like waves and swirls.
Repeat again if you want a very active high layer damascus of 576 layers. This will look stunning and have all sorts of wiggles and swirls.
Ways to make a damascus billet show more activity:
If you only use a press to make the layers add up, you are making a steel equivalent of plywood. It will have lots of layers that will show up as you grind the bevels and edge, but they all fall more or less in straight lines. Hand forging the knife to shape will add some pattern, but you are still restricted to stratified layers. If making low to medium layered damascus billet, it is best to make a thick billet about one- half to two-thirds of the length of the final blade and draw out and shape by hand from there. This disrupts the laminations more and adds more wave and swirl effect.
If you manipulate the layers in forming the laminated billet, you get more activity in the final blade. Bars that are manipulated will have the layers disrupted and show much more damascus pattern. This works best with medium layer damascus in the 100-to-200-layer range. You lose metal in manipulation, but greatly gain activity. Some of the complex damascus patterns lose well over half the starting steel by the time the billet is done.
The simplest manipulations are ladder and raindrop. Ladder requires grinding in grooves along the bar and then forging it out to make it flat, or the reverse - forging or pressing in grooves and grinding the bar flat.
Raindrop is the same, using divots drilled around half-way through the bar and then forging it out, or the reverse (my preferred procedure) of hammering the bar heavily on both sides with a big ball peen hammer and then grinding it flat and smooth. You can make ladder or raindrop dies for your press and press the pattern in and then grind flat.
Welding TIPs:
After stacking the billet and welding the ends up and welding the re-bar handle on, soak the billet in kerosene until ready to forge weld. This prevents any oxides starting between the layers, and the carbon left behind when it burns off when placed in the forge greatly helps the weld form and increases the contrast in the layers. You can still use borax as a flux if you want to during the weld heats.
This procedure is called hydrocarbon-fluxing. Many people who do damascus don't use any borax at all, just start with a billet soaked in kerosene or other hydrocarbon fluid. Use fluids that don't have unsafe smoke. many brake cleaners and solvents are not good choices. Plain kerosene is one of the easiest to get and works perfect. When ready to forge weld and draw out the billet, just let it drain into the tank a minute and stick in the forge. The black soot from the kerosene burning off is the flux.
Keep a tall tank with kerosene in the bottom in the shop and make a bunch of billets with handles up. Store them in the tank under the kerosene with a cover on the tank until forging day. When done forging for the day you can store them back in the tank until the next session. Some folks just store them in the quench tank oil ... It works.
Don't let the billet cool beyond bright red in drawing out. Once the billet drops below red the scale forms. If you draw a bit and put immediately back in the forge scale is greatly reduced. A quick brushing off with a wire brush before and after each heat will make for great welds.
Don't try and weld too cool. Welding is done at high heat. It is yellow color and around 2100°F (1900-2300°, depending on the steel type). Trying to make a weld when the steel is red or has cooled a bit will break the welds formed and make cold shuts and bad welds. Weld a bit, put back in the forge, weld a bit, put back ... repeat.
Don't try to weld too hard. In making the initial welds, the steel will weld with very little pressure. Moderate hammer blows or gentle pressing is what you want. Once the billet is fully welded you can lower the temperature and work it harder. Too much pressure too soon can mush the billet apart or make split welds.
Hey Stacy, as far as this step goes, are you saying when I’m done forging for the day, I should place the HOT? billet right in the shallow kerosene tank before they have a chance to cool and oxidize?? Or do you let the billet COOL completely next to the forge and then put in back in the kerosene for the night? Something about putting a hot billet in kerosene seems sketchy even though I know kerosene is a much more stable hydrocarbon than say gasoline. Also I’m thinking you mean a cool billet because I know kerosene would essentially quench and harden a hot billet and I’m thinking that’s not good for it.Keep a tall tank with kerosene in the bottom in the shop and make a bunch of billets with handles up. Store them in the tank under the kerosene with a cover on the tank until forging day. When done forging for the day you can store them back in the tank until the next session. Some folks just store them in the quench tank oil ... It works.


Thanks Stacy, that means a lot. I recently financed a Riverside Machine Uncleal’s 24ton press so once that gets here I’m really going to try to challenge myself with higher layer Damascus blades. The 6.5 ton homemade log splitter press I built works but takes forever to move steel.Much improved.

