New Oven

Joined
Feb 17, 2007
Messages
3,375
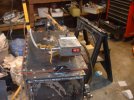
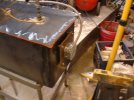
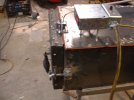
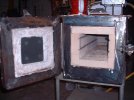
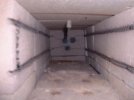
Well, I just finished my HT oven, I made it with soft bricks from a old kiln, and kao wool. A pid from ebay for $70 bucks, some Kantho wire from ebay, a 40 amp ssr (ebay lol) and some steel from the local yard. Fired it up and from 56 degrees to 1500 f in 11 minutes and after a short inital high of 1515 it dropped to 1500 and cycled between there and 1505 and the outside skin was still cold to the touch. I am a happy camper. The kiln was taking ah hour ro hit 1500. This oven has a chamber of 20"x6"x6". It also seals up fairly tight and I made a 3/8 heavy wall stainless tube inlet controled with a needle valve so I can try hooking it to my tig rigs argon flow meter and try setting up an argo atmoshere. Let tjhe games begin.
 
From ebay I got 2 of the wires the wire sold for about $19 each
115V, 14 Amps Kanthal A1 heating element.
(For 240-volt kilns you'll need 2 elements connected in series, which will draw 14.5 amps = 3480 Watts)
Then I went to the steel yard and picked up a couple pieces of 11 gauge drop (1/8" thick) and some 1x1x1/8"angle. I already had some 2x2x1/8" and a bunch of small pieces. The one piece of drop was 12 3/4" wide and 8' long. I marked a sq line at 24" and clamped it 1/8" over the edge of my small fab table and heated the line red with my cutting torch and kept pressure on it until I made a nice 90 degree bend. Then I moved it out 13" and did it again. then cut that piece of at 24". I then had 3 walls of a 24"x13" box. I then cut off another piece 24" long and rounded 2 corners to fit those on the one ed of my box. The 12 3/4" piece fit between the 13 inch wide bx because of the 1/8 walls. I tack welded it in sq and flat then welded it inside and out with 3/32 7018 rod. and cleaned it up a touch with a grinder. Then I took the 1x1 angle and made a 3 legged frame that fit the top ot the 24x 13 box. I drilled the top leg of the angle with spaced 5/16" holes. I then but welded the angle to the box (down leg to top of plate) this made the box 13 3/4" high and gave the top a flange. I then took the other piece of 11 gauge drop and cut a front panel 13" wide and 13 3/4'" wide with a rectangle hole 9 " wide and 8 1/2 high. The hole is 2" from the top and sides and 3 1/4 from the bottom. I welded that in place in the front of the box. I took a piece of 1x1x 1/4" angle I had and drilled and tapped 1/4-20 holes spaced in the top flange and welded it across the front on top. Then I cut a piece of 11 gauge 15"x25" and set it on the table and transfer punched all the holes and then drilled the at 5/16". Now I had a top. I then put a layer soft insulation from work on the bottom. It is a rigidized Koawool product and 2" thick, I then cut some of the bricks from the kiln to 6 inches in length. The cut easy with a sawsall and a coarse blade. I have something to do will continue this if others are interested
 
I layed these cut bricks side ways on the bottom of the box from front back untill I was about a 1/2" from the back wall. I had to cut one brick down side ways to make the length come out. I used a coarse file to file a bit of the front brick so that the portion that raised above the door hole would set flush with the outside edge of the steel. I packed some kaowool in behind the brick by the back wall, I then sed a 6"x1+1/2" brick on top the center floor layer and then took a 6" brick and drilled 3 1/4" holes in the center of it in a triangle shape about 2" apart. I drilled matching holes thru a 6"x6" piece of high temp fiber board for electrical boxes and matching holes in the back wall of the metal box then opened the holes in the metal up to 1/2". I drilled 1/4" holes in the 4 corners of the electrical board and matching holes in the metal box. Then I stuck 3: threaded bolts thru the 4 corner holes from the inside of the metal box and tightened a nut on the outside ( I used all 304 stainless bolts as I have a good supply of surplus bolts) This gave me a way to hold the board off the metal by placing another nut on each bolt then the bard then another nut, This placed the board securely a bit over an inch away from the metal then I took 1/4" stainless all thread and ran ti thru the center holes in the board with a nut behind the board thru the 1/2 hole in the metal thru an inch of kaowool then the drilled brick. I then place ss fender washers on the brick side and double nutted the all thread leaving about 1" protruding. I did the same on the outside of the electrical board. I did this to all three of the center holes. This made a solid way to get the power from the outside to the kanthal wires that would be inside. The nuts on both sides of the hard mounted electrical board hold these studs very rigid More to come and pictures too. I took some but they are shaky.
 
Ok here are some pictures of the oven I built. It is heating up for a try at some copper brass Makome, I added a interlock switch above the door so the power is off to the elements when opened. The knob on side 2 can be turned to tighten the door very securely. The valve on top is for argon if I want. I ran it to 1650 and held it for 4 hours trying to make makome and after using the pids auto adjust function it went up and down from 1649 to 1651. After 4 hours you could touch it in most places. It was very warm and a few places like where the stainless tube for the argon injection went from skin to interior it was hot and would steam a drop of water.
 

Attachments

  • oven front.jpg
    oven front.jpg
    74.1 KB · Views: 79
  • oven side.jpg
    oven side.jpg
    61.5 KB · Views: 67
  • oven back.jpg
    oven back.jpg
    61.7 KB · Views: 58
  • oven side2.jpg
    oven side2.jpg
    53.7 KB · Views: 68
Nice work! Thanks for the pictures. I just got my PID in the mail a few days ago and have my SSR and a couple elements on the way. Now, I just have to con one of the local refractory suppliers into selling me a box of bricks and build the box. Great job showing it can be done.
 
Thanks all. I will post a picture of the inside in the morning. I pinned all the bricks together by cleaning of a piece off 1/8" welding rod and using it as a long drill bit. Then after I had a hole I placed another piece of 309 stainless rod in the hole.
 
Here are some of the inside. The piece of metal on the door holding the koawool "gasket" in place is a piece of 410 stainless which is supposed to take heat real well, I made 4 of these plates, so I am good to go until I can make one of ceramic material. I do have a question> I have st my PID to use a type k thermocouple which is what I am using. How do I know that the display's temperature reading is dead on?

PS you can get a PID like mine and a good thermocouple with a terminal (the kiln model) from here cheap
http://auberins.com/
The Kanthal wire was like this and from this seller I used 2 as I made it 220. http://cgi.ebay.com/ws/eBayISAPI.dll?ViewItem&item=190162793708
 

Attachments

  • inside door.jpg
    inside door.jpg
    72.3 KB · Views: 33
  • inside.jpg
    inside.jpg
    31.3 KB · Views: 39
Right on i have everything ordered and paid for. Now i can start working on the oven. Thanks for the info and insperation i have been thinking about doing this for a while!:thumbup:

Bob
 
Back
Top