New Scabbard and Pics!

Thanks Bill. I'm not so into matching. When you start trying to match woods you often find that the minute difference draws negative attention. Thats why I usually try to contrast woods. In my furniture for example I made a small accessory table out of cherry and curly maple. Another good one is a dowry chest I made of black walnutu and white oak. The contrasts add something to the design, and don't allow for a negative impression of your match. On this scabbard I wanted a three tone arrangement (dark, lighter, lightest). The leather is the darkest, then the handle, and finally the light curly scabbard. There is a guy who refinishes furniture in Cumming, GA which is very close to where I live. He is a master, and can "almost always get a good match." (He was being modest.) However, after he pointed out the line between the new and old finish, and you had your eye trained to detect it, it was easy to find. He's an old fellow and had been doing this for many years. Thats when I decided to use more contrasts than try to match things up. Its not always avoidable, but I always try. So, this post turned long, I don't think you'll see lots of occasions in my work where I've tried to match or blend the parts together. Just a style thing really. Thanks for the compliments bud.:thumbup: :D :p
 
Hey Andy was it hard to chisel out the cavity ? Was it hard to get a good fit between blade and scarbbard ?
 
Astrodada said:
Hey Andy was it hard to chisel out the cavity ? Was it hard to get a good fit between blade and scarbbard ?

It wasn't hard to do (skill wise), but it was ~3 hours work. The fit is trial and error. When the two pieces were close I clamped them together and tried the knife. Then it was back to the bench. When using chisels first thing you've got to do is make yourself a toe board. (At least thats what my grandad called it.) Its a piece of plywood with two strips of wood nailed and glued to it. One on top and one on bottom, on alternate ends. This board sits on the edge of your workbench and allows you to push the chisel into the work AWAY from your body with both hands out of the way. This simple piece of equipment will make your chiseling skills much better. Get yourself some good OLD CAST STEEL chisels from ebay too. Look for: Keen Kutter, Ohio Tool Co, Sheffield (almost anything cast steel from there is good), Stanley 750's (could be expensive), OVB, Hibbard Spencer and Bartlett, Bluegrass, etc. A nice woodworking vice is a BIG help too. (I got mine on ebay.)

Bri in Chi could give MUCH more wisdom here than I. I was hoping to get some chiseling tips from him here. If you need me to draw up a toe board lemme know.
 
aproy1101 said:
It wasn't hard to do (skill wise), but it was ~3 hours work. The fit is trial and error. When the two pieces were close I clamped them together and tried the knife. Then it was back to the bench. When using chisels first thing you've got to do is make yourself a toe board. (At least thats what my grandad called it.) Its a piece of plywood with two strips of wood nailed and glued to it. One on top and one on bottom, on alternate ends. This board sits on the edge of your workbench and allows you to push the chisel into the work AWAY from your body with both hands out of the way. This simple piece of equipment will make your chiseling skills much better. Get yourself some good OLD CAST STEEL chisels from ebay too. Look for: Keen Kutter, Ohio Tool Co, Sheffield (almost anything cast steel from there is good), Stanley 750's (could be expensive), OVB, Hibbard Spencer and Bartlett, Bluegrass, etc. A nice woodworking vice is a BIG help too. (I got mine on ebay.)

Bri in Chi could give MUCH more wisdom here than I. I was hoping to get some chiseling tips from him here. If you need me to draw up a toe board lemme know.

From what I've read that's how the Japanese scabbard makers do that too.

Long slivers of thin wood seperating under the sharpness of the chisel...fit and slivers out again......that's zen man ! :thumbup:
 
Yea, but Astro I'm no master sword maker. With me its more like fit, swear for a minute, hack at it with a chisel, fit, swear some more, etc. One thing I can say is that the master swordmaker would have sharper chisels than me. I am pretty good at sharpening chisels and plane irons though. But I've been in a masters shop (my Uncle Ray) and his chisels are on another level. I was supposed to go over there and learn something about sharpening from him, but alas, he died before my visit.
 
aproy1101 said:
Thanks Bill. I'm not so into matching. When you start trying to match woods you often find that the minute difference draws negative attention.

Yes, I get your point. Especially in a situation where you have limited control, if any, over handle wood selection and, probably, no access to nepalese woods. Good work.:thumbup:
 
My favorite thing about the scabbard is how thin it is. Its truly comfortable to walk with. If the khuk wasn't so dang heavy it would be a favorite rig. The knife is heavy enough to be an around camp knife, but not a hike all day knife. I'm going to have to do another one (yea right, one) for a more carryable khuk. Maybe a BAS.
 
aproy1101 said:
It wasn't hard to do (skill wise), but it was ~3 hours work. The fit is trial and error. When the two pieces were close I clamped them together and tried the knife. Then it was back to the bench. When using chisels first thing you've got to do is make yourself a toe board. (At least thats what my grandad called it.) Its a piece of plywood with two strips of wood nailed and glued to it. One on top and one on bottom, on alternate ends. This board sits on the edge of your workbench and allows you to push the chisel into the work AWAY from your body with both hands out of the way. This simple piece of equipment will make your chiseling skills much better.

Andy,

So one strip faces down and hooks on the edge of the bench, and you push your work against the other strip, right? I would think in this case a "V" on top would work better. (?) I drilled some 3/4" holes in my bench and use bench dogs to hold a board and then push against that, but as I envision this, this would be both more portable and could be more easily customized for different shapes of work. If I tried this project, I wouldn't want to try and cut this one out crossways, it would be easier to chisel from the top of the scabbard to the bottom I would think.

Thanks,

Norm
 
Norm I miss having you on the forums during the workday.

Um. I just don't know how much you want to put into your toe board. Don't get cought up making it complicated. Its certainly more portable, and during the evenings I carry it in and work at the kitchen table with it. Ray's was a few simple scraps.

I certainly did make many lateral (perpendicular to the grain) cuts. Thats a lot of wood to hog out. You're gonna turn the plank blank every way you can imagine. Also, to say you're going to cut from the top to the bottom ignores that you're gonna try to cut with, rather than against, the grain. If you don't you'll be fighting yourself the whole time.

Do you have a woodworking vice on that bench that allows you to cinch things down with your bench dogs? Get one. Be sure its quick release, you'll thank me. I spent ~$125 shipped for two on ebay (seperately). A large 10"x4" craftsman (old as hell) and an old Wilton 8"x4". They change everything about how you work. When you can cinch that toe board cleat in the vice it makes it way speedier. I also hooked the toeboard into the vice and tightened the dog onto the piece. I could move around it without moving the piece. Use a mallet too.
 
Hey, I'm gonna make a couple of those bench hook things. Thanks for the idea.

Here's how I do the hollowing out thing with hand tools:
1. I use basswood if I'm going to cover with leather. Re-saw to appropriate thickness if not already there. Plane inside faces flat.
2. Trace around blade about 1/16" from edge, 1/8" at tip end with a pencil.
3. Using a sharp utility knife blade, cut around the outline to a depth of about 1/2 the thickness of blade.Deeper at the spine than the edge obviously.
4. Using a narrow chisel, cut a V against the inside of the outline against the first cut. Now you have an accurate outline, and all that's left to do is remove the wood inside. This can be done several ways. Gouges, chisels, bent knives. whatever works for you. I wouldn't use an electric router, but some might choose to.
5. Repeat for the other side. Test the fit and adjust as needed. This takes some time. Don't rush.
6. Cut the outside shape of the first piece about 1/4" from the blade .
7. Use the cut-out side to line up the other side with the blade in place. Trace the outline on second piece
8. Cut out the second piece.
9. If I'm going to attach a belt loop, I inlet a rectangle of thin leather inside the back half, so the stitching has something to grab. Thread tends to cut through soft wood. Glue it in place, the drill holes and glue and stitch the loop in place. Tape up the leather belt-loop to keep it clean in subsequent steps.
10. Glue and clamp the sides together. Beware of glue oozing into the inside. Small spring clamps work fine if the two pieces are nice and flat to begin with. I use Elmer's yellow, Weldbond or other water clean-up glue. Epoxy isn't warranted here.
11. Shape the outside as desired. I find a spokeshave and a small plane work well. Any small oopsies can be patched with Plastic Wood if you're going to cover the sheath. Sand smooth and seal with a couple of coats of Deft, shellac, or other sealer. Now you're ready to cover the thing.
:D
 
Speaking of chiesels, would it be a smart idea to have the kamis at HI forge up a set, or would shopping for some at the local Sears be a better option?
 
Thank You G. It was fun to do.

I'm not interested in purchasing HI chisels. As stated below, the best chisels you can get are available on ebay. Read my posts below to get key words for searches. As for Sears chisels, they stink.

Edited to thank Brian for posting those steps. Glad to help with the toeboard. Need a drawing just lemme know.
 
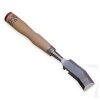
I have an HI chisel. It takes some getting used to...
 

Attachments

  • khukchisel.jpg
    khukchisel.jpg
    3 KB · Views: 104
LOL. Friggin cracking me up. A bent chisel. Cool. How do they harden those?
 
Back
Top