Newbie second knife WIP

Joined
Aug 1, 2016
Messages
644
I'm a total newbie to making knives, just finished my first and working on the second. Posting pics because a question I had in the forum, figure this will be a good way to show how much I'm struggling, LOL!

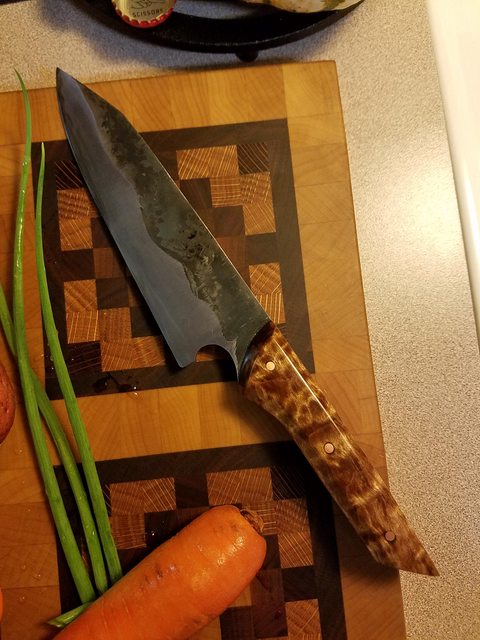
First knife, a little kitchen utility knife in Aldo's 1084, quilted maple handle with red G10 spacers. 9 3/4" OAL, 5 3"/8 blade. I learned a lot and made a lot of mistakes. I already was a fan of rustic looking knives, so now I made one!

tDSpu22l.jpg


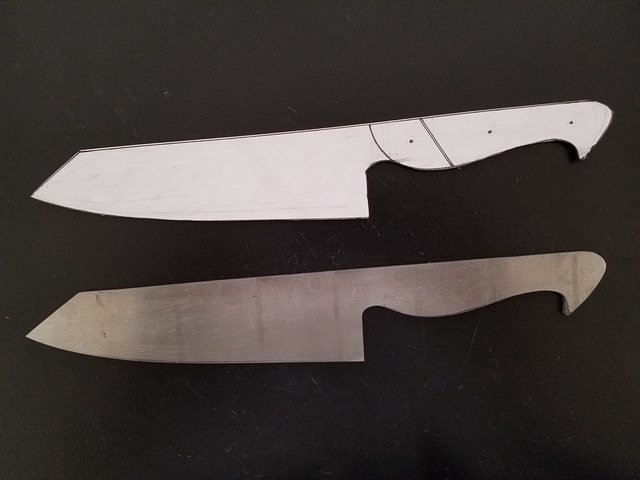
Wanting to get better at this means practice and learning more! Second knife I'm working on is a curvy bunkabocho in 1084. First I worked the design in pencil on paper then glued it to thin balsa to make a template and guesstimate how it felt in hand and on cutting board.

1JLfgFEl.jpg


aSGhV2Gl.jpg


Ec1TL4Zl.jpg


TRotWF7l.jpg


6cp2jFsl.jpg


6XE9Mj5l.jpg


It seemed okay, so then I traced the profile onto the 1/8" thick 1084 steel (actual measures more like 0.135-0.140" it seems), rough cut with an 18 tpi bimetal hacksaw blade, then profiled on my 1x30 belt sander with 50 grit zirconia belt except for hard to reach curvy areas which were done by hand filing.

JGUPtBRl.jpg


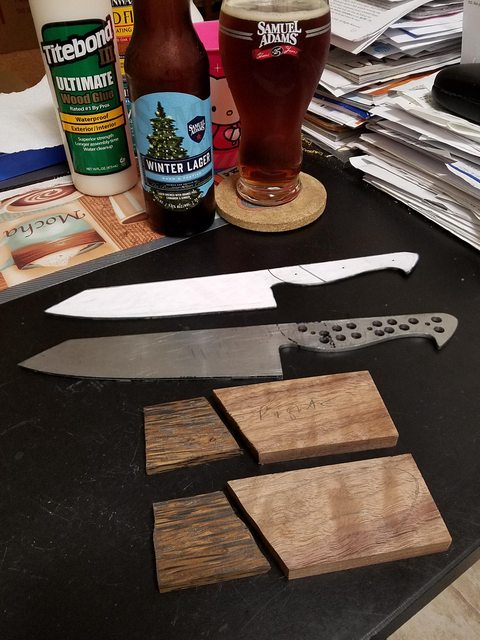
Wanted to have a maker's mark and easiest thing without spending extra money was a file pattern on the handle spine. Colored with sharpie to see what it might look like. As you can see, also sharpied the edges and scribed a center line with 1/8" drill bit.

TFjgZjUl.jpg


Drilled out slightly bigger than 1/8" pin holes ("30" size drill bit) and 1/4" weight reduction and epoxy "pin" holes in the tang, maybe should've planned out where the big holes go ahead of time. You can see where I got two of them overlapped. Probably could've done more but the bit is dull and I got impatient. Hand cut wood for the planned handle, walnut for the main part and black palm for the "bolsters". Wavy cuts with a coping saw, LOL.

eayDWenl.jpg


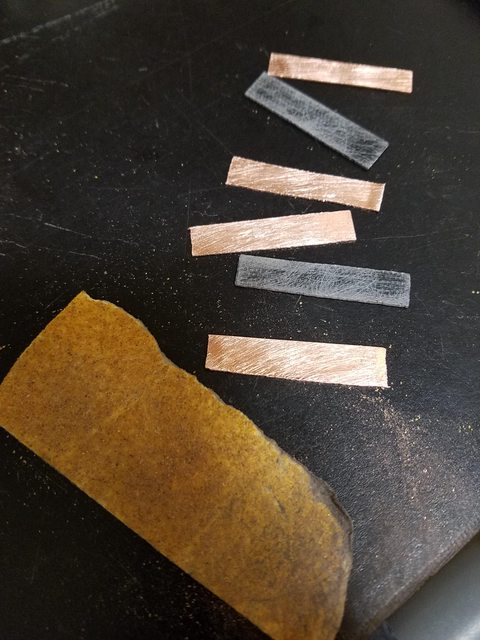
What got me started on this was a question about gluing up multipart spacers between wood bolster to the rest of the scales. I was almost going to just skip the spacers because I was confident Titebond would make a great bond between the two woods directly, but figured I would learn more if I went for my original vision: metal and G10 spacers inbetween the woods. I hand cut strips of copper and black G10, roughed up the surfaces with the lowest grit sandpaper I had on hand (80? grit). Since I was worried about clamping many pieces up at a time, I decided to try gluing just the spacers together first using epoxy. I used wax paper to because I get epoxy everywhere and didn't want to glue the pieces to the clamps.

cz0zVpNl.jpg


pCf6HPjl.jpg


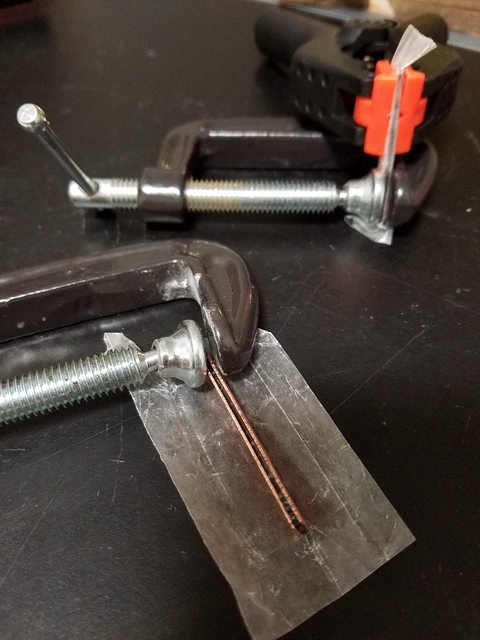
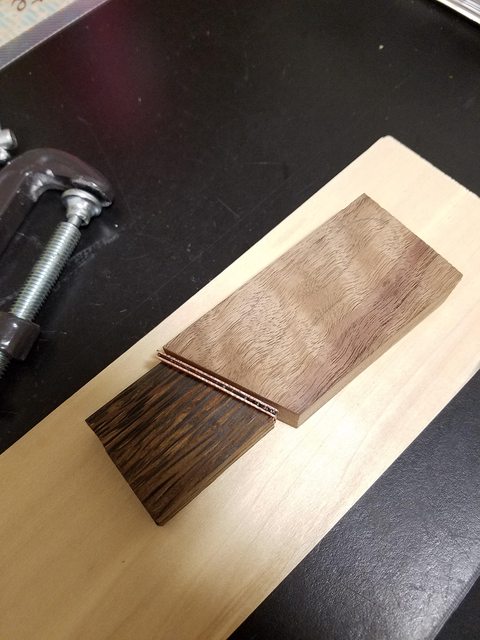
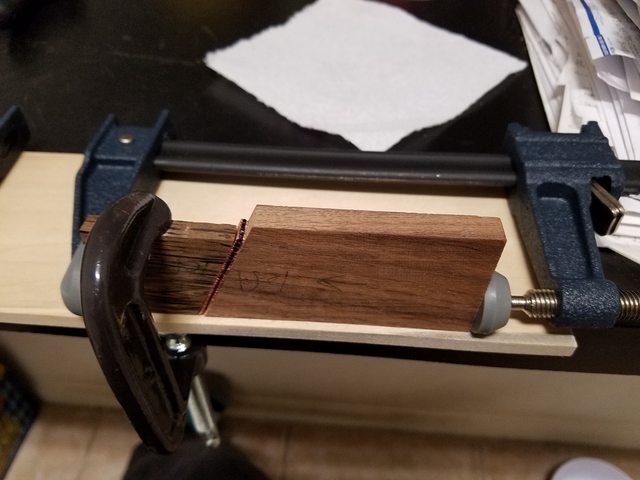
The copper and G10 seemed to stick together okay so I planned the scale glue up. More sandpaper roughing then figured a way to clamp everything with the stuff I have on hand. I wrapped wax paper around a 1/4" poplar board I was saving for making sayas then clamped the black palm with angle such that it would hold the other pieces down (because I don't have enough clamps tall enough to clamp the other pieces). The angle would otherwise make the pieces slide with the pressure from the clamps on the side. If I had thought about it enough, I would've made the wood the same height so I could've just clamped everything between a couple of boards top and bottom instead of this convoluted setup.

I do everything at my little breakfast bar table or front porch, so I had my coffee and Sunday brunch around this stuff today. :)

n5xml8gl.jpg


L1VmEgfl.jpg


fnv9uubl.jpg
 
Last edited:
I also got most of the initial grind done on my Grizzly 1x30 belt sander. 50 grit zirconia belt, took two or three hours to grind down this 0.125" stock to semi-suitable kitchen knife thickness. Done by eye freehand against a small 1" wide platen, managed to get distal taper. 0.09" at the spine above the heel, 0.7" at the spine halfway, 0.3" at the spine right at the start of the k-tip. Blade edge ranges from 0.04" to 0.02", hopefully I won't get too much warping after heat treat quenching?

5fkppLBl.jpg


I recently saw a video of people grinding without respirators or eye protection. I know there must be old timers who never wore this stuff and are "perfectly healthy". My first knife I wore a simple dust mask until reading that was pretty much useless then bought a half face 3M 7000 series respirator. I wet ground this knife, and you can see the inside of my grinder is full of caked in steel dust, a.k.a. lung cancer. It's crazy how much volume it takes up, I can't imagine what my lungs would look like...

Au24Sqll.jpg


53Eq6D0l.jpg


I'll probably just gently run the blade on 80 grit then 120 grit belts today to lessen the 50 grit scratches. Was hoping to build my two brick forge for heat treating but too many other things to do today. Wish I could work two days, fish and make knives five days a week...
 
Last edited:
Looks like you've got a good knife going there - I do like the blade shape. I started with a 1X30 sander myself. They really do work good for sharpening knives.

Ken H>
 
Well, I've been slowly working on this knife a bit at a time... saved a bunch of pictures! Here's what happened next:

Here's what the "choil shot", or looking at the heel of the blade from the end on, looked like after the initial pre-HT grinding. Just doing everything freehand and looking at it by eye trying to check my work as it went along... pretty low tech.

MlPS8u1l.jpg


Even though this was only my second knife, I decided I might as well get fancy and learn from trying and making mistakes. So I decided to make my own mosaic pins. I found 3/16" tubes and rectangular tubes that fit in the inner diameter of the 3/16" tubes. Then I had some other rods, I think this was 1/16" brass and then some copper colored beading wire I found at Michaels crafts. I did a dry fit up to see what I could do with the things I had on hand and liked the design. Before gluing, I cleaned everything with acetone and then 91% isopropyl alcohol (rubbing alcohol). I used some epoxy dyed black and took a syringe and squirted it inside the tubes and smooshed everything in there best I could. The beading wire was soft, so I had to take pliers, grab it about a quarter inch or so just outside the tube and shove it in a little at a time, otherwise it would just bend and not go in. I knew there were going to be bubbles in the epoxy, but I figured I'd fix it somehow later, maybe more dyed epoxy if a void showed up or perhaps some CA glue. Made a nice big mess with black epoxy everywhere! I let it cure a while before messing with it, basically because I didn't have much spare time to work on this anyhow...

Yf6LKwjl.jpg


atgxLeEl.jpg


sBHgD81l.jpg


Also, since the scales I glued up weren't flat and evened out, I ground them on the disc sander. The copper spacers heated up and I had an epoxy failure on one scale. In the pic you can see that I had to re-glue the scale on the left. I was debating just using these scales directly to the tang, but I figured I'd learn more if I did more, so I glued up a black G10 and copper spacer to go between the scales and the tang, that's the rectangle in the middle of the pic below, and to the far right is the scale that didn't fall apart being glue to the spacers. You can see the copper spacer is all scuffed up, I used some low grit sandpaper hoping to give the epoxy more surface area to work with. Above there are a couple new knives up next, same blade profile but one full tang and one in hidden tang.

TP8YAgZl.jpg
 
Last edited:
Since I had a miserable experience heat treating my first knife with just one plumber's propane torch in open air, I decided no more knives until I made a little two brick forge. I ordered some insulating firebricks and searched all over for designs. I settled on carving out a half round cylinder in two bricks that I'd plop on top of each other. Then I just carved out a little hole in one of them where it met the other brick and tried to angle it so the flame would sorta go in away from the front, bounce of the top, and then swirl around all swirly-like.

Just a little planning with ruler, sharpie, and hacksaw... I used the hacksaw to cut down the length of the brick, a screwdriver as a makeshift chisel to knock out parts, then a big soup spoon to carve out the final shape of the cylinder... ta-da!

6tIlYMtl.jpg


TfGwi4Ol.jpg


The real test was did it get hot? Heck yeah, woohooooooo! :D

xV2eVfHl.jpg


The satisfied afterglow...

ttpwUcCl.jpg


Anyhow, I took a trusty vise grip, welding gloves, and my knife to heat up in the forge. I forgot to take pics, but I poured the gallon of canola oil I used the first time into a 6 quart pot and heated it on the stovetop. Stirred it and checked with a thermometer until it was around 150-160F, figuring it was a bit chilly outside and it would cool off by the time I got the blade heated up. Kept it moving around, focusing mostly on just the blade (not worried about heating the entire tang) trying to heat it evenly. Heated it until non-magnetic, then a little smidgen more and dunked it edge down into the canola oil with a little straight up and down gentle agitation. Nice dark blade after that. You can see the lighter colored part near the tang that didn't get dunked right away because the angle I was holding the tang didn't let me dunk the whole blade at once. Checked that it skated a file, saw that the thing looked fairly straight, then went into the oven for tempering at 375F for an hour or two, cooled to room temp then repeated the same temper.

VkOrSUcl.jpg


gMEyEG9l.jpg
 
Since I didn't want to waste the scales I went through so much trouble to make, I decided to sharpen up the knife and test it out. I hit up my 1x30 belt sander and got it close as I was comfortable without making the blade shorter. This 1x30 has a teeny platen that sticks up halfway and then a slack area above it. I don't have the belt running super close to the platen so it can grind down the edge of the blade when I'm grinding edge up to see what I'm doing. So a lot of the work was done on diamond plate and waterstone.

Forgot to take pics, but the progression was DMT XC (about 220ish grit?), King 400 waterstone, then King 1000/6000 waterstone. I didn't get the bevel ground the way I would have preferred on the belt sander (I'm learning), and therefore ended up with a fairly large polished edge bevel after sharpening. But at least the durn thing cuts.

88VoZarl.jpg


kjs4oODl.jpg


Not sure it shows up, but I took this pic to try to show that I attempted to grind a distal taper to the blade as I prefer the tip to be thinner for the kitchen work it's going to do. I started with 0.125" stock and the spine at the heel is about 0.090", spine at about halfway around 0.065", then around 0.030" at the start of the k-tip.

lwXiGgCl.jpg


I always liked the blue and purple colors in the patina I get from cutting sweet onion... so I diced up an onion and let the blade sit and stew in the juices for 10 or 15 minutes.

PG8pQ5ul.jpg


Since I wanted to test the knife, I did my Thanksgiving dinner prep with the blade. All types of veggies and finished off with steak. Worked fairly decent, though I'll try to adjust the geometry a bit more for the next one. I'm not getting the tip ground as thin and even as I want on the 1x30, just gotta practice more!

7JU7eUol.jpg


HdZz2m5l.jpg


ptYKPjil.jpg


My dog approves! :D

ZcjATkAl.jpg


EhNBAFZl.jpg
 
As I was using the knife, I thought the handle design had too long a pointy thing at the end. Initially thought it would have some swag, but it's more like something a drunk Klingon would like (what that says about me, I dunno). So I colored it out with a sharpie then rubbed it out on the grinder.

Before:
XJS5MJtl.jpg


After:
SoAHiSql.jpg


Got my scales all squared up on the disc grinder. The edges of the spacers look wavy from cutting, but I was hoping they'd be less wavy in the middle where they'd be ground down to. Too late to worry about that now...

gO8bFRPl.jpg


Drill baby, drill! And a little round filing so everything goes in smoothly... Also, while I love the look of black palm, the tear out of the tough black parts is a real b*tch... Supposedly stabilizing helps prevent bad tear out, but I'm too lazy to send what I got in to K&G or WSSI. Maybe if I ever start giving these things away.

KpAEDcml.jpg


W1EZQfjl.jpg


A little double sided tape and put the pins in to work on the front side of the scales and get it rough ground closer to the tang profile. It's a pain not to have a bandsaw.

UiU68GQl.jpg


Taking advice from the very knowledgeable and very awesome knifemakers on the forum (THANK YOU for sharing your knowledge so freely!!!), I tried to go slow, used new belts, as well as wet the handle to keep the copper spacers from heating up too much. To be honest, I still suffered some delaminations, so in one case I had to go back, clean things up, and epoxy them back together. In another case where the G10 was peeling a bit away from the copper, I just wicked some thin CA glue in which worked awesome. Pics below are close, but not yet ground down to the shape of the tang.

PK99ehSl.jpg


lE0LDKXl.jpg


I was flush with success! So I got carried away and started grinding on the belt sander to get the shape of the handle I wanted: forwardish palm swell for a pinch grip, taper from the top down to the bottom of the handle, thin and tapered at the thin part of the handle with the butt swell at the end.

h8CdInQl.jpg


1mEyZDFl.jpg


DqWZjcll.jpg


I cleaned everything up with rubbing alcohol, roughed up all the parts with low grit sandpaper, and set about epoxying everything together. One problem: Now the scales were all nicely rounded and curvy (just like I enjoy my wimmens), how could I clamp them down (another problem I have with wimmens)? I quickly found out this was a problem when I tried to put some clamps on and they were all sliding around on the scales. In the meantime, epoxy was dripping everywhere on everything. So I just wrapped up the handle with wax paper and put some C-clamps on gently, tight enough to keep things from sloshing around, but not so tight as to squeeze a bunch of epoxy out. I waited a bit for the epoxy to set up some so I could clean a bit off the exterior. I think I waited an hour then went at it with a paper towel soaked in rubbing alcohol as well as toothpicks to scrape epoxy off the metal...

NAj3UjRl.jpg


H8OCCNnl.jpg


After a day or so, I went back to file down the pins with a metal file. I was a bit worried about heat buildup causing epoxy failure considering how many times I already had to deal with that this build. Got pretty close as you can see in the pic below. I hit the wood a few times, that's them scratches you can see. Also you can see the wood and tang were slathered in dried epoxy, that was a pain to clean up.

9QVkaVll.jpg


I did a little more on the belt sander with fresh 50 grit just to get the pins closer to the wood. Then more hand filing. Got it real close then started with the hand sanding, I think it was 80 grit until I was happy with the shape, then 120, 220, and 400 grit. At this point, I started with the tung oil finish. Learned from you forum makers about wet sanding and started wet sanding backing down one step to 220 grit to fill in the very open walnut pores. The walnut really starts to look awesome with the oil on it as opposed to dull when dry.

YgADD7Bl.jpg


oD3dOFll.jpg
 
That handle is looking fantastic, the spacer and the mosaic pin look great against the wood combo
 
Very nice looking knife.
You have been thinking things through and taking your time.

If I may suggest,
I use G-Flex Epoxy, Its for gluing boats & planes together and holds up to the constant moisture that Kitchen knife handles are exposed to the best I've found.

Keep up the great work!
 
Wow! That's one of the best first knives I've ever seen! I hope my first knife can look half as good as yours! Keep up the good work![emoji1303]

Daniel.


Sent from my iPhone using Tapatalk
 
Don't be so hard on yourself. I bet a sober Klingon would use that knife. Looks real good for a second knife.

I'm with Rhino, ditch the devcon \ box store epoxy for something of better quality. Use the devcon for your mosaic pins and stuff like that.

G-Flex, Acra Glass, West Systems, Blade Bond, etc. All great epoxies and if you buy the larger bottles and do the math your coming out way ahead price-wise over the cheap stuff. Kevin Cashen went on a rant about it at one of the seminars I attended and I think a he said a big bottle of acra glass comes out to like .50 per knife.

-Clint
 
Thanks for all the tips, when I'm out of the BSI epoxy, I'm going to pick up something much better.

So I did about 8 days of tung oil finish applications letting each one dry about 24 hours inbetween. Then it was a coat of paste wax.

I also made a burnt or scorched finish pine saya for the knife with a retention pin including a little mosaic pin cutoff in it. I took a quarter inch thick piece of craft pine and burnt the outside with a propane torch. It warped but I ironed it mostly flat with a clothes iron with final flattening on the disc sander. I like the rough look of just finishing the saya with mineral oil and beeswax but it might require more maintenance than the tung oil and wax on the one handle.

nYFnxw2l.jpg


jIqyFbKl.jpg


pj3maw7l.jpg


I made a lot of mistakes but learned a lot and even more importantly had so much fun! Very satisfying to make a knife... I think I'm hooked.

gFIhkpPl.jpg


uWo2W4ol.jpg


ls7E3JSl.jpg


mmOzDVUl.jpg


n3za5uPl.jpg


v7jbbmYl.jpg


DUKj2W4l.jpg


HbKnrFjl.jpg
 
Wow! That saya is gorgeous. Very unique shape. And the knife looks great too:cool:
 
Back
Top