- Joined
- Jan 10, 2007
- Messages
- 1,924
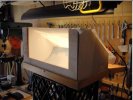
For several months I have been displeased with only being able to take "good" photos when the conditions were perfect. So I decided to make a lightbox to allow me to take decent pictures regardless of the weather or time of day. After having seen what Jim Cooper came up with for indoor photography on the cheap I settled on making his " 'No Frills' $75.00 home studio tent/lightbox".
By the way, all of the photos in this thread except for the last one were taken on my phone.

The first thing that I did was make the box part out of 3 sheets of foam board (aka poster board). I didn't have any measurements so I just laid it out using my phone as a length of measure so that both sides would be the same and I used the foam board as a straight edge.

Then I cut it out using a knife (one of my pocket cutlasses in this case).

Here you can see how I cut the sides. Notice that it folds. To do that just cut through the top layer of paper and foam leaving the bottom layer of paper intact. Remember to make that cut on the opposite side of the board for the other side so that they fold in towards each other.

In this shot you can see the line where I am about to trim the part that folds in making about half as wide.

Here is the front piece after I cut it. The slits will go on either side of the flaps that were cut to fold. You will be able to see that in the next picture.


 So I am not really doing this set up justice.