Novice leatherworker just focusing on "functional"

EngrSorenson

Noticed by Senpai
Platinum Member
Joined
Jul 3, 2019
Messages
14,779
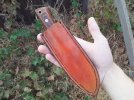
Hey everyone- just figured I'd share a sheath I made last night for an ESEE 3 I own.
It's pretty plain and simple but I'm pretty pleased with how I improved my process compared to some of my others.
I'm not looking for fancy, just functional- I don't use any glue, no leather treatment or even a stitching pony, just a pricking iron, needles and thread.
You can see it here in the middle of wet forming.
I'm happy to receive constructive criticism and advice, but keep in mind- I'm just looking for a way to make a thing to hold a thing.

cVK5SzH.jpg

u28hktg.jpg

IucF9Jl.jpg
 
Heh, "pricking iron," heh. Form follows function, my friend, looks good enough to me!
haha, thanks man, I'm sure there's things that I'm neglecting that would be better for the leather, or maybe the welt is too thick, but I can at least confirm it holds the thing I intended it to. 🤣
 
haha, thanks man, I'm sure there's things that I'm neglecting that would be better for the leather, or maybe the welt is too thick, but I can at least confirm it holds the thing I intended it to. 🤣
More seriously, it looks like a solid pouch sheath made by a competent amateur. It's not gorgeous, but I've absolutely had knives that came with worse (in the case of my Sharpfinger in particular, one that didn't goddamn well fit the knife).
 
More seriously, it looks like a solid pouch sheath made by a competent amateur. It's not gorgeous, but I've absolutely had knives that came with worse (in the case of my Sharpfinger in particular, one that didn't goddamn well fit the knife).
Thank you very much- I really appreciate your kind words. I prefer leather sheaths to the plastic ones that ESEEs come with, or even worse, the plastic one my Mora Classic #2 came with.
I actually now have a bunch of Dexter Russell knives that now also could use a sheath, so I'm about to get more practice in.
I can't believe the sharpfinger came with a sheath that didn't fit. you'd think that'd be top of the list of things to do.
Thankfully, I had a custom sheath ordered before the knife even arrived, so it was just an annoyance, but definitely pretty crappy.
 
Your design and execution looks great, particularly considering the tools you have!
My only recommendation would be to look into some higher quality leather that does not have that shag carpet look on the flesh side. You will be amazed how much easier good leather can be to work with. That said, nice work my friend.
Randy
 
pretty satisfying, making your own sheath, eh?
 
Your design and execution looks great, particularly considering the tools you have!
My only recommendation would be to look into some higher quality leather that does not have that shag carpet look on the flesh side. You will be amazed how much easier good leather can be to work with. That said, nice work my friend.
Randy
Ah, see- that's great advice because I don't know what to expect when it comes to buying leather- this was on a discount stack over at Tandy back before I even really knew what I was doing.
A double shoulder (or whatever they call it) for about 50 bucks gave me a lot of practice material. I think I've made around 10-13 sheaths/masks with it and still have plenty left over.
I saw some obvious imperfections - a few cuts into the hide that I figured was the reason for the discount, but perhaps that raggedy shaggy stuff was also a rationale.

I also appreciate your opinion on the design and execution- it's very uplifting. I spent 2 and a half hours cutting leather and stitching, but I think I spent 4 hours figuring out the measurements I'd need to account for the blade-to-handle transition, the thickness of the material, and the extra "slack" I'd need to account for material stiffness. Making the pattern was the tough part (as it always seems to be...).
pretty satisfying, making your own sheath, eh?
couldn't agree more- it's nice to just make what I want.
I also like knowing that I can repair it or make a new one.
One day I hope to make both the knife and the sheath!
 
I was on the verge of giving it whirl at one point. Put together an order that included a few pieces of leather and the stuff I figured I needed to get started. The next day, I received a notification that one item was out of stock. I had the options of receiving the rest on schedule & them sending the last item when it was available, modifying my order (skipping that piece or picking something else), or cancelling. I chose the latter - partially because I'd taken a good bit of time planning and choosing, and I didn't feel like revisiting to come up with a substitute (kinda funny that I was so set on my choices when I basically had no idea what I was ordering, lol).
The stuff may still be in cart.

Nothing to be ashamed of, or make excuses for, with that sheath. I prefer simple and functional. It is, as you said, a thing to hold a thing.
 
That looks good, I normally end up with at least one hole that's a bit off or I mess up somewhere with the stitch groover.

I had to make far more sheaths than that before I started getting results this good, and I still don't get results like this every time.

You certainly did a better job than I did with my last sheath here.

20220911_180453.jpg
 
I was on the verge of giving it whirl at one point. Put together an order that included a few pieces of leather and the stuff I figured I needed to get started. The next day, I received a notification that one item was out of stock. I had the options of receiving the rest on schedule & them sending the last item when it was available, modifying my order (skipping that piece or picking something else), or cancelling. I chose the latter - partially because I'd taken a good bit of time planning and choosing, and I didn't feel like revisiting to come up with a substitute (kinda funny that I was so set on my choices when I basically had no idea what I was ordering, lol).
The stuff may still be in cart.

Nothing to be ashamed of, or make excuses for, with that sheath. I prefer simple and functional. It is, as you said, a thing to hold a thing.
I know what you mean- sometimes little things prevent me from taking the plunge into bigger projects. If you ever get around to the idea of it again, it’s a lot of fun to make simple things like this. And I end up with lots of extra leather scraps which are surprisingly useful. And thank you for your kind words!
That looks good, I normally end up with at least one hole that's a bit off or I mess up somewhere with the stitch groover.

I had to make far more sheaths than that before I started getting results this good, and I still don't get results like this every time.

You certainly did a better job than I did with my last sheath here.

View attachment 1936278
It’s funny you say that, my 4 year old is with me, not sleeping, looking over my shoulder and remarked that your sheath looks very cool and that I should try to make one like that sometime. It’s obvious that you put more effort into a finished product and it pays off. Good work.

And I know what you mean. I don’t know how any of these pros get such consistent results, but I imagine it takes a lot more work than I’m willing to put into it. They earn those “big bucks”. (I can’t believe a custom sheath doesn’t cost a thousand bucks 😂)
 
That is certainly a decent job and looks like a totally functional sheath.

If you are so inclined to smooth the edges you may not need anything special. Lots of guys use belt sanders of one sort or another. I recently read of a guy who uses a broken piece of glass from a bottle or jar. I tried that and it works but takes longer than a power sander. Sandpaper on a sanding block does the job too.
Also, if you care about the flesh side roughness, you can smooth it with sandpaper too.

You may not have used glue to date but contact cement, either traditional or water-based, is easy to find and cheap. If you don't use enough to warrant a bottle you can buy it in little tubes. It really helps to glue your pieces together for punching the holes and stitching, it simplifying the job greatly.

Finishing the edges is not only for appearances, it helps prevent moisture from getting into the leather and if your sheath is a "user" that may be an issue for you. Again, you don't need to use anything fancy for sealing the edges. Most ppl have a candle around and candle wax works just fine as a sealant for edges and for the finished side of the leather if you chose. You can melt it into the leather with friction, which takes longer, or heat it up (I use a little metal lid and a heat gun) and rub it on wherever you need it. A hair dryer, heat gun or baking in a low oven will facilitate the wax soaking into the leather and waterproofing it, thereby extending its life.

Olive oil rubbed into the leather also helps to protect it. It only takes a minute to do and will help keep the leather from drying out. Not all the little things you can do are for appearances.

Anyway, good job.
 
Last edited:
I love it and would not hesitate to use it myself !

And the fact that you made it means perfect fit and carry position for you and that you can fix it, which is invaluable.
 
That is certainly a decent job and looks like a totally functional sheath.

If you are so inclined to smooth the edges you may not need anything special. Lots of guys use belt sanders of one sort or another. I recently read of a guy who uses a broken piece of glass from a bottle or jar. I tried that and it works but takes longer than a power sander. Sandpaper on a sanding block does the job too.
Also, if you care about the flesh side roughness, you can smooth it with sandpaper too.

You may not have used glue to date but contact cement, either traditional or water-based, is easy to find and cheap. If you don't use enough to warrant a bottle you can buy it in little tubes. It really helps to glue your pieces together for punching the holes and stitching, it simplifying the job greatly.

Finishing the edges is not only for appearances, it helps prevent moisture from getting into the leather and if your sheath is a "user" that may be an issue for you. Again, you don't need to use anything fancy for sealing the edges. Most ppl have a candle around and candle wax works just fine as a sealant for edges and for the finished side of the leather if you chose. You can melt it into the leather with friction, which takes longer, or heat it up (I use a little metal lid and a heat gun) and rub it on wherever you need it. A hair dryer, heat gun or baking in a low oven will facilitate the wax soaking into the leather and waterproofing it, thereby extending its life.

Olive oil rubbed into the leather also helps to protect it. It only takes a minute to do and will help keep the leather from drying out. Not all the little things you can do are for appearances.

Anyway, good job.
Yeah, the contact cement would definitely make things a little easier- I'll look into it. Also I've used a beeswax/mineral oil product used in food safe wood finishing as a sealer before, and I've heard mineral oil "burns" leather so I've held off doing that. I might go for raw bees wax. Thanks for the advice.

I love it and would not hesitate to use it myself !

And the fact that you made it means perfect fit and carry position for you and that you can fix it, which is invaluable.
Ah, thanks man- I appreciate the compliment. There's no confidence builder quite as good as, "I'd use that myself!".
Looks good! Much, much better than my first attempt
Haha, well thank you- but I bet my first attempt doesn't look as good as your first attempt!
 
Yeah, the contact cement would definitely make things a little easier- I'll look into it.
I just used wood glue on my last sheath, wood glue and a couple small clamps.

I've got a can of barge contact cement but it was in the garage this summer where it got too hot and the stuff is kind of hardened up.
 
I just used wood glue on my last sheath, wood glue and a couple small clamps.

I've got a can of barge contact cement but it was in the garage this summer where it got too hot and the stuff is kind of hardened up.
If ya want to rehabilitate your Barge they do make a special thinner for it.

OP nice job on the first sheath! You remarked about the consistency that others get and Randy gave ya the biggest hint or reason for it and thats the leather. When ya can, say if you are buying leather in person check the backside. Ya want to avoid the shag carpet look. A little here and there is normal but ya don't want a lot of shag and ya don't want long shag. This usually indicates a loose grain area in the leather and so the leather in that area will not be as consistent. It will have firm areas and spongy areas and makes it very difficult to do good work with. The shag will also indicate that you are getting down into the belly area on the cow and most of the time ya want to avoid that area of the cow. Stretchy, loose grain, spongy lots of bad stuff not so much good stuff. Unfortunately most double shoulders are imported leather and quality will vary widely. Most pro's would recommend one of two different American leathers. Either Herman Oak or my favorite Wicket and Craig. Both have been in business a long time and do this veg tan leather thing very, very well. But they are expensive I know. Maker's Leather Supply will sell either of those to ya by the square foot. So ya could try these leathers to compare with what ya have without investing in a whole side. Couple square feet would give ya plenty for a couple three sheaths.

I too would recommend the glue to make your life easier. It accomplishes two things in leather work. 1) it holds things together while you sew and this sure makes life easier. 2) And probably more important, it helps bond multiple layers into one. So take your sheath edge for instance. We want those layers for years and the lifetime of that sheath to stay together as one. Sewing by itself won't do it and eventually those layers will try to separate. The separation of the layers will make any finished edge look lousy but it will then also put more strain and wear and tear on the stitching. Ya don't have to use a specialized glue and in fact I haven't used "leather" glue for 15 years maybe. I use a contact cement I get at Home Depot. I buy it by the gallon but it does come in small quart cans too and I believe pints as well. It's called Weldwood and its made by DAP. They have two formulations and I use the green can not the red. It binds leather very strongly, works on all but the most oily chap leathers has great glue lines for edge finishing. Most importantly it remains flexible after it dries. This is important when sewing. If a glue dries firm like many wood glues, you are breaking the bond every time you drive that needle through. I think that this is why Barge has been "the" leather glue for generations, because it dries flexible. The green can formulation is also thinned with water if need be and doesn't harm your braincells, particularly important to me to save as many of those as I have left.

Again a great job on a first sheath. Looking forward to seeing the second. Backside of your leather should be more tight like this:

m0AAyl7.jpg


4NjVCr2.jpg


It's an easy indicator of quality.
 
Thanks for the info on the barge cement thinner, I may look into it because the can of barge wasn't cheap.
 
Back
Top