Official 2011 MINI KITH photo thread

Joined
Oct 27, 2010
Messages
8,721
Well folks, here is the official mini KITH photo thread! Post pictures of your completed mini knife here. Be sure to include all the specs of your knife.

Since this thread didn't get utilized until late into and after the deadline for the KITH please post pics of your received knife as well.


Here is the list of makers who completed a mini:

Fast14riot - Xander Holman
Bladsmith - Stacy E. Apelt
Daniel Fairly Knives - Daniel Fairly
Zaph1 - Charles Steffes-Clayton
Mike Davis - Mike Davis
RyanW - Ryan Weeks

Thank you all for your participation! Without you, this wouldn't have happened!

Cheers-
-xander
 
Last edited:
Hehe, found the photo thread.

Here's my entry for the KITH. This is my first properly etched damascus blade. Having seen how this one etched, I now know what to aim for when etching in the future. I may have to re-etch my damascus putter now that I know how it should look. I know I shouldn't use Joe in the picture, but it's such a perfect fit in his hand!

Forged Damascus hunter w/ Koa handle and filework on the spine
1080/15n20 "Bullseye" pattern low-layer damascus from Deker
2" OAL
1 3/8" blade length
Titanium guards
Koa handle w/ CA finish

mini1.jpg

And the filework on the spine turned out great, IMHO.
mini2.jpg


*GI Joe is copyright Hasbro Entertainment, Inc.
 
Here is my mini-tanto.

Specs: 1:4 scale Tanto, OAL 5.5"
Blade -
3.5", Forged W2
Shinogi-tsukuri
Ko-kissaki
Mitsu-mune
Koshirae -
Habaki - copper
Tsuba - San-mai sterling and copper, with yellow gold "taiyo".
kozuka and kogai hitsu-ana
Koiguchi - sterling
Mekugi - brass
Tsuka/saya - Buckeye burl and ebony
Illustrated and labeled diagram ,and Maintenance kit sent with tanto
 

Attachments

  • mini tanto KITH 004.jpg
    mini tanto KITH 004.jpg
    35.2 KB · Views: 40
  • mini tanto KITH 014.jpg
    mini tanto KITH 014.jpg
    58.8 KB · Views: 80
It is a 1:4 scale chopper. The original is about a foot long, .250" thick, and has 1/4" tubes. This one is about 3" long, 1/16" thick and has 1/16" tubes.

It is made of differentially hardened O1 Steel; the spine and handle are slightly softer. The pins are aluminum and the sheath is concealex that I ground down thin so it is close to scale.

I made the scale material, burlap mycarta. I tried to make the mycarta glow in the dark and it has a very faint glow.

078j.jpg


064ra.jpg


066mr.jpg


061si.jpg
 
Looks like you guys are having too much fun.

I like Joe in the picture. :)

That mini-tanto is a thing of beauty.

...and those choppers grow on me more and more every day.

Nice work all.
 
Wow....I just found this thread lol...I got one i will post here.
Blade: Tight twist cable damascus
Guard/Pommel: 1080/15n20 damascus
Handle/Scabbard: Honey Locust Burl, Tung oil coated, CA sealed and sanded to 1000 then buffed.

2011-07-02_00-54-51_564-1.jpg


Glad this went to a good home, Enjoy it Charles!
 
I posted in the KITH thread already, but i wanted to post this here also! I am stoked to get this!
2011-07-11_17-57-37_200.jpg

2011-07-11_17-59-43_586.jpg


He also sent me some Lapis to play with! Thanks a ton Daniel, this is awesome!
 
I posted some pics in the sticky but I will post here as well.
I am super excited to get this knife! This event was so much fun!

2011-07-11180635.jpg


And this is where it will live. Atop the humidor on my bar displayed proudly for all to see.

2011-07-11192927.jpg


Thanks again Ryan!

-Xander
 
YES! I just got my mini and it is so freaking cool it isn't even funny. NICE JOB XANDER! :D

This is Xanders first knife and I am very honored to have it. The work in it is incredible! Thank you very much!

The sealed personalized certificate and gold box were excellent touches, very nice!
010koy.jpg


Look at the handle gleaming in the sunlight! It looks even better in person.
001eea.jpg


021ts.jpg


014je.jpg


Great fit and finish everywhere.
020qh.jpg


The detail is amazing... incredible job.
018cng.jpg


Thank you very much Xander for the excellent knife and thanks again for getting this whole thing going, it wouldn't of happened without your work.

Thanks again to Stacy also for making sure everything went well, great job!
 
I have to say it again...

That was Xander's first knife!

Nice job man, I am more than happy.
 
Thanx Daniel for the compliments, I am humbled that you are so pleased with it. Yes, this was my first knife from scratch, completely done by me. I have modded many knives, built knives on blanks, made blades for other knives (tried to anyways) but never made a knife from scratch. Do enjoy it. I sure did. All dimensions were taken from my original 1944 manufactured Camillus made US M3 that my great uncle carried in the war. I tried to keep all tolerances to +/- .001".


-Xander

It looks exactly like the original!

http://www.usmilitaryknives.com/m3.htm Amazing! I have always wanted a M3 they are really cool!

Thanks again it really, really rocks!
 
It looks exactly like the original!

http://www.usmilitaryknives.com/m3.htm Amazing! I have always wanted a M3 they are really cool!

Thanks again it really, really rocks!


I was really hoping to capture the spirit of the original with that knife. Only two details not included are the two pins through the pommel, and the grooves cut into the handle. I thought about trying to mark the pin locations some how but didn't figure out a way in time. The grooves were not cut due to me being unsure of my ability to do it nicely without cutting to far into the handle and hitting the tang. Obviously I couldn't stamp the blade either. Working directly from an original sure helped.


-Xander

The one you made is cooler than the original! It is so tiny I can't even fathom making something like it, I am very impressed. Nice work!
 
A sign of a good mini, properly done to scale, is that without a reference for size, someone may assume it is full size.And with a reference to size, it seems amazingly small.
Attention to scale is far more important than embellishment. If the piece is hand engraved amazingly, with ivory and gold fittings, but the scale is off, or the ivory grain is too wide, the whole mini is pretty much worthless. However, a simple chopper or bowie ,with no embellishment, made to scale in every detail will look better and sell for $100-200.

For shooting photos that make this show best, there are two ways to go.
One is to use scale revealing props. The GI Joe is a good way to show the scale size. Other ways are to use something that will say to the brain, "Wow, that's small." Coins, printed material ( books and magazines),a Zippo lighter,a 45 calibre bullet,your palm or fingertips,a leaf or an acorn, etc. These things show how tiny the knife is.

The other way is to use something that the brain will assume to be bigger than it is. A mini anvil can be used to shoot a picture of the blade resting on the face during construction. Without any other things in the shot, it will not give away the size. Use tight weave cloth for background, like silk or nylon.Use very tight grain wood for the same reason.
After showing some of these shots, follow with a shot of a scale revealing nature. The effect seems to make the mini seem even smaller.

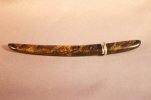
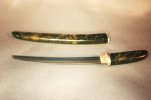
A few years back I posted shots of a katana and wakizashi blade I was working on. Shortly after that I posted some shots of a second blade set. Everyone assumed they were full size until I shot them sitting on the kissaki of the full size blade. I followed that with a bowie,with the stats stating it was 16 OAL with a 5 handle. and then a few days later I shot the bowie on a dime.The measurements were in mm ( 25:1 scale). For about a year after that, no one would believe any of my full size blades were real.

To keep scale realistic, all things must match. The thickness at the spine, and the handle thickness and length are the most common wrong places. They often work out to be a 5/8" thick blade or a 2" thick handle, by scale. Use your micrometer while working, and keep removing material until the scale is right. An easy way of doing this is to use scales that are somewhat easy for your brain to convert. 10:1 is easy, as all you do is move the decimal a place.16" = 1.6".
25:1 is easy as all you do is read in mm and think in inches. thus a 36" sword with a .380" thick blade is a 36mm mini with a .380mm blade.

Making a measurement chart for reference is always a good idea. Draw the mini with all parts in an exploded diagram. Put the full size measurements by each one, and the scale size under those numbers.Pay attention to thicknesses.

Things to look for:
Super tight grain wood for mini handles. Ebony and other nearly grainless woods are good choices.Linen Micarta is a good material,too.
Metals with no visible grain or markings.
Metals with markings that give a scale look - needle files for file knives, or super tight twist for scale damascus.
Things to avoid -
Wood, ivory, materials with visible large grain.
Standard size damascus patterns.
Porous materials and metals.
Materials that don't fit the scale, like canvas Micarta, leather and kydex showing normal size surface patterns,etc.
 
Awesome tips Stacy, I should have busted out the mini anvil for the photos.

This was really fun!
 
Back
Top