-
The BladeForums.com 2024 Traditional Knife is available! Price is $250 ea (shipped within CONUS).
Order here: https://www.bladeforums.com/help/2024-traditional/
You are using an out of date browser. It may not display this or other websites correctly.
You should upgrade or use an alternative browser.
You should upgrade or use an alternative browser.
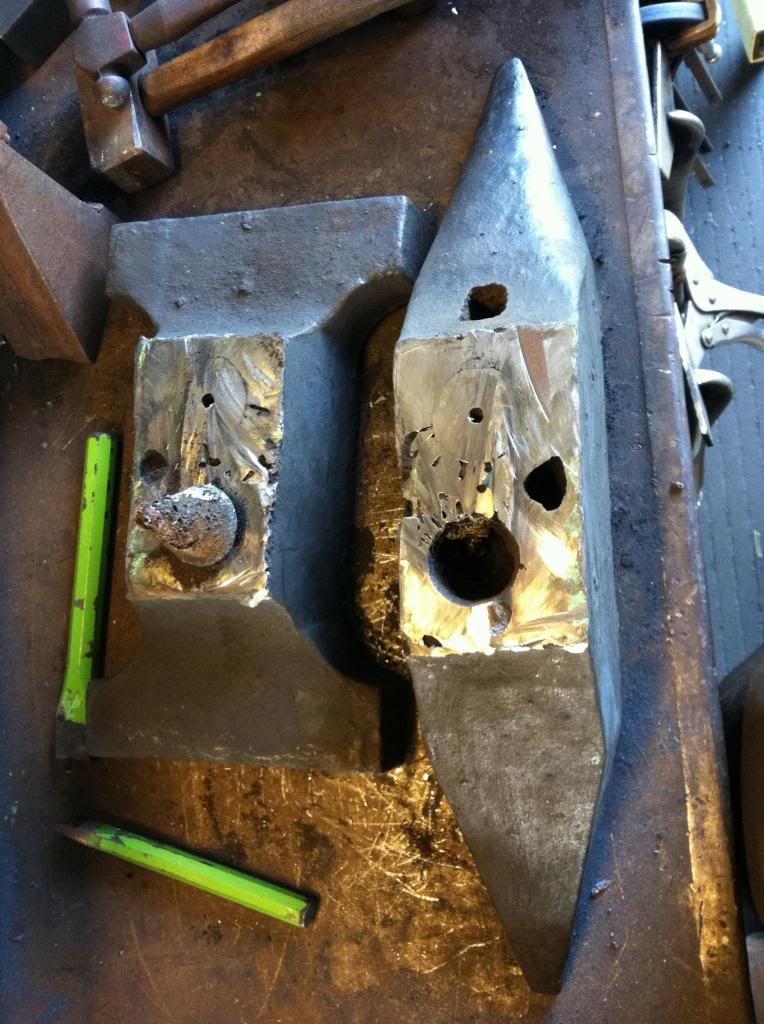
Peddinghaus anvil... Cut in half... Interesting to say the least...
- Thread starter SinePari
- Start date

- Joined
- Oct 20, 2008
- Messages
- 5,547
That actually is interesting. At first I was mad that the anvil had been cut in half. I'll bet it still worked fine. But then, the contents proved interesting. It seems like maybe Peddinghaus should not have let this one out the door, but who knows.
I just hope it gets welded back together.
I just hope it gets welded back together.
- Joined
- Oct 24, 2013
- Messages
- 906
Yeah, the void that you see there had the volume of almost two 16oz bottles of water, and the rebound was 40% max... I've restored a few anvils so far, but this one's issues were a different monster all together. I'd planned on drilling the cavities out and filling them in with weld but this cavity is huge! I'm back to the drawing board as far as ideas are concerned...
- Joined
- Jul 4, 2010
- Messages
- 873
Send the vid to Penddingauus for comment. Jess
- Joined
- Oct 24, 2013
- Messages
- 906
Send the vid to Penddingauus for comment. Jess
I wonder if they would honor the 40-50 year old return policy? If I were them I'd honor it just to get the pics and vid of the internets... Seems like an interesting way to construct an anvil to say the least, as if these cones were meant for tensioning after press-fitting the two pieces together? If you take a close look at the center of the circular pin i cut in half (not the cone) you can see a center hole... That little hole is threaded...the thread pitch is huge...
I had a machinist friend of mine take a look at it, and he'd never seen anything like it in his 40 some years of work...
- Joined
- Jan 13, 2010
- Messages
- 71
Sine- Would you be OK filling the void with bronze? Wild video. Cool results.
I wonder if they would honor the 40-50 year old return policy? If I were them I'd honor it just to get the pics and vid of the internets... Seems like an interesting way to construct an anvil to say the least, as if these cones were meant for tensioning after press-fitting the two pieces together? If you take a close look at the center of the circular pin i cut in half (not the cone) you can see a center hole... That little hole is threaded...the thread pitch is huge...
I had a machinist friend of mine take a look at it, and he'd never seen anything like it in his 40 some years of work...
There isn't any bad press that I could find on their anvils so the pictures and video wouldn't hurt them much if any. Not many industrial secrets being disclosed either. I'd ask them like Jess suggested. Great and interesting post by the way
")
- Joined
- Oct 24, 2013
- Messages
- 906
Thanks, glad it hasn't sent people into an epileptic puke-seizure... I need to get one of those tri-pod dealios...Awesome vid.
Sine- Would you be OK filling the void with bronze? Wild video. Cool results.
I honestly hadn't considered bronze specifically... I'd originally thought lead, but bronze sounds a bit healthier. The anvil itself is quite hard, a file skips across the top even when you try to dig. If I can keep the interpass temps lower by running weld beads it might be a better option..? True challenge; I just have to keep it from losing it's temper all the while filling in the huge void. A fools errand to say the least but I have a real passion for getting anvils back in service.
I've thought seriously about just going to town on it with the stick welder, not worrying about annealing it, and just rehardening it by my own means... I just cant for sure tell what kind of steel it is?
I get very small/faint short bursts of red with red-orange clusters, then I'll get longs streaming sparks of yellow/white with a lot of fanning clusters...I'm no metallurgist, but it's weird stuff to say the least, almost as if the the steel isn't the same consistency throughout...?
There isn't any bad press that I could find on their anvils so the pictures and video wouldn't hurt them much if any. Not many industrial secrets being disclosed either. I'd ask them like Jess suggested. Great and interesting post by the way
I've never seen anything negative either, and I consider myself spoiled rotten when it comes to forging on my #12. This one hit the all the ugly branches coming down and amazingly fell a good distance from the tree if you catch my drift...
- Joined
- Oct 24, 2013
- Messages
- 906
I contacted RIGID through their website option yesterday and received a phone call from them this morning. I spoke with the regional sales rep Larry, who directed me to their customer service representative Irwin, who promptly transferred me to a tool tech by the name of Mike. In spite of how awkward my question came across within 5 minutes I was talking to the right guy, which is pretty uncommon in my experience dealing with customer service.
Mike stated that the tensioning system that was utilized in the earlier Paul Ferdinand Peddinghaus anvils was obsolete technology regarding their modern manufacturing methods. My guess in their reasoning and utilization of the two-piece option was due to limited industrial capabilities. I pointed out in the video what I thought to be a faint arc weld in the #12 RIGID; this was a false observation. Apparently the RIGID Peddinghaus anvils are all one-piece drop-forged tool steel, which is actually quite impressive. "Simple is Betterer"; there is more consistency in the anvil and less that could go wrong with the one-piece option.
I don't see any of this as being trivial information. 1; because I'm an anvil nerd and 2; It lets those DIY types in on some pretty cool ideas. I've read numerous DIY anvil threads where a few individuals proposed the idea of a tensioning system being utilized... Smart cookies to say the least.
- Joined
- Jan 13, 2010
- Messages
- 71
Sine- in the Bronze consideration- you could get ahold of a few fellows over on the "Alloy Avenue" forum (home casters) there are a few guys in your neck of the woods who can do a fair amount of casting... one crucible full and pour it in- quick chill to the face- should harden it rapidly... don't know how you would temper the mass afterwards... but its a thought.
AncientSword
Gold Member
- Joined
- Apr 18, 2009
- Messages
- 398
I have enjoyed following this thread. Thanks for posting it and sharing what you learned.
Awesome to see the void from the casting. Surprising that the maker didn't offer to replace the faulty anvil.
Repairing the anvil.... I wouldn't try to fill the void with something other than welding rod. You want a good bond between the two types of metal, and just pouring brass or bronze into the cavity isn't going to give you that.
On the upside, I don't see a need to weld up the void. If you look at it like an older anvil with the welded-on top plate, what you've got is a fairly thick top plate on a good base.
I would just fill the void with some lead shot and a squirt of oil, then weld the two pieces back together. Invert the anvil so the face is in direct contact with the metal work table. Use a sheet of copper between the two so heat transfer is maximized. The heat from welding will be pulled from the anvil into the work bench, minimizing any chance of softening the anvil's face.
- Joined
- Feb 16, 2010
- Messages
- 3,668
Man, I missed out. I just got a new dry cut saw and was thinking of cutting an anvil in half with it. Cool video.
- Joined
- Oct 24, 2013
- Messages
- 906
Man, I missed out. I just got a new dry cut saw and was thinking of cutting an anvil in half with it. Cool video.
I kinda regret using the chop saw... I didn't wreck havoc on it, but it would catch on the inclusions... It's been acting weak and tired since...
- Joined
- Feb 26, 2014
- Messages
- 77
If your still trying to figure out how to fill it with molten medal and not make it loose it's hardness then keep it submerged except for the very top( middle I guess) in ice water. Basically pit the thing in upside down in ice water and pour the metal in the hole.
If your still trying to figure out how to fill it with molten medal and not make it loose it's hardness then keep it submerged except for the very top( middle I guess) in ice water. Basically pit the thing in upside down in ice water and pour the metal in the hole.
Pouring molten metal over a liquid that can boil, i.e. water, can be very dangerous. If you screw up and pour the metal in the water, there is a good chance the steam that is formed will blow some of the molten metal back on you and everything else in the shop!
Jim A.
ABS JS
- Joined
- Oct 24, 2013
- Messages
- 906
Please disregard any of the aforementioned content associating Peddinghaus with the anvil above. With a great bit of discussion and due diligence, along with some very thorough research from a friend in Germany, the manufacturing of Peddinghaus (Rigid and Paul Ferdinand Peddinghaus PFP) have never utilized the pressed cone method, even for R&D purposes. They've manufactured P'haus anvils the same way, consistently, throughout the age of modern industrialization, since the first original PFP anvil became available to smiths in the early part of the 20th century, even when they expanded manufacturing to the domestic US in Bradley, IL.
I will post an updated video to counter the earlier misrepresentation and misinformation disseminated in the previous video. I'm sure everyone can respect the notion of deleting the video in it's entirety. I'm not one to even entertain the idea of spreading fallacy and or even assumption. Thank you all for watching, commenting, and taking part in the discussion. The new video will not disappoint! :thumbup:
I will post an updated video to counter the earlier misrepresentation and misinformation disseminated in the previous video. I'm sure everyone can respect the notion of deleting the video in it's entirety. I'm not one to even entertain the idea of spreading fallacy and or even assumption. Thank you all for watching, commenting, and taking part in the discussion. The new video will not disappoint! :thumbup:
- Joined
- Nov 4, 2018
- Messages
- 1
You could fill voids with molten lead