Persian linerlock WIP.

A shout out to Pittknife here on the forum for helping me work the kinks I had in the detent process!

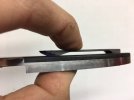
The problem I was having, and didn't know how to solve well, was how do I get the detent ball to work inside of a .010 gap.

Here is the forum post that explains the theory and gives the drill bit sizes. http://www.bladeforums.com/forums/showthread.php/1460316-Detent-ball-sizing-question!?p=16803848

One thing of note that is not mentioned in that post is the interplay between detent ball and hole size. Picture a circle and divide it into 4 parts. View that 1/4 of a circle as a distance over time graph (Hit that link! somebody made a nice CAD drawing!). What I found when playing around with numbers on an online circle calculator is that you get very little change in relation to how far the detent ball will sit in its hole at the extreme ends of the spectrum.

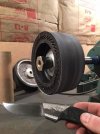
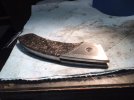
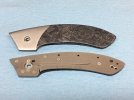
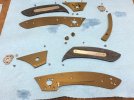
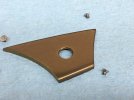
I needed to get more clearance between the lock bar and scales so I got the liner setup on the surface grinder and took off around .009 inch. I used a feeler guage for a shim and I also put some tape down to protect my finish and give me a bit of a buffer. The tape measured in at .0045 thick. As soon as I started scuffing the tape I stopped.

IMG_0331.JPG

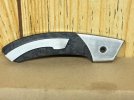
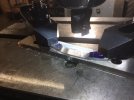
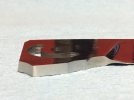
Next I used calipers and measured the clearance I wanted from the edge of the lock bar to the detent ball. Using the calipers I scribed two lines. The intersection of the lines was where I would drill my hole. I mounted the liner in my jig, and using an optivisor so I could see, I got it set into place and clamped it down. I center drilled the hole then hit it with a drill bit. After that was done I mounted the blade and used a carbide center drill and carbide drill bit to drill the detent hole in the blade.

IMG_0332.JPG IMG_0335.JPG
 
Last edited:
I stickied both Threads.

I like seeing how others "theory craft" their manufacturing process. I was never really good at free handing the "shoulder grind" (aka 7 degree grind) or drilling the detent. I boffed so many blades in 2 years...wasn't fun!

If I only had a mill, I would venture back into trying to make my own knives. I will keep this post as a future endeavor, just in case I am able to do that.

Your work is clean though, and I like it.

Paul
 
VangaurdForge and Pavlos, Thanks!

Pavlos, it has certainly been a process (pun intended) in figuring out how to go about this. This thread is really just me talking out loud as I make the folder. This process started about 2 years ago now. This is the 3rd try at making a folder. As you can imagine there has been massive amounts of progress made on each attempt but it has involved hundreds of hour over the 2 years I have been at it. I am certainly not claiming that any of these methods are "best practice" but like you said it is interesting seeing how others go about it.

As for needing a mill.... I am using this mill as a drill press 99% of the time. I think a surface grinder of some sort, variable speed grinder, and a good drill press will cover a lot of the heavy equipment needed. Having a mill with a digital readout allows for some repeat-ability but in the end I think with some ingenuity with sacrificial plates that double as one off jigs and making templates with drill guides you could do most of what I am doing. It would certainly work for using jigs with the lock face and jigs for doing the detent.

Thanks again,

Matt
 
Just finished up the detent ball and lock bar face. I am really pleased with the way the detent feels. It is defiantly the best I have done to date! To push the detent ball in the liner I use a machinist vice and automotive feeler gauges to set the depth. I like the feeler gauge sets because you get a full selection of shim thicknesses and the hole in the feeler gauges is perfect for going around the ball!

IMG_0336.JPG

I also carbidized the lock bar. I was using the same power supply for my titanium anodizing but after searching around a bit I am now using an etch-o-matic at about 2.25 on the dial. My 5 amp power supply was too much juice on the lock bar when doing a liner lock style knife.
 
Last edited:
A quick update. I am working on it! I am spending a lot of time figuring out how to get the correct finish on the blade.
 
I hadn't been posting much because I thought I wasn't getting anything done. I am getting close to completion so I was thumbing through my phone and I realized that I have quite a bit of posting to do over the next day or two.

The basic function of the knife is solid so it is time to start contouring and getting it all slimmed down and feeling good in the hand.
 

Attachments

  • IMG_0337.JPG
    IMG_0337.JPG
    50.1 KB · Views: 6
Last edited:
Now for the pocket clip. I hadn't really put much thought into the design of the clip. I knew I could do something simple but it just wasn't working. When I was looking at the knife I could tell that it would have been the weakest point in the build as far as design. I ended up going with a pocket clip that is the same shape as the knife. The pick here is still a bit on the fat side but it should give you an idea of where it is headed.

After the shape was decided on and the blind holes were drilled and tapped I went back to the mill and milled out the relief on the bottom of the clip. Then I used some double sided tape to mount it to a machinist vice. This gave me a controlled way to put an even radius leading into the milled out area. It also kept it square so I was able to exactly copy my plunge angles on both ends of the of the clip.
 

Attachments

  • IMG_0338.JPG
    IMG_0338.JPG
    45.6 KB · Views: 11
  • IMG_0350.JPG
    IMG_0350.JPG
    23.8 KB · Views: 11
  • IMG_0347.JPG
    IMG_0347.JPG
    43.8 KB · Views: 12
  • IMG_0349.JPG
    IMG_0349.JPG
    38.5 KB · Views: 10
Last edited:
Once the contouring is done I settled in on giving it a nice hand rubbed finish. In the end I decided to do a light tumble on the handles because of how the reflection of the light on the bolsters was coming off of it. Here is a pic in the 1200 grit range. I was using a piece of packing tape to guard the scale and bolster transition.
 

Attachments

  • IMG_0363.JPG
    IMG_0363.JPG
    46.9 KB · Views: 11
Finishing the blade turned out to be a complete pain. I put in an easy 50 hours messing around with it. I fixed the grind a bit but I am still not all that happy with it.

A lot of the finish problems I had were related to contamination on the belts. When you get to 1000 grit it is surprisingly easy to pick up coarse grinding dust on your belt and put scratches in it. Bruce pointed that out to me and now I know why his work areas are clean and his belts are in a cabinet. He also chucked up the blade and showed me how he went about it. After a couple of minutes he asked me what blade steel I was using. CPM S30V. He then commented that I would have quite a bit of effort to put in as it worked pretty slow under sandpaper.

After I had thought about it for a week I also came to the conclusion that I was also having problems using the surface grinder because of the high wear resistance of the steel and the fine belts I was wanting to use. The next blade it going to be CPM 154. At least things will happen faster as I experiment to get the finish I want.

If anybody has some advice to give on my problems state above I would really appreciate it.

Since the grind lines were not as sharp as I wanted I decided to get some ceramic media and a cheep tumbler to see what would happen. The overall finish of the blade was ok'ish at this point. All in all there are 10 surface areas on the blade that needed to get finished.
 

Attachments

  • IMG_0354.JPG
    IMG_0354.JPG
    25.5 KB · Views: 11
  • IMG_0448.JPG
    IMG_0448.JPG
    88 KB · Views: 11
Last edited:
Back
Top