- Joined
- Apr 25, 2007
- Messages
- 990
I saw this on the Zen Stove site...and said WTF i can make that.
so here is what i did,
material.
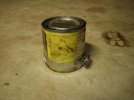
one 8 oz paint, varnish, or finish can empty and cleaned.
cotton balls or steel wool for filler in the can ( use as much to fill it to the top and pack it moderatly tight, not to tight.
section of sheet metal about the same height of the stove can.
adjustable metal hose clamp (large)
HEET or similar alcohol based item
Building
1.Clean the can thouroghly with paint thinner and fill with the "wick" of your choice. replace lid to stove.
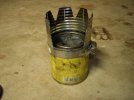
2. fit your sheet metal shield top to the can making sure to leave an opening on the side about 1-2 inches wide so you can light the stove. After getting the fitment and opening set make 4-6 v notches in the top of the shield.
3. fit your hose clamp to the top of the can around the steel shield and tighten down. ( its tough stuff, it can handle some torque so make sure its tight enough to hold your food and cookware)
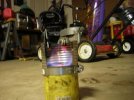
4. fill with the burning agent of your choice and light it.
5. enjoy your plumbers stove.
I have found my model to burn on one filling of 6 oz of heat for almost 52 minutes. It also brought 16 oz of water to boil in under 4 minutes. I like this design and i like to move the shield down when i am not using it. makes a great back up or even primary light weight cooker for hiking, camping or a BOB. It can be resealed like a paint can so keeping fuel in it is no problem.
remember to keep th lid for storage and flame snufffing.
so here is what i did,
material.
one 8 oz paint, varnish, or finish can empty and cleaned.
cotton balls or steel wool for filler in the can ( use as much to fill it to the top and pack it moderatly tight, not to tight.
section of sheet metal about the same height of the stove can.
adjustable metal hose clamp (large)
HEET or similar alcohol based item
Building
1.Clean the can thouroghly with paint thinner and fill with the "wick" of your choice. replace lid to stove.
2. fit your sheet metal shield top to the can making sure to leave an opening on the side about 1-2 inches wide so you can light the stove. After getting the fitment and opening set make 4-6 v notches in the top of the shield.
3. fit your hose clamp to the top of the can around the steel shield and tighten down. ( its tough stuff, it can handle some torque so make sure its tight enough to hold your food and cookware)
4. fill with the burning agent of your choice and light it.
5. enjoy your plumbers stove.
I have found my model to burn on one filling of 6 oz of heat for almost 52 minutes. It also brought 16 oz of water to boil in under 4 minutes. I like this design and i like to move the shield down when i am not using it. makes a great back up or even primary light weight cooker for hiking, camping or a BOB. It can be resealed like a paint can so keeping fuel in it is no problem.
remember to keep th lid for storage and flame snufffing.
 .
.