"Pocket" Knife, Critiques Please

Joined
Jul 28, 2006
Messages
3,953
Well, this is a prototype. I've been messing around with it. I call it a pocket knife because the sheath is a pouch with a pocket/belt clip. You can wear it in your jeans pocket or on your belt, since the pouch is rectangular it's ambidextrous. When I wore it on my belt, I would wear it "inside the belt" like some slide holsters.

Specs:
Aldo 1084, whomped into submission
6 7/8" overall
2 3/4" cutting edge
1/8" at the spine
600x finish
Edge quenched and 3x tempered

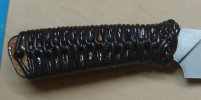
The handle is kinda something I'm experienting with, it's 2mm leather round cord over 7oz leather sides on the tang then coated with expoxy. I'm thinking reshaping the butt to make it a little more friendlier to wrapping.

As always your comments (good, bad, funny) are appreciated.

pocketknifeINhand.jpg


pocketknife.jpg
 
Looks useful. My only concern would be that if you sharpen the full length of the blade your index finger would be against the sharp edge at the rear. You might move the grind line a little bit farther up or radius that corner a bit.

The handle treatment looks neat.

SDS
 
I make a lot of EDCs like this... you'd really have to work to cut your finger but I know what you mean.
 
I don't really have much critiques for it, It looks like a nice knife. Great job!
 
My only critique... it's probably going to cost too much! :p

More seriously, I love "pocket" FBs, and that one looks like a great example.
 
Will, the size looks like it would be about perfect for EDC. It might be hard for YOU to cut yourself, but I swear I'm a klutz sometimes........okay, a lot of the time.

Didn't mean it as a criticizm. Sometimes it's just hard to tell from a picture.

If you get a chance, can you show a closeup of the handle? I'm interested in how you did that. Did you just pour the epoxy on or rub it in somehow??

Thanks,
SDS
 
My only critique is that I probably can't afford it.:D That is very nice work. Love the handles.
 
She's sweet looking. I agree with you about the butt end. The lines don't seem flow as well right there. I'm with SDS, and also would be worried for my index finger. The swell of the wrap at that end seems to move the finger out closer to the blade edge. I too would love to see a clearer closeup of the wrap. It looks quite intriguing!
 
Neat little edc or utility knife. I'm kinda partial to the more vertical grind line though.
 
After playing with knife more here's some changes I'm thinking.

Redo the butt to fit the wrapping style

Going to reduce the tang width/heighth?? at the finger choil to accomodate the turk's head knot and move the finger away from the cutting edge

I used a plastic butter knife to spread the epoxy then used a stiff brush to brush it in.... I'm going to thin it some more next time.

Here's a close up of the handle. It was my first attempt at a handle wrap, turk's head and a epoxy handle. I know how to do it better now :D
 

Attachments

  • PKEDChandleCU.jpg
    PKEDChandleCU.jpg
    32 KB · Views: 28
Nothing negative to say about this knife Will!!!
I love pocket size straight blades with wicked sharp blades!!!
They're so small and light weight you don't even know they're there and when you need them they're great for most any cutting you have to do!
I've never done the handle wrapping before like this knife has.
I've always wondered why the wrap gets coated with epoxy?
Is this to keep it from coming apart or just to make the wrap hard?
It seems like the wrap would be more comfortable in the hand without the epoxy.
What do you guys think about this?
Take care!!
Michael
 
Michael,
I epoxied it to protect the leather from getting dirty. I think the guys that do the more open weaves do it to keep it in place. I may try some thin super glue instead of thinned epoxy.

Oh yeah, forgot to explain the handle... I tied a turk's head knot in the air (in the center of the length of lace),then slipped the tang through the middle. I ran another strand through the turks head and tightened it up. I clamped the blade in my stitching pony, turned on the tv, loosely tied some punches to the free ends of the lace to provide tension. The pattern is basically crossing "U"s after crossing them, fiddle them straight and tighten down. I made a few mistakes in the lacing but it was my first try. I'll do better next one.

Thanks for looking and the questions.
 
Back
Top