-
The BladeForums.com 2024 Traditional Knife is available! Price is $250 ea (shipped within CONUS).
Order here: https://www.bladeforums.com/help/2024-traditional/
You are using an out of date browser. It may not display this or other websites correctly.
You should upgrade or use an alternative browser.
You should upgrade or use an alternative browser.
Project #10: Push Dagger
- Thread starter tryppyr
- Start date
")

Stacy E. Apelt - Bladesmith
ilmarinen - MODERATOR
Moderator
Knifemaker / Craftsman / Service Provider
- Joined
- Aug 20, 2004
- Messages
- 38,468
- Joined
- Feb 5, 2010
- Messages
- 3,911
Ah, I get it now. Thanks for the explanation. I'm pretty committed to the integral guard on this one, but I can definitely see the benefit of your approach. I'll go that route on the next one I make (using the leftover piece of sharks tooth damascus I have).
Stacy E. Apelt - Bladesmith
ilmarinen - MODERATOR
Moderator
Knifemaker / Craftsman / Service Provider
- Joined
- Aug 20, 2004
- Messages
- 38,468
The biggest advantage over the integral mode is the ability to finish the bevels straight and smooth without the guard in the way. Once the blade is done, the hardware is fitted and the knife is assembled.
- Joined
- Feb 5, 2010
- Messages
- 3,911
Exactly what I was thinking. I'll admit it has been challenging using my approach, and the results are not perfect. I'm generally pleased with the way it's going, but your way would definitely be easier and more professional.
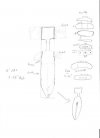
I had another thought about your approach too... if the tang was thin enough, you could put a cylindrical bolster around it to act as a brace for the guard and give the fingers a smooth round surface to contact instead of the tang. I think that is how they made the one pictured in the book. My only problem with that is it would result in the tang being very small in the handle. When I look at the picture from the book I think I see a screw in the base of the handle, and I wouldn't want that protruding on my version.
I had another thought about your approach too... if the tang was thin enough, you could put a cylindrical bolster around it to act as a brace for the guard and give the fingers a smooth round surface to contact instead of the tang. I think that is how they made the one pictured in the book. My only problem with that is it would result in the tang being very small in the handle. When I look at the picture from the book I think I see a screw in the base of the handle, and I wouldn't want that protruding on my version.
- Joined
- Dec 10, 1998
- Messages
- 4,860
Here is some inspiration for you, good luck.


- Joined
- Feb 5, 2010
- Messages
- 3,911
This morning I had an idea for the handle. I remembered that the Lignum Vitae had a curvature in the banding that approximated the curve of the antler piece. I also remembered that this wood is one of the toughest around, so there should not be any problems with chipping or breakage during assemble (as I had with another wood block I used for a sample handle).
So I traced the outline of the antler on the piece that most closely matched the curve, cut it out and drilled out the channel to the proper depth. I feel good about this so far, so I'll likely use this as my solution. The ink line above the banding shows the channel depth... enough to give me room to shape the top and still maintain about equal parts of dark and light in the handle.
Once I get this shaped properly (and decide whether or not to use corby bolts in addition to glue), I'll send the blade off for HT. Right now I'm leaning toward no bolts.


I love my ColdSteel safekeeper 1 (hard to find now adays). It's blade is humungus compared to the safe keeper2 which is the same size as the safemaker1. Either way, I suggest a longer blade lenght of at least 4-5 inchs. A 3 inch blade may not reach someones heart if you decide you have to punch someone in the chest...
Here is some inspiration for you, good luck.
damn, nice push knife!
- Joined
- Feb 5, 2010
- Messages
- 3,911
I love my ColdSteel safekeeper 1 (hard to find now adays). It's blade is humungus compared to the safe keeper2 which is the same size as the safemaker1. Either way, I suggest a longer blade lenght of at least 4-5 inchs. A 3 inch blade may not reach someones heart if you decide you have to punch someone in the chest...
Now there's a gruesome thought.
Agreed. This isn't the place for it, but 3" would accomplish that anyways.
Any update on your PD? Still out at heat treat I would guess. How are you planning to finish the handle?
- Joined
- Feb 5, 2010
- Messages
- 3,911
Any update on your PD? Still out at heat treat I would guess. How are you planning to finish the handle?
Back from heat treat as of yesterday. It came back with a beautiful blued finish. Pity I had to sand it off. My plan it to keep this one simple. No elaborate carving in the handle, no additional detailing for the metal. I'm even going to hide the makers mark on the tang, buried in the handle. I thought about other placements, but that one makes the most sense to me. I'm going for simplicity with this one because it seems to fit. The pictures I posted on May 14 will be essentially the final form, with just a bit more sanding and shaping done once the handle is permanently fitted.
Hengelo_77
Basic Member
- Joined
- Mar 2, 2006
- Messages
- 6,307
It's looking nice and sleek.
Will you pin the handle?
I assume you'll also hand finish the blade.
Personaly I like it if you can see the lines of the last finish go from the ricasso to the tip, folowing the edge. So not in a straight line but so that where the blade has a bellie, the hand finnish will follow it.
To me details like that give a knife (or other object) charm