Renaisance Dagger Project

Stacy E. Apelt - Bladesmith

ilmarinen - MODERATOR
Moderator
Knifemaker / Craftsman / Service Provider
Joined
Aug 20, 2004
Messages
38,524
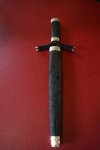
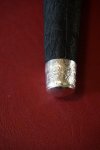
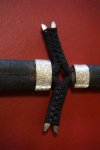
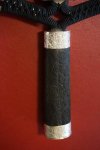
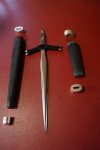
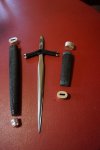
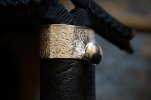
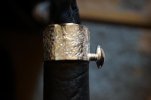
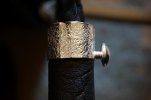
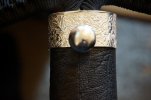
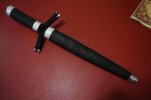
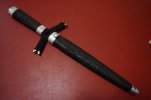
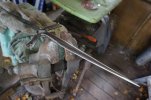
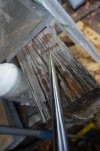
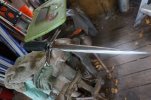
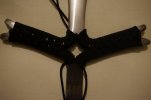
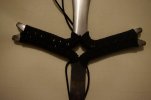
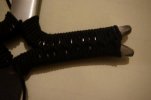
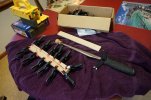
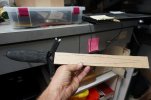
I posted last year about the dagger I forged at Ashokan from a single bar of 1070 steel. There are no welds, only cuts and flips. The last two photos are from a previous post recently on another thread of it after HT. I now have it 90% cleaned up and am starting the Italian water buffalo leather handle fitting. Here are a few shots of it so far. I'll try and post more as it progresses.

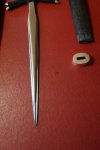
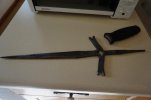
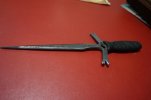
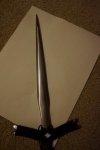
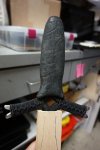
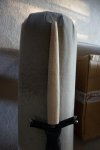
The 3"" tip is diamond shaped ( almost square), and thicker than the blade by about 25%. The actual point is four facets at about 30°. The main blade is navette ( also called marquise) shape with moderately sharp edges. Tip and blade are around Rc 56-57. The ricasso is very strong and has been drawn to a low 50's hardness. A blade like this can pierce armor or leather protective gear, and is a great left hand parrying weapon. Kevin Cashen gave a lecture on how this shape is the true quillion dagger shape, and how the pretty ABS ones aren't all that historically accurate.
 

Attachments

  • DSC00441 (1024x682).jpg
    DSC00441 (1024x682).jpg
    35.8 KB · Views: 209
  • DSC00449 (1024x682).jpg
    DSC00449 (1024x682).jpg
    30.9 KB · Views: 254
  • DSC00463.jpg
    DSC00463.jpg
    50.9 KB · Views: 225
  • DSC00467.jpg
    DSC00467.jpg
    32.7 KB · Views: 196
  • DSC00469.jpg
    DSC00469.jpg
    57.3 KB · Views: 217
Last edited:
Interesting timing Stacy. Having just sat through that lecture the first thing I wanted to check out was how you forged your cross section. Looks like you understand the purpose of a dagger quite well.

Though according to the man himself its "quillon" not "quillion". Hey he fondled the queen's daggers at buckingham palace, I'm not going to argue with him ;)

-Clint
 
Angus,
I took a 20" bar of 3/4" 1070. I made slits down it in two directions. From the handle end I cut down the center 6". I cut a slit about 1" at 90° to that on the same end. These will flip open into the quillons ( formerly quillions) and the "Y" splits at the ends.

From the tip end, I cut a slit at 90° to the 6" slit on the other end. This slit was make 1/4" deep, segmenting that part of the bar into 1/2" and 1/4" segments. This slit went about 15" up the bar until it passed the 6" slit by 1". This slit will flip up to make a 1/2"X3/4" piece to forge the blade out of and a long 1/4"X3/4" piece to use as a forging handle and later on to forge the tang out of.

The combination of the two ends each being flipped and rolled will create the diamond shaped opening in the center of the quillon/quillion.

After that, it is just flattening the cruciform shaper and forging the blade and tang.

Complicated as all that sounds, it is merely the process of making a Frederick's cross from a RR spike.

I will be bringing another piece up to Ashokan and forging a sister sword to match this dagger. I'm shooting for a 30" blade.
 
Last edited:
You see daggers on TV and they are all jeweled and fancy and I bet this was more common. Neat project and thanks for showing us.
 
Stacy - That's NICE work.... but then you ALWAYS do VERY nice work. Keep photos coming - we all enjoy learning at the feet of the Master.

Ken H>
 
No feet of the master here, just an old guy having some fun. If anyone is sitting around by my feet, they need to get up and go do something.

I learned ... and continue to learn ... from others. Hopefully, someone will take something I said or did and learn from it. That is all the "praise and glory" I want.
( But feel free to mail me a bottle of single malt if I have elevated your spirit :D )

Seriously, if it ain't fun, quit doing it and find something that will help you live happy and longer.
Unhappiness and stress also appear to lengthen your life - but they don't. What they really do is make it seem to go on, and on, and on.
Happy people look back and say, "Wow, where did the time go!"
 
Last edited:
OK, I got some sanding done this evening, and the blade is sanded to a nice satin 800 grit. It is done.

I decided that the quillion needed something, so I "invented" a cross guard knotted wrap that would accommodate the diamond pattern opening.
Came out pretty cool when done. The photos are where it is right now. They don't really show the detail in the knotting very well, but it looks pretty nice.
I will lock them in place with a drop of CA, and trim the excess cord tomorrow.
The cord is from an 70+ year old roll of braided watch strap cord, for the thin black cord wrist watches your grandmother wore.

Let to do are finish fitting the leather covered handle and make a matching leather covered sheath. Sheathed, it will be all black ( except the small tips of the quillion forks).
 

Attachments

  • DSC00478 (1024x682) (2).jpg
    DSC00478 (1024x682) (2).jpg
    25.9 KB · Views: 79
  • DSC00479 (1024x682).jpg
    DSC00479 (1024x682).jpg
    26.2 KB · Views: 79
  • DSC00480 (1024x682).jpg
    DSC00480 (1024x682).jpg
    25.6 KB · Views: 74
  • DSC00481 (1024x682).jpg
    DSC00481 (1024x682).jpg
    20.3 KB · Views: 78
  • DSC00483 (682x1024).jpg
    DSC00483 (682x1024).jpg
    17.6 KB · Views: 96
OK, sheath will be leather covered over alder wood. Alder is a really good sheath wood, as it works and looks a lot like Japanese ho wood.
Sheath has been sanded down to around .010" thick walls. You can see on the side shot that the inner channel was tapered to keep the blade from rattling.
The one shot of it before shaping shows the knotting on the quillion.
 

Attachments

  • DSC00484 (1024x682).jpg
    DSC00484 (1024x682).jpg
    63.1 KB · Views: 71
  • DSC00486 (1024x682).jpg
    DSC00486 (1024x682).jpg
    37.5 KB · Views: 63
  • DSC00487 (1024x682).jpg
    DSC00487 (1024x682).jpg
    41.5 KB · Views: 73
  • DSC00490 (682x1024).jpg
    DSC00490 (682x1024).jpg
    25.4 KB · Views: 91
  • DSC00491 (682x1024).jpg
    DSC00491 (682x1024).jpg
    22.9 KB · Views: 73
I took a good look at the handle and decided it didn't match the dagger style and the sheath well....so I made a new handle yesterday. It is like the sheath, and will have silver fittings to match. I got it up to the leather wrap before I turned in for the night. I have company coming today, so I'll try and take some photos later on and post them.

This is a perfect example of not being afraid to go back and change something that is bothering you about a knife ( or something that is just plain wrong). Once you bite the bullet and do it you are almost always much happier with the knife. There is no handle that can't b removed with a heat gun, a hammer, and a grinder....luckily, I changed this one before final attachment.
 
Stacy - it's those type decisions that make you "The Master" knifemaker that you are. Looking good.

Ken H>
 
OK, got the fittings finished and the new handle done. These are just stuck together until the final assembly. I still have to engrave the makers mark on the pommel cap. All shots are of the back side, showing the leather seam. On the handle it is nearly invisible. When finished, I will post a front shot :)

First - Shot of the temporarily assembled dagger and sheath. Camera angle makes the tip look fat.
Second - Shot of sheath cap
Third - Shot of quillion and fittings on handle/sheath.
Fourth - Shot of handle
Fifth - Shot of disassembled parts.
 

Attachments

  • DSC00495 (682x1024).jpg
    DSC00495 (682x1024).jpg
    15.1 KB · Views: 52
  • DSC00496 (682x1024).jpg
    DSC00496 (682x1024).jpg
    23.3 KB · Views: 48
  • DSC00497 (682x1024).jpg
    DSC00497 (682x1024).jpg
    23.4 KB · Views: 49
  • DSC00498 (682x1024).jpg
    DSC00498 (682x1024).jpg
    25.7 KB · Views: 47
  • DSC00499 (682x1024).jpg
    DSC00499 (682x1024).jpg
    22.4 KB · Views: 60
Last edited:
Two more shots
 

Attachments

  • DSC00500 (682x1024).jpg
    DSC00500 (682x1024).jpg
    28.4 KB · Views: 39
  • DSC00501 (682x1024).jpg
    DSC00501 (682x1024).jpg
    22 KB · Views: 54
such beauty in the blade, and the sheath and fittings, reminecient,to me at least, of a S'gian Dubh,.... but the guard. Not a fan of that guard. Smaller would be better, imo. Just my take on it, others might love it.
 
This is not a "stealth ops" dagger, which should be thin and sleek. It is a renaissance dagger used in sword fighting.
The powerful tip is designed to pierce chain mail, leather jerkins, and slide in/under the chinks/flaps of armor.
The quillion on a renaissance dagger was to catch and retard a blade in a left hand block.
The elaborate looking guards on the renaissance sword blades did the same function on a right hand block/catch. Some guards were designed to "capture" the opponents sword and lock it into the guard.

On this knife, the quillion shape and size is a product of the blade being flipped and unfolded from one bar of steel in a demo. It was not intended to be much more than a basic dagger with a quillion in the forging demo, but the blade finished so nice that I did the cord wrap to give it at least some pizzazz. The buffalo leather handle, sheath, and silver fittings are just fancy tack on a work horse. Obviously, if being made as a standard dagger, the quillion would be a separate piece, .... and a much different shape.

Also, the quillion is not as large as the camera angle makes it look. I'll post final dimensions with the final shots.
 
Wow. As usual it is very humbling seeing your work. I love the fittings. Blown away.
 
Last part finished today. I added the frog button to the sheath cap.

Button is made from one 1/4domed silver disc and one only slightly domed, and a 6mm tubing stud.

For those who are interested, all fittings are assembled with hard silver solder which flows at 1420F. This pretty much welds the sterling fittings solid. Buffed with Tripoli and then white rouge, and tumbled/burnished in a magnetic pin tumbler for a shiny satin finish.

I will assemble it over the next day and it should be ready for Ashokan.
 

Attachments

  • DSC00504 (1024x682).jpg
    DSC00504 (1024x682).jpg
    36.6 KB · Views: 25
  • DSC00505 (1024x682).jpg
    DSC00505 (1024x682).jpg
    25 KB · Views: 26
  • DSC00506 (1024x682).jpg
    DSC00506 (1024x682).jpg
    31.8 KB · Views: 27
  • DSC00507 (1024x682).jpg
    DSC00507 (1024x682).jpg
    41.5 KB · Views: 27
Last edited:
Last Photos.

It is finalized and ready to take to NY. I'll make a frog when I get home.

Specs:"
1070 steel from Aldo
Handle wrap and sheath cover - Buffalo leather
Handle and sheath core - Alder
Fittings - Sterling silver
HT in open forge, oil quenched, and oven tempered to Rc 52-53

Blade 11" long by 1" wide
Handle 5.5"
Quillion 5.5"
OAL with sheath 18".

Notes -
Blade forged from a single bar of 3/4" square 1070 stock. Two opposing and perpendicular slits were cut down the bar to allow a "Fredrick's flip". This made the quillion and tang.
Diamond cross section tip for piercing chain mail, armor, and leather plates.
Forged at Ashokan 2014
 

Attachments

  • DSC00508 (1024x682).jpg
    DSC00508 (1024x682).jpg
    35.7 KB · Views: 23
  • DSC00509 (1024x682).jpg
    DSC00509 (1024x682).jpg
    37.1 KB · Views: 23
  • DSC00510 (1024x682).jpg
    DSC00510 (1024x682).jpg
    38 KB · Views: 23
Back
Top