-
The BladeForums.com 2024 Traditional Knife is available! Price is $250 ea (shipped within CONUS).
Order here: https://www.bladeforums.com/help/2024-traditional/
You are using an out of date browser. It may not display this or other websites correctly.
You should upgrade or use an alternative browser.
You should upgrade or use an alternative browser.
Rustic Repair or ?
- Thread starter r8shell
- Start date
5K Qs
Gold Member
- Joined
- Jul 20, 2014
- Messages
- 15,814
I know it's only Sunday, but this is definitely the best laugh I've had all week!... Is it a repair at all, or was the knife possessed by an evil spirit that could only be killed by driving three silver stakes through it?
Thanks for sharing this one,

 Gotta admit it's the type of repair I'd consider, and it has given me some ideas for an old Kumaster stockman I have with both springs broken, but otherwise a beautiful knife!
 - GT
r8shell
Knifemaker / Craftsman / Service Provider
- Joined
- Jan 16, 2010
- Messages
- 25,899
I've got a few ideas.I'm waiting to see how you repair the old repair.
O.B.
Hmm...maybe you can hammer it into a fixed blade.I know it's only Sunday, but this is definitely the best laugh I've had all week!
Thanks for sharing this one,r8shell .
Gotta admit it's the type of repair I'd consider, and it has given me some ideas for an old Kumaster stockman I have with both springs broken, but otherwise a beautiful knife!
- GT
r8shell
Knifemaker / Craftsman / Service Provider
- Joined
- Jan 16, 2010
- Messages
- 25,899
Okay, folks, I finally got around to messing with the old thing.
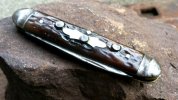
First, I filed the kick on the main blade, and managed to drop the point enough to be pocketable. I also put a tiny bit of epoxy under the nail heads, so they don't feel so rough.
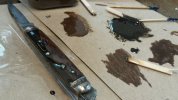
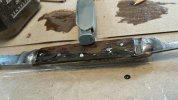
I mixed some brown pigment into epoxy, made a dam with clear packing tape, and patched the brown bone on the pile side. I started with dark and added gradually lighter layers, then just before it set, pressed a few divots to mimic the worn jigging. After it set, I trimmed and sanded it down to match the level of the bone.
It ain't pretty; I'm afraid it came out darker than I wanted, but it is now ready to be sharpened and carried.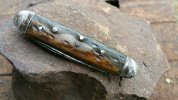
First, I filed the kick on the main blade, and managed to drop the point enough to be pocketable. I also put a tiny bit of epoxy under the nail heads, so they don't feel so rough.

I mixed some brown pigment into epoxy, made a dam with clear packing tape, and patched the brown bone on the pile side. I started with dark and added gradually lighter layers, then just before it set, pressed a few divots to mimic the worn jigging. After it set, I trimmed and sanded it down to match the level of the bone.


It ain't pretty; I'm afraid it came out darker than I wanted, but it is now ready to be sharpened and carried.

- Joined
- Nov 20, 2014
- Messages
- 639
Nice, keeps with the theme of things:"It's dead? Again? Hold on, I'll fix that.. Not a problem."
- Joined
- May 14, 2018
- Messages
- 28,969
Great job!!! It really keeps the theme of the original fix.Okay, folks, I finally got around to messing with the old thing.
First, I filed the kick on the main blade, and managed to drop the point enough to be pocketable. I also put a tiny bit of epoxy under the nail heads, so they don't feel so rough.
View attachment 986132
I mixed some brown pigment into epoxy, made a dam with clear packing tape, and patched the brown bone on the pile side. I started with dark and added gradually lighter layers, then just before it set, pressed a few divots to mimic the worn jigging. After it set, I trimmed and sanded it down to match the level of the bone.
View attachment 986133 View attachment 986134
It ain't pretty; I'm afraid it came out darker than I wanted, but it is now ready to be sharpened and carried.View attachment 986136
- Joined
- Nov 20, 2014
- Messages
- 639
I always liked the clear epoxy fixes that were done so long ago they almost look like fossil amber. I like that look, I dont know if it's because I'd seen my Grandpa fix a few like that when I was really little (he's not a knife guy, but he always had a few because they were good tools, and cared for/fixed them like any other) or just something about the effort put in to save it instead of replace it and what that adds to the soul of an old tool.
screened porch
Basic Member
- Joined
- Feb 19, 2012
- Messages
- 19,326
Not a theory in my poor old head.
screened porch
Basic Member
- Joined
- Feb 19, 2012
- Messages
- 19,326
Nice fix.
- Joined
- Feb 11, 2016
- Messages
- 2,541
Another success story from @r8shell’s reinvigorating retirement home for well-worn knives. Great job.
- Joined
- Apr 16, 2018
- Messages
- 1,502
That is a pro looking repair and I love how you kept the old nails in.
r8shell
Knifemaker / Craftsman / Service Provider
- Joined
- Jan 16, 2010
- Messages
- 25,899
Nice, keeps with the theme of things:"It's dead? Again? Hold on, I'll fix that.. Not a problem."
Ha! It was only mostly dead...
I know what you mean. I've seen a few knives patched with metallic grey JB Weld. They looked funky, but I liked imagining a guy in the middle of a job, using what he had on him to fix his knife, and then getting back to work.I always liked the clear epoxy fixes that were done so long ago they almost look like fossil amber. I like that look, I dont know if it's because I'd seen my Grandpa fix a few like that when I was really little (he's not a knife guy, but he always had a few because they were good tools, and cared for/fixed them like any other) or just something about the effort put in to save it instead of replace it and what that adds to the soul of an old tool.
Thanks for the compliments, everyone. There's no point in worrying about making a repair look seamless on this knife, but it was good practice for other jobs. I'm still disappointed that I didn't match the color better. I think if I build up more, and thinner layers of lighter brown, I can mimic the depth of worn bone. I expect it won't be too long before I find another old wreck to rehabilitate.
Henry Beige
Gold Member
- Joined
- Jun 1, 2015
- Messages
- 3,765
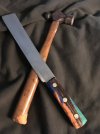
Nice rescue, especially the epoxy work. I might have been inclined to resort to Sugru, as I did on this hammer and old kitchen knife, but the epoxy is really better.
A vintage motorcyclist might call your solution a bodge. Others would refer to it as third-world engineering. I have used JB Weld to repair a cracked valve cover, and zip-ties to replace a missing screw or hold a flat tire on the rim. My shoes have been held together with duct tape, at least until I could put my hands on a tube of Shoe Goo.
A vintage motorcyclist might call your solution a bodge. Others would refer to it as third-world engineering. I have used JB Weld to repair a cracked valve cover, and zip-ties to replace a missing screw or hold a flat tire on the rim. My shoes have been held together with duct tape, at least until I could put my hands on a tube of Shoe Goo.

- Joined
- Jun 29, 2014
- Messages
- 1,291
Real nice work r8shell.

I had to smile, thinking of the potential puzzlement and confusion you've now added for any future knife knut unaware of its backstory, examining the knife and trying to come up with an explanation of its multilayered repairs!

Cool thread, thanks for sharing it.


Well worth the ten bucks just to be able to pull it out of your pocket and hand it to a knife knut friend and watch their facial expressions as they try to puzzle it out.
I had to smile, thinking of the potential puzzlement and confusion you've now added for any future knife knut unaware of its backstory, examining the knife and trying to come up with an explanation of its multilayered repairs!
Cool thread, thanks for sharing it.

