-
The BladeForums.com 2024 Traditional Knife is available! Price is $250 ea (shipped within CONUS).
Order here: https://www.bladeforums.com/help/2024-traditional/
You are using an out of date browser. It may not display this or other websites correctly.
You should upgrade or use an alternative browser.
You should upgrade or use an alternative browser.
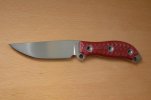
Satin and Red Meaner!
- Thread starter Ban
- Start date
 ).
). - Joined
- Mar 10, 2002
- Messages
- 19,808
very nice :thumbup:
.
.
- Joined
- Oct 31, 2003
- Messages
- 8,583
That thing looks SCARY sharp. Excellent job. Is that your ZTMS? ")
Ban
Moderator
- Joined
- Oct 14, 1998
- Messages
- 4,942
Ban, do you take off the scales to finish the knife then reattach them?
What is your method?
Perhaps you could post pics of the process?
Thanks ! It looks great.
Yes, the scales have to be removed to get the dimples out of the flats. There is a recent thread with links on how to remove and reattach the handles. One tutorial was done by Wicked and the other done by Randucci.
The process is quite simple :foot: Here are the steps
")
1) The handle scales are removed by drilling out and punching out the flared rivets.
2) The new profile of the knife blade and/or handle is ground out depending on request.
3) The flats of the blade is sanded down progressively from 60, 120, 300, and 400 grit until all the dimples are removed.
Note: When the flats are sanded down they eat into the primary bevel of the knife. Most of the time about 1/8-1/4 of the primary bevel is converted to flats during this process.
4) The primary bevels are reground progressively from 60, 120, 300, and 400 grit.
5) The entire knife is now given a hand rubbed satin finish finish from 80, 150, 320, then 600 grit.
6) The entire spine from the tip to butt of the knife is polished out and given a radius/bevel on all the sharp edges.
7) The handle scales are reattached and the handle slabs are now ground down and re contoured if the handles were modified.
That thing looks SCARY sharp. Excellent job. Is that your ZTMS?
Not mine but someone elses ZTMS
jimmyjones
Gold Member
- Joined
- Jan 16, 2005
- Messages
- 4,080
Great looking job :thumbup:
.
:thumbup:.
- Joined
- Oct 6, 2007
- Messages
- 3,174
1) The handle scales are removed by drilling out and punching out the flared rivets.
2) The new profile of the knife blade and/or handle is ground out depending on request.
3) The flats of the blade is sanded down progressively from 60, 120, 300, and 400 grit until all the dimples are removed.
Note: When the flats are sanded down they eat into the primary bevel of the knife. Most of the time about 1/8-1/4 of the primary bevel is converted to flats during this process.
4) The primary bevels are reground progressively from 60, 120, 300, and 400 grit.
5) The entire knife is now given a hand rubbed satin finish finish from 80, 150, 320, then 600 grit.
6) The entire spine from the tip to butt of the knife is polished out and given a radius/bevel on all the sharp edges.
7) The handle scales are reattached and the handle slabs are now ground down and re contoured if the handles were modified.
Wow!

That's awesome! Thanks for posting your process. I might try "satin'ing" up my S6.
Ban
Moderator
- Joined
- Oct 14, 1998
- Messages
- 4,942
Wow!
That's awesome! Thanks for posting your process. I might try "satin'ing" up my S6.
Removing the rivet on the Respirene-C is a little trickier. It tends to spin in place when applying pressure to drill out the rivet. Make sure you have a sharp and new drill bit and if possible try to clamp the opposite side of the rivet with a locking needlenose plier.
- Joined
- May 7, 2006
- Messages
- 3,338
Cool...
We need more Busse guys Useing, modding and sharpening.....
More fun than just lookin at em. GO BAN!
We need more Busse guys Useing, modding and sharpening.....
More fun than just lookin at em. GO BAN!
- Joined
- Sep 19, 2006
- Messages
- 1,103
Nice work, Ban!
That would make a great companion for a Santa's Outlaw Wicked NO.
That would make a great companion for a Santa's Outlaw Wicked NO.
- Joined
- Aug 24, 2006
- Messages
- 1,188
Awesome work!!
- Joined
- May 28, 2005
- Messages
- 5,081
How do I place an order with the BCS(Ban Custom Shop)?