-
The BladeForums.com 2024 Traditional Knife is available! Price is $250 ea (shipped within CONUS).
Order here: https://www.bladeforums.com/help/2024-traditional/
You are using an out of date browser. It may not display this or other websites correctly.
You should upgrade or use an alternative browser.
You should upgrade or use an alternative browser.
SaVaGe LaMeY CHoPPeR
- Thread starter Lorien
- Start date
- Joined
- Dec 5, 2005
- Messages
- 28,848
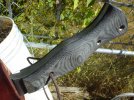
Well, this knife so far is nameless, but I know what it is and where it is, so a name is pretty irrelevant.
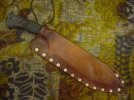
But I did get together a sheath for it though. I'll admit it's not one of my better efforts, but it'll get the job done for now. I generally think that stitches are the best way to join leather, but these rivets should work okay. Besides, I wanted to get out in the woods with this sucker, and with my schedule, it's hard to find the time to handstitch a sheath this big.
Anyway, thanks for looking!")
But I did get together a sheath for it though. I'll admit it's not one of my better efforts, but it'll get the job done for now. I generally think that stitches are the best way to join leather, but these rivets should work okay. Besides, I wanted to get out in the woods with this sucker, and with my schedule, it's hard to find the time to handstitch a sheath this big.
Anyway, thanks for looking!
Attachments

- Joined
- Dec 5, 2005
- Messages
- 28,848
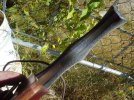
Well I had this savage chopper out in the bush over the weekend, and I have to tell you all that it was worth every cent!
I spent two hours on foot, cruising the trail and removing Scotch Broom, (http://www.shim.bc.ca/invasivespecies/_private/Scotchbroom.htm) along the way. As my home is located pretty much at the epicenter of this noxious, invasive plant, there was lots of opportunity to test out my blade. Broom stalks vary in size from about 4mm in diameter up to 15mm. It is extremely fibrous and tough. It also grows thick, and a maneuverable blade is key.
Of course, one of the first things that happened was that I christened the edge on a rock! It sucks chipping your edge, but I expected that something like that would happen at some point, so best get it out of the way early! I was able to remove most of the damage, and this blade will pop hairs off my carcass just like when it was new. Even after almost two hours of continuous hacking through nasty plant matter, the edge remained keen.
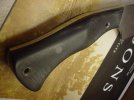
I found that the handle had a couple of hot spots, and got home with a blister on my index finger and one on the heel of my hand. No problem! I had initially asked Matt to leave the handle rough and full, so I've since removed material and smoothed the handle where it was chafing my delicate hands") Usually I wear gloves for this kind of work, as I always encounter Black Cap tendrils, which are covered in very irritating prickles not to mention the broom itself which always leaves slivers and perforates hand skin with ease. But I wanted to get a handle which fits me perfectly, so I went au natural. My hands are torn up a bit, but the handle on this knife is sooo dialed now!
Usually I wear gloves for this kind of work, as I always encounter Black Cap tendrils, which are covered in very irritating prickles not to mention the broom itself which always leaves slivers and perforates hand skin with ease. But I wanted to get a handle which fits me perfectly, so I went au natural. My hands are torn up a bit, but the handle on this knife is sooo dialed now!
So, with all that being said, this knife was born to kill broom. Its heft and broad blade, coupled with a dropped handle heel creates a lot of force and power- allowing me to sever, in one swing, limbs up to 10mm in diameter. This custom/handmade knife is a tool without comparison in the production knife world, which goes to show that custom/handmade knives definitely have their place with those who need specific tools that they can depend on.
Great job Matt! This knife gets a ten out of ten:thumbup::thumbup::thumbup:
I spent two hours on foot, cruising the trail and removing Scotch Broom, (http://www.shim.bc.ca/invasivespecies/_private/Scotchbroom.htm) along the way. As my home is located pretty much at the epicenter of this noxious, invasive plant, there was lots of opportunity to test out my blade. Broom stalks vary in size from about 4mm in diameter up to 15mm. It is extremely fibrous and tough. It also grows thick, and a maneuverable blade is key.
Of course, one of the first things that happened was that I christened the edge on a rock! It sucks chipping your edge, but I expected that something like that would happen at some point, so best get it out of the way early! I was able to remove most of the damage, and this blade will pop hairs off my carcass just like when it was new. Even after almost two hours of continuous hacking through nasty plant matter, the edge remained keen.
I found that the handle had a couple of hot spots, and got home with a blister on my index finger and one on the heel of my hand. No problem! I had initially asked Matt to leave the handle rough and full, so I've since removed material and smoothed the handle where it was chafing my delicate hands
Usually I wear gloves for this kind of work, as I always encounter Black Cap tendrils, which are covered in very irritating prickles not to mention the broom itself which always leaves slivers and perforates hand skin with ease. But I wanted to get a handle which fits me perfectly, so I went au natural. My hands are torn up a bit, but the handle on this knife is sooo dialed now!So, with all that being said, this knife was born to kill broom. Its heft and broad blade, coupled with a dropped handle heel creates a lot of force and power- allowing me to sever, in one swing, limbs up to 10mm in diameter. This custom/handmade knife is a tool without comparison in the production knife world, which goes to show that custom/handmade knives definitely have their place with those who need specific tools that they can depend on.
Great job Matt! This knife gets a ten out of ten:thumbup::thumbup::thumbup:
Attachments

- Joined
- Dec 5, 2005
- Messages
- 28,848
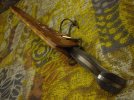
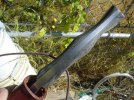
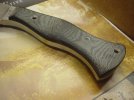
with ease! That 1095 is pretty nice stuff. Very suitable for this kind of work.
I really enjoy being able to appreciate the heat treatment visually as well. I've been gradually sanding away at the blade, every time I take er out for a whack, and the 600 grit is just starting to show an effect. Man that hamon is becoming damn gorgeous!!!
I really enjoy being able to appreciate the heat treatment visually as well. I've been gradually sanding away at the blade, every time I take er out for a whack, and the 600 grit is just starting to show an effect. Man that hamon is becoming damn gorgeous!!!
- Joined
- Dec 5, 2005
- Messages
- 28,848
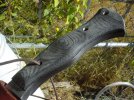
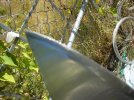
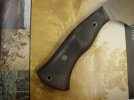
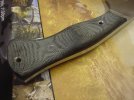
I've recently discovered the joy of handle modification by way of adding texture and traction using varying grittinesses of sandpaper.
I don't know if it's that easy to see from the pictures, but I've smoothed out most of the palm side handle slab to 320 and 600 grit, and left the finger side handle slab at 280 grit.
Where there is movement, say at the heel of my palm and along most of the top and bottom of the handle, I've found a nice smooth surface really keeps the blisters down.
In order to have a tactile grip with lots of traction, I find the rougher finish under the tips of my fingers really helps keeping this thing from flying out of my hand!
I've also filled the middle hollow fastener with JB Weld, flush on the palm side, but left a little divot on the finger side as an index point. We'll see if that works, but if not I can always fill it flush and smooth it out.
Attachments

Last edited:
