Sgian Dubh Dimensions

DanF

Knifemaker / Craftsman / Service Provider
Joined
Apr 17, 2017
Messages
1,321
I've been looking for a consensus on dimensions for an accurate Sgian Dubh. Most on-line articles I have seen agree on a 3.5" long blade (somewhat). But, beyond that, width, OAL length, and single vs double edge blade differ.
IS there a historical consensus for this little blade, or did they simply change over the centuries and as long as it's "close" it's okay? I would like to be as accurate as possible, if possible.

The pattern I have cut out has a 3.5" blade and 1" width, and I've drawn it showing a double-edged blade, but can make it single edges also.IMG_20171016_140021.jpg

Thanks,
 
There is no standard for a sgian dubh. Originally it was a hideout knife for last ditch defense and for eating. During the 19th century it became a decorative knife used as part of a highland costume, but seldom used as a knife, and it was incorporated into Britain's Scots regimental dress. Current decorative usage has the blade at about 3 1/2" long, overall length about 6 5/8 (depending on how long handle needs to be for the owners hand size), spear or dagger point, single edge, back of blade may be scalloped, wood handle is thin (for comfort when worn on leg) and may be decorated with carvings and inlay, and a leather sheath. Going back beyond 19th century, there are no records that reference any details of a sgian dubl and its dimensions and fittings are up to your imagination, guided by pictures of the few older scotish knives that still exist. In ye olden times it is probable that a sgian dubl was not a special design, but was just a normal knife of a size that suited the purposes of a sgian dubl.

Good references:
https://www.pinterest.com/pin/322992604502690291/
http://www.xmarksthescot.com/forum/f103/sgian-dubh-length-38938/
https://en.wikipedia.org/wiki/Sgian-dubh
http://unknownscottishhistory.com/articlenineteen.php
http://www.gaelicthemes.net/index.php/articles/3-the-history-of-sgian-dubh
 
I agree with Bob.

3-3.5" blade, single edge, file-worked spine.
3-3.5" handle, flat profile. Blackwood, carved in a woven pattern is most authentic.
No guard. A bolster collar is normal, but not required.On ceremonial sgian dubh, the collar is often engraved or patterned.
Handles may vary with taste, and a small stag crown is also authentic. Mounting a small scottish coin in the crown end is nice.
Silver fittings are traditional, but any metal will work.
A simple blade cover scabbard made from waterproofed light weight leather is a good idea. 5-6oz leather is fine. The sheath does not need dying unless you want it, but it does need waterproof sealing with Resilone or other good grade sealer. You don't want dyd because it may bleed into your hose or shin.
The knife needs to be lightweight, so keep all thicknesses down. 1" is pretty wide. 3/4" is more like it. 1/8" is plenty thick, even less is good.
The handle should be around 1/2" to 5/8" thick. 3/4" to 1" wide is about right.

All that said, there are no sgian dubh police checking your weapon at events to make sure it meets any standards.

Optional idea:
Make a sgian dubh with a beer bottle opener as the blade. It meets TSA standards and can be worn in public places and assemblies where weapons are barred. It also will get a lot more use at a ceilidh or highland games that a knife blade will. The opener part can be bought from any supplier that sells turning and pen making stuff - Woodcraft, Penn State, Rockler, etc.
 
Thanks Bob and Stacy, I'll modify my pattern to incorporate the suggestions into my build.
 
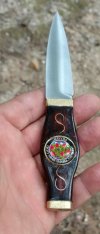
IMG_20180613_202009.jpg
Well, I like the blade with it's threaded through tang, hammered bolster and butt cap but I hate with a passion the lapel pin the wife ordered to be inset. I TOLD her to get a stags head silver coin, but Nooo, she liked this one.
That's all right this one is HERS and I'll make me one now.
On another note, never leave a knife lay around long enough to forget what wood you used and then try to silver inlay it. Orange Agate just does not like to be inlaid.
Blade 3.5", OAL 6.5", handle just shy of 3/8" thick on edge.
My cell phone still sucks for bad reflections, even in low light.
 
I figured I would lend my own knowledge here. I hope it helps.
I am Scottish by blood, and spent a long time doing research into Scottish history.
Stacy E.Apelt Is correct, but here are traditional specs if your going for absolute tradition. The Sgian Dubh literally translates to "black Knife" and was by and large as Bob Dahl and Stacy E.Apelt say. 3.5 inch single edged blade with decorative file work on the spine. Traditionally black handle (occasionally ornate) with brass bolsters, and no cross guard. the sheath has no belt loop or carrier, as it was usually tucked into the stocking, in the belt hidden with a fold of the Ghille shirt or shoulder throw of the ancient kilts, or in some rare instances strapped to the bicep in the sleeve. I would not recommend concealing it, (check on your particular state laws) But at most Highland games and Renaissance festivals it is usually kept in the stocking when wearing a kilt with the handle showing above the top of the stocking. Again check your particular state laws. I hope my input helps, like I said I am Scottish by name and blood, third generation born in America of my particular family line. My great grand father was a direct immigrant in the late eighteen hundreds early nineteen hundreds.
I am always happy to share anything I know.
As always, wishing all of you all the best.
 
Here is my take on the Sgian Dubh, customer wanted a bone breaker on the back instead of the traditional stone, also the pin pattern and the corian inlay were part of his, very specific, requests.

Pablo

qVe21OS.jpg


wuWnnsN.jpg
 
Here is my take on the Sgian Dubh, customer wanted a bone breaker on the back instead of the traditional stone, also the pin pattern and the corian inlay were part of his, very specific, requests.

Pablo

qVe21OS.jpg


wuWnnsN.jpg

Very nice work!
 
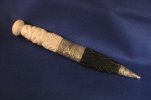
This is my dress sgian dubh - mammoth handle, black mammoth scabbard, stainless damascus blade, and sterling fittings.
Stacy Elliott Apelt, FSA Scotsgian dubh ivory.JPG
 
Last edited:
Stacy, I've long known of the Society, but you are the first Fellow I've personally come across. Way cool!
 
There are only about 3000 Fellows of the Society of Antiquaries of Scotland worldwide.
 
Checked the link myself and it works.
I made the blade out of mild steel, so it didn't harden, but it will hold a reasonable edge.
The handle is Elk antler that I found laying in a field. Tang is only a half inch long and is secured by one pin, but it is solid.
I made this with a small hammer and a piece of flagstone for an anvil.
It was an interesting experience, but it turned out better than I expected it to.
Enjoy!
 
Well, for a KSO it is nice.

Some suggestions if you haven't already discovered them:
1) Use hardenable steel. For a sgian dubh, carbon steel is traditional, but stainless will resist rusting much better if worn regularly.
2) The pointy cornered guard isn't needed or desirable on a sgian dubh.
3) You need a longer tang than 1/2". On a sgian dubh, the tang should be at least 1/2 the blade length.
4) The sheath needs to be waterproof as possible, because it will absorb the sweat from your leg.
5) When stitching, run a stitching groover run down the edges before punching the holes. This makes the thread sit below the surface when stitched. It would also be better if the stitching was a bit closer and tighter.

TIP:
Don't store the blade in the sheath when not wearing it. The sheath is likely full of moisture and salts from sweat. It can cause the blade to corrode is stored in the sheath.
 
Last edited:
Well, for a KSO it is nice.

Some suggestions if you haven't already discovered them:
1) Use hardenable steel. For a sgian dubh, carbon steel is traditional, but stainless will resist rusting much better if worn regularly.
2) The pointy cornered guard isn't needed or desirable on a sgian dubh.
3) You need a longer tang that 1/2". On a sgian dubh, the tang should be at least 1/2 the blade length.
4) The sheath needs to be waterproof as possible, because it will absorb the sweat from your leg.
5) When stitching, run a stitching groover run down the edges before punching the holes. This makes the thread sit below the surface when stitched. It would also be better if the stitching was a bit closer and tighter.

TIP:
Don't store the blade in the sheath when not wearing it. The sheath is likely full of moisture and salts from sweat. It can cause the blade to corrode is stored in the sheath.


Yah I intend to make a second one with hardenable steel.
I dont wear this one its more decorative and a trophy because its the first knife I made.
Cornered guard was all I had at the time and I didnt have the tools to make a round one.
The half inch tang was all I had to work with the steel I had to make it.
and I didnt have the tools or know how to make a stich groove.
But you are right that is the correct way to go about doing it.
Pardon my ignorance but what is KSO?
Thanks for the tips and advice!
 
KSO is the term for a Knife Shaped Object - a non functional knife. It isn't really derogatory, merely descriptive. It is often used to refer to rebar and RR spike knives, wooden knives, and unhardened blade knives used for letter openers.
 
sorry to revive an old thread, but i was wondering if anyone has any tips on how to set a cabochon stone into the pommel on a sgian dubh? i have made a couple now but i feel mounting stones should be the next step in my progression.
pictures of some previous works included purely for fun
post.php
post.php
 
You can make the pommel cap with a bezel extending up from it. Set the cabochon in the bezel with slow setting epoxy and work the bezel down tight against the stone. If you are good with a jewelers torch, this works fine.

The simplest way to do a cabochon ended handle is:
Start by making the handle. It should end in the shape of the desired cabochon. If working from a pre-made cabochon, a good trick is to glue the cabochon on the end of the handle blank and shape until the butt is flush with the stone. Do all work on the handle.
Make a 3/4" high cylinder of malleable metal - silver, copper, brass, or nickel silver work fine. If you can't silver solder well, use a ring cut from pipe. Copper plumbing pipe will work great, and can be hammer worked easily. See tip below*.
Put the cylinder on a steel tapered mandrel and work it until the cylinder slightly tapered.
Remove from the mandrel and shape it by hand to the shape of the handle. Make it fit the handle so 1/4" of the bezel is sticking past the wood and over the sides of the stone. Trim the bezel to the length and shape so it looks right. You want the bezel to come up about 1/4 of the stones height ( but that can vary depending on stone shape and size).
After the look and fit is good, apply 5 minute epoxy to the wood at the handle butt, set the stone on the butt ( if it is not still glued in place) and push the bezel on tight. Put the resin on the wood only, and not up on the stone. Clamp/hold in place while the epoxy sets. You can clean off excess while it is gelling with denatured alcohol. Once set, clean off any excess resin and you can add a few decorative round head brads for security, or just leave it glued in place.
Using a burnisher, work the exposed bezel down snug on the stone.
Use a very fine steel wool or 3M polishing papers to buff up the bezel and handle.

Because I cut my own cabochons to fit, I usually make the handle and blade first, and then when they are fitted and sanded as much as they will get, I fit the bezel and stone. If you are working with a purchased cabochon, you have to make the handle butt match the stone shape, so gluing it on the end while you finish shaping and sanding the handle is a good idea.


TIP *
Copper pipe is great for making ferrules, butt caps, and sword fittings. It can be soldered to plates of metal with easy silver solder ( high temp, not the low-temp soft stuff).
Copper pipe comes in several grades, with M and L being the ones readily available. M is the thin stuff for piping homes. L is heavier gauge and much thicker. It is the type best used for making knife fittings. Ebay is the place to buy short pieces of copper pipe. I suggest getting a foot or so of 1/2", 3/4", and 1" for making fittings. If making collars, throats, and tips for scabbards, you may even want 1.25". Cut the pipe with a hack saw or on the metal cutting band saw. Sticking a wooden dowel in the pipe when cutting makes it easier to control.
Copper needs to be annealed to work it. Hammering on it will harden it, and it will need to be re-annealed regularly. Just heat copper to a dull red glow and quench in water. That will return it to dead soft. Copper takes on a great look when hammer worked with a ball faced hammer. take a small ball peen hammer and grind the ball down to be a less pointed curve. Sand to 400 grit and polish the face. The shinier the face, the smoother the dimples left by it. Once the copper is about 75% shaped to the desired size, start working it with the ball faced hammer. This will continue to stretch the fitting. Obviously, you want to be working on a steel mandrel. The mandrel does not need to be the exact shape of the final fitting, but it is nice if it is close. You can shape the fitting to the final size after the last annealing.
To clean the copper up, soak in pickle for a short while. Pickle is a term for an acidic solution to remove oxides from metal. There are many commercial pickles, like Sparex, but a couple tablespoons of Ph-Down in a quart of water works fine. Freshly pickles and then buffed with steel wool will make the copper shiny golden color. However, patina will soon form and make it the reddish color we all know as copper.
To darken the fitting to a wonderful look - after all work, shaping, pickling, sanding and buffing is done - use a solution of Livers of Sulfur to get a great silvery black look. Soak the fittings in the solution for as long as needed to turn black ( I leave them for several hours), wash off and rub with the finest steel wool you can get, wash well to remove all oils from your hands and the steel wool, and soak again in the solution. Repeat until it has that wonderful glowing look of aged silver fittings or Japanese shakudo. This black look will last almost forever.
 
Stacy,

Thank you for posting the information you have already. This post has made planning out my first of these knives far easier. I am left wondering about the width of the blade however. I was thinking 1'-1.25" would be correct and am hoping you could confirm for me.

Regards,

Matt
 
Back
Top