-
The BladeForums.com 2024 Traditional Knife is available! Price is $250 ea (shipped within CONUS).
Order here: https://www.bladeforums.com/help/2024-traditional/
You are using an out of date browser. It may not display this or other websites correctly.
You should upgrade or use an alternative browser.
You should upgrade or use an alternative browser.
Sharp inside corners and Stress Risers.....
- Thread starter Cushing H.
- Start date
I have solution for youI am still looking at emulating the guard construction technique demonstrated in the Loveless video - and I am still pondering something: Loveless makes no point at all about having a sharp inside corner in the notch he grinds out for his bolster/guard - he just profiles it and sends it out for heat treating. *Yet* - there is this pervasive statement on this forum that one should NOT have a sharp inside corner, because this acts as a stress riser - and can/will lead to fracture at that point during HT.
Question: has anyone actually experienced a crack/failure of a blade, especially during HT, that started at a sharp inside corner?
- Joined
- Jun 3, 2019
- Messages
- 2,714
You know .... somehow it seems like you really "can not get there from here....". There has been previous discussion about thicker blades not always being better - with something like 0.09 to 0.1 inch thickness being quite acceptable for skinners. However, if one needs to build a skinner with a notched guard/bolster, then you need to mill the slot. While there do exist 1/6 inch diameter endmills, they do not have much depth of cut, and are pretty easily broken. so.... if you are constrained to effectively cut a minimum width slot in a bolster of 1/8 inch, then you are constrained to using steel that is *greater* in thickness than 1/8 inch. In my current case, my steel measures 0.130" thick - after HT and surface grinding it is going to lose a little of that. Whether it goes below 0.125 I guess we will have to see. I dont know, maybe I had better deviate from Loveless and drill my holes for the guard pins *after* HT (can anyone say "carbide bit"), so that I can fiddle with dimensions of the guard when I know what the final thickness of the blade will be....
Grrrrrr.......
Grrrrrr.......
- Joined
- Mar 10, 2013
- Messages
- 1,074
- Joined
- Jun 3, 2019
- Messages
- 2,714
I decided to grab some time in the shop today to see what would happen..... Used the mill to carve out a "slot" in the blade (one sided, open to the handle side - opposite of what Loveless seems to do - just the way my geometry worked out....), and got a 1/8" slot milled into the guard material...
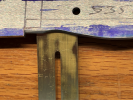
Absolutely needed to round the handle material at the bottom of the one-sided slot to mesh with the curve in the guard slot. This really only took a couple minutes - easy!
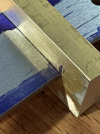
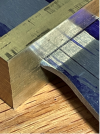
Loveless's approach of clamping the bolster with vise grips while drilling the pin holes worked extremely well (these drilled with a #11 drill for 1/8" pins - either brass or mosaic...
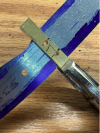
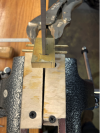
I have no idea how cleanly things will fit up after HT - but looks reasonable so far. Still - that clearance between the 1/8" milled slot in the guard and the actual thickness of the blade is really touchy. got lucky this time - definitely not something to rely on.....

Absolutely needed to round the handle material at the bottom of the one-sided slot to mesh with the curve in the guard slot. This really only took a couple minutes - easy!


Loveless's approach of clamping the bolster with vise grips while drilling the pin holes worked extremely well (these drilled with a #11 drill for 1/8" pins - either brass or mosaic...


I have no idea how cleanly things will fit up after HT - but looks reasonable so far. Still - that clearance between the 1/8" milled slot in the guard and the actual thickness of the blade is really touchy. got lucky this time - definitely not something to rely on.....
- Joined
- Sep 6, 2014
- Messages
- 5,137
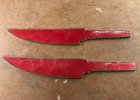
For what it's worth my thought is if you your hidden tang on the beefy side you should never have a problem with the knife breaking. I have a 20 year old hidden tang, 4" blade drop point hunter scab knife, I use in me shop as a shop knife. It has a 3/16" ATS-34 blade HRc-59-60, I clamped the blade in my vise about an 1/8" from the guard and pushed and pulled as hard as I could several times and I couldn't even manage to flex it much less break it.

- Joined
- Feb 27, 2006
- Messages
- 5,191
In Loveless they make lot of knife , it is some kind of production .They must keep production as simple as they can .Slot in guard is milled and they leave that half round end because to make it square need lot more additional work , .Rounding on ricasso is more simple/ forgiving and faster step then to square guard slot .
natlek- i agree, its easier to round the ricasso than square the guard, but its flat on the utility knives i have seen. if rounding was easier, i figured they would do it on all the knives. there must be some reason they are different.
- Joined
- Feb 27, 2006
- Messages
- 5,191
cushing, just letting you know the drop point hunter has the tab for the guard to rest on behind the guard, and the utility has the tab in front of the guard. you are still in "loveless territory". he used both. are you using stainless or high carbon? the gap does not really seem to enlarge much after post heat treat finishing. the solder seems to have no problem filling the gap. you project looks good.
- Joined
- Jun 3, 2019
- Messages
- 2,714
Thanks john. I never really set out to exactly replicate the loveless hunter ... just to use the profile for inspiration. Not sure exactly why but the geometry between handle and ricasso ended up requiring the tab in the front of the guard. Like you said - it should still work...cushing, just letting you know the drop point hunter has the tab for the guard to rest on behind the guard, and the utility has the tab in front of the guard. you are still in "loveless territory". he used both. are you using stainless or high carbon? the gap does not really seem to enlarge much after post heat treat finishing. the solder seems to have no problem filling the gap. you project looks good.
The steel on that particular blade is s35vn, so i guess it should not require much surface griding after HT....
Thanks also for the "good" comment. I do mostly cooking knives (this is only my third skinner) and so uses slightly different techniques. Interesting learning experience...
- Joined
- Jun 3, 2019
- Messages
- 2,714
Oh ... and i am thinking i will not solder - instead use jb weld and peened pins. Soldering has been a little touchy for me, and ive had good luck with jbweld. Ive een discovered how to make peened brass pins virtually invisible...cushing, just letting you know the drop point hunter has the tab for the guard to rest on behind the guard, and the utility has the tab in front of the guard. you are still in "loveless territory". he used both. are you using stainless or high carbon? the gap does not really seem to enlarge much after post heat treat finishing. the solder seems to have no problem filling the gap. you project looks good.


