-
The BladeForums.com 2024 Traditional Knife is available! Price is $250 ea (shipped within CONUS).
Order here: https://www.bladeforums.com/help/2024-traditional/
You are using an out of date browser. It may not display this or other websites correctly.
You should upgrade or use an alternative browser.
You should upgrade or use an alternative browser.
Should I wait for the Custom shop to reopen?
- Thread starter ipreferpie
- Start date
- Joined
- Aug 31, 2013
- Messages
- 3,197
I don't remove them. If you do a good job getting the coating off you'll never know that there's still any under the scales.What's the proper method for removing the handles?
- Joined
- Jan 29, 2010
- Messages
- 9,859
Look at some of the work AZTim as done recently !!!!! Handles....blade finish.... I am just waiting to find the right blade in the US to then try and negotiate something myself !!!!
gk4ever2
Gold Member
- Joined
- May 1, 2008
- Messages
- 2,632
gk4ever2 said: ↑
Jerry posted the 36 month timing on 10/7/2015, so does that mean the Custom Shop will reopen in about 1 year? (please )
)
Hmmm . . . good question. . . we all know how bad I am with guesstimates on timing. . . Might be 36 years!
Let's Drink!
Jerry
-----------------------------------------------------------------------------------------------
The above is what Jerry said about the Custom Shop on 9/29/2017 in another thread. Apparently reopening the CS to customer requests is not a priority.
Jerry posted the 36 month timing on 10/7/2015, so does that mean the Custom Shop will reopen in about 1 year? (please
Hmmm . . . good question. . . we all know how bad I am with guesstimates on timing. . . Might be 36 years!
Let's Drink!

Jerry
-----------------------------------------------------------------------------------------------
The above is what Jerry said about the Custom Shop on 9/29/2017 in another thread. Apparently reopening the CS to customer requests is not a priority.
- Joined
- Oct 10, 2010
- Messages
- 289
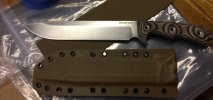
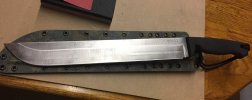
View attachment 780463 View attachment 780464 I just stripped these. I etched the logo first then stripped with handles on so the paint stays on under them. Then sand by hand with various grit size until it looks good. Also made the sheath. It is a lot of fun!
Sweet pics. I love the look of stripped INFI. Is is possible to texture the handles without removing them? Or do they have to be removed to be modded? I think my G10 scales are a bit too smooth
- Joined
- Apr 2, 2015
- Messages
- 127
I don't think so, since you wouldn't want to change the profile where it meets the metal. I have never sanded the grips, yet. They are easy to remove and put back on though. I have done it with brass and stainless tubing. Main reason was to be able to sand the steel near the grips easier. There are a couple threads you can search up here that explain how to do it. I didn't do it to the last couple I stripped due to laziness.Sweet pics. I love the look of stripped INFI. Is is possible to texture the handles without removing them? Or do they have to be removed to be modded? I think my G10 scales are a bit too smooth
- Joined
- Jun 13, 2016
- Messages
- 542
View attachment 780463 View attachment 780464 I just stripped these. I etched the logo first then stripped with handles on so the paint stays on under them. Then sand by hand with various grit size until it looks good. Also made the sheath. It is a lot of fun!
Looks really good. Would love to strip my SYKCO 311. Is there a special way to do this? I've checked YouTube and everyone seems to have different methods of stripping their knives. I'd love to get mine to look like yours. Or maybe you can direct me to the perfect thread on doing this. Once again, great job


- Joined
- Apr 2, 2015
- Messages
- 127
Looks really good. Would love to strip my SYKCO 311. Is there a special way to do this? I've checked YouTube and everyone seems to have different methods of stripping their knives. I'd love to get mine to look like yours. Or maybe you can direct me to the perfect thread on doing this. Once again, great job
Link to etching thread...
https://www.bladeforums.com/threads...need-help-please.1440609/page-3#post-16954593
Link to stripping thread...
https://www.bladeforums.com/threads/tips-on-strippin.743659/
Before you start, please understand that the bare metal can have varying degrees of dimples from the heat treat process. Both of the ones in the pics in my earlier post had very little dimples and required limited sanding to look like that. I did have one that had a lot of deep dimples on one side and it required a ton of sanding, actually an insane amount - so please be prepared. Its normal and kinda the luck of the draw, although in my experience I have had only one like that out of six.
Here's how I did the two in my earlier post...
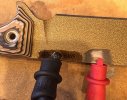
1. I used a 12V diesel truck battery, two wires with alligator clips, q-tips, vinegar and salt solution. First I sanded a section of the blade to bare metal for the positive contact to connect to. Then connected the blade to the positive terminal of the battery. The other wire (black in the pic) was connected to the negative terminal of the battery. I cut the stem off the q-tip and put the cotton part in the jaws of the alligator clip. Then dipped it in the vinegar solution and brushed it evenly over the logo. At first I dip it in the solution after every pass to get the logo covered in solution. Repeated it until I got the depth I was looking for. You will know when its working when you see bubbles coming off the logo. I usually go back and forth, dipping as necessary to keep the logo wet 20 or 30 times. Depending on the size of your power source it could take more or less. The q-tip will get black and begin to not work so well, so I replace it when this happens. I usually go through two or three before its done. Once its done I wiped off the solution and put some Brownells Oxo-Blue on it to darken the logo and leave it one during the stripping.
A word of caution here... if you notice any of the paint chip off around the logo stop immediately or the exposed bare metal will get etched too. Also, don't sand the bare metal for the positive clip too close to the logo either, you don't want solution to get there or you'll have a short or etch that metal. Try to go evenly with your strokes because you want to remove metal in the logo uniformly. Don't dwell too long over any one letter in the logo.
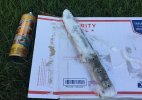
2. Spray down the knife with handles using a paint stripper. I didn't mask them off because they were both G-10, no ill effects. I did a couple with micarta and, however, I not 100% sure but I think it softened the texture a little. In the future I will either saturate them with mineral oil so they don't absorb stripper or mask them. I used Kleenstrip in the aerosol can, but any brand should work well. I let it set soaked in stripper for 15 minutes then brushed off the paint with a stainless steel brush and sprayed off the excess stripper/paint goo with a water hose. If any paint remains, repeat. You might want to wear plastic gloves and safety glasses, the stripper burns skin.
3. Then I sand the blade down to my liking. For these two I used a foam pad glued to a board as a backer, and put the sand paper on that. Making back and forth strokes with light pressure. Be careful not to push to hard or you risk touching the sharpened edge and dulling it. I started on these with 120 grit, then 220 and finished with 400. It took about an hour per knife for sanding. (I just left the areas around the handles that were too close to get as is, its like a primer or something that was left after the stripping).
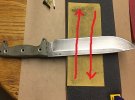
Good Luck! Please post a pic when you get it done.
- Joined
- Jun 13, 2016
- Messages
- 542
Link to etching thread...
https://www.bladeforums.com/threads...need-help-please.1440609/page-3#post-16954593
Link to stripping thread...
https://www.bladeforums.com/threads/tips-on-strippin.743659/
Before you start, please understand that the bare metal can have varying degrees of dimples from the heat treat process. Both of the ones in the pics in my earlier post had very little dimples and required limited sanding to look like that. I did have one that had a lot of deep dimples on one side and it required a ton of sanding, actually an insane amount - so please be prepared. Its normal and kinda the luck of the draw, although in my experience I have had only one like that out of six.
Here's how I did the two in my earlier post...
1. I used a 12V diesel truck battery, two wires with alligator clips, q-tips, vinegar and salt solution. First I sanded a section of the blade to bare metal for the positive contact to connect to. Then connected the blade to the positive terminal of the battery. The other wire (black in the pic) was connected to the negative terminal of the battery. I cut the stem off the q-tip and put the cotton part in the jaws of the alligator clip. Then dipped it in the vinegar solution and brushed it evenly over the logo. At first I dip it in the solution after every pass to get the logo covered in solution. Repeated it until I got the depth I was looking for. You will know when its working when you see bubbles coming off the logo. I usually go back and forth, dipping as necessary to keep the logo wet 20 or 30 times. Depending on the size of your power source it could take more or less. The q-tip will get black and begin to not work so well, so I replace it when this happens. I usually go through two or three before its done. Once its done I wiped off the solution and put some Brownells Oxo-Blue on it to darken the logo and leave it one during the stripping.
A word of caution here... if you notice any of the paint chip off around the logo stop immediately or the exposed bare metal will get etched too. Also, don't sand the bare metal for the positive clip too close to the logo either, you don't want solution to get there or you'll have a short or etch that metal. Try to go evenly with your strokes because you want to remove metal in the logo uniformly. Don't dwell too long over any one letter in the logo.
View attachment 782149
2. Spray down the knife with handles using a paint stripper. I didn't mask them off because they were both G-10, no ill effects. I did a couple with micarta and, however, I not 100% sure but I think it softened the texture a little. In the future I will either saturate them with mineral oil so they don't absorb stripper or mask them. I used Kleenstrip in the aerosol can, but any brand should work well. I let it set soaked in stripper for 15 minutes then brushed off the paint with a stainless steel brush and sprayed off the excess stripper/paint goo with a water hose. If any paint remains, repeat. You might want to wear plastic gloves and safety glasses, the stripper burns skin.
View attachment 782150
3. Then I sand the blade down to my liking. For these two I used a foam pad glued to a board as a backer, and put the sand paper on that. Making back and forth strokes with light pressure. Be careful not to push to hard or you risk touching the sharpened edge and dulling it. I started on these with 120 grit, then 220 and finished with 400. It took about an hour per knife for sanding. (I just left the areas around the handles that were too close to get as is, its like a primer or something that was left after the stripping).
View attachment 782161
Good Luck! Please post a pic when you get it done.
Thanks rsdeke!
 I will try and get started with this hopefully sometime this week. Just waiting on Thursday's grab bag to get in and see if there's anything else I'd like to strip. I'll be sure to contact you if I get stuck with anything along the way. Once again, Thanks for the excellent write up

- Joined
- Jan 29, 2010
- Messages
- 9,859
And remember INFI and SR101 look a little different to each other stripped.
- Joined
- Jun 13, 2016
- Messages
- 542
Is it worth doing the sr101? Or should I strip an INFI? Thanks in advance for the responseAnd remember INFI and SR101 look a little different to each other stripped.
- Joined
- Dec 8, 2011
- Messages
- 4,071
They're both worth stripping


- Joined
- Jun 13, 2016
- Messages
- 542
Beautiful!They're both worth stripping


- Joined
- Dec 8, 2011
- Messages
- 4,071
Thank you
And you're welcome
And you're welcome

Beautiful!I've been convinced. Thanks Icky.

- Joined
- Jan 29, 2010
- Messages
- 9,859
INFI just looks very special when stripped. SR101 more like most steels you are familiar with.

