Solder help wanted

Hengelo_77

Basic Member
Joined
Mar 2, 2006
Messages
6,219
I want to learn to solder bolsters on to liners (slipjoints)
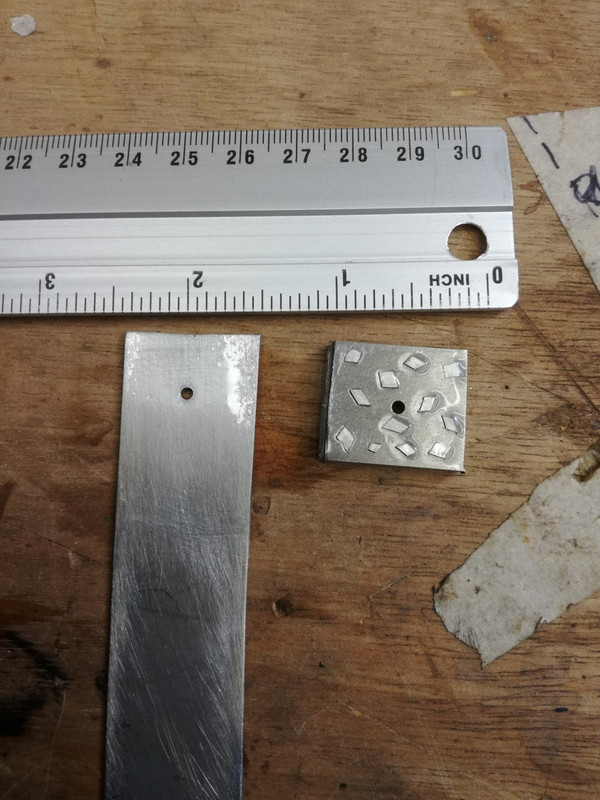
I've made several test pieces and as you can see without good result.

It is stainless steel, the solder I have is 4%Ag and I have special stainless flux.
I've sanded the steel to either 180/240/400 grit and cleaned with alcohol or acetone.
I put a layer of flux on the steel, either as much as the brush leaves behind or half that.

I flatten the solder, clean it with a fine file, clean it with acetone and even clean the tweezers I use to put the solder on the steel with acetone. I use as much(or little) as Steve Culver shows in his slip joint book.
A few times I put a little flux over the pieces of solder but not always.

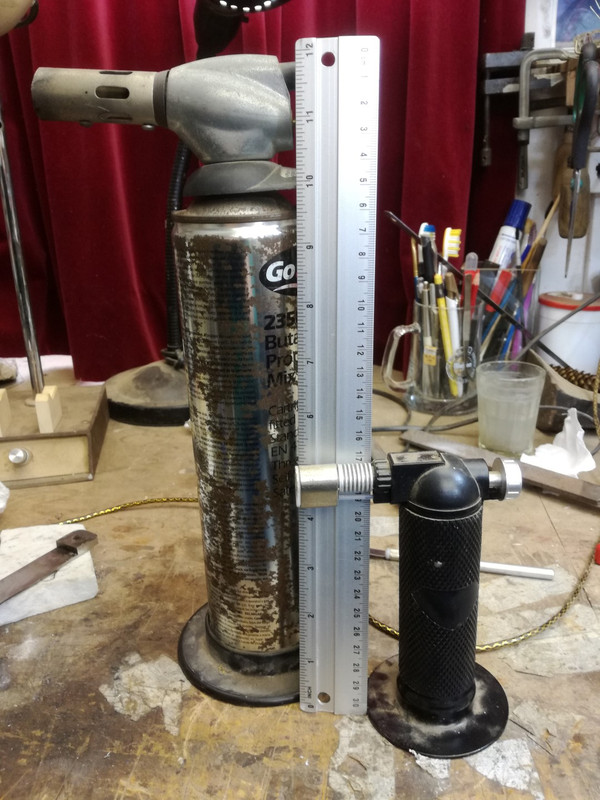
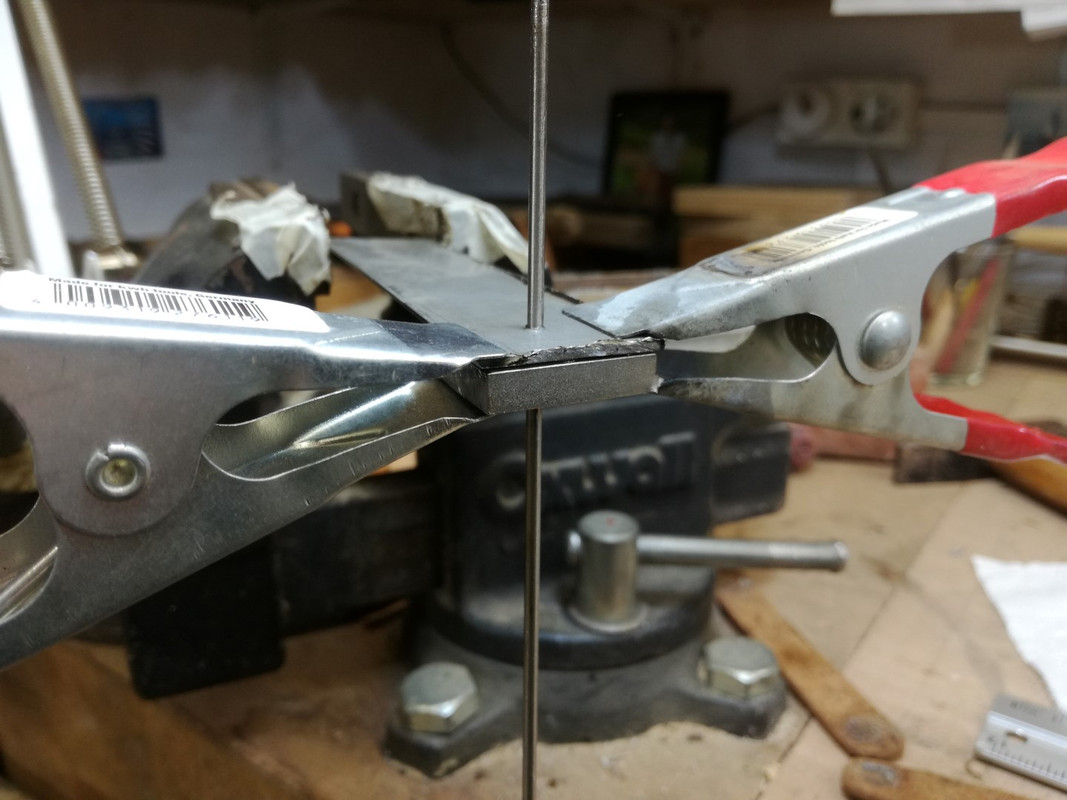
I try to heat slowly from below with a small flame (crème brûlée burner) have 4" to 6" distance between the burner and the steel and I move it around.
The flux bubbles and creates a foam like substance before the solder melts.

I have a piece of sharpened Ti roundstock to try and spread the liquid solder.

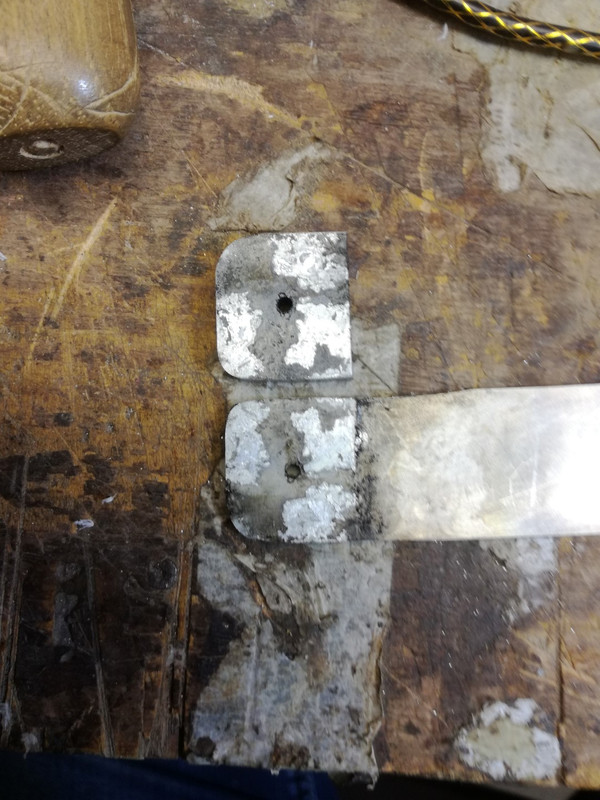
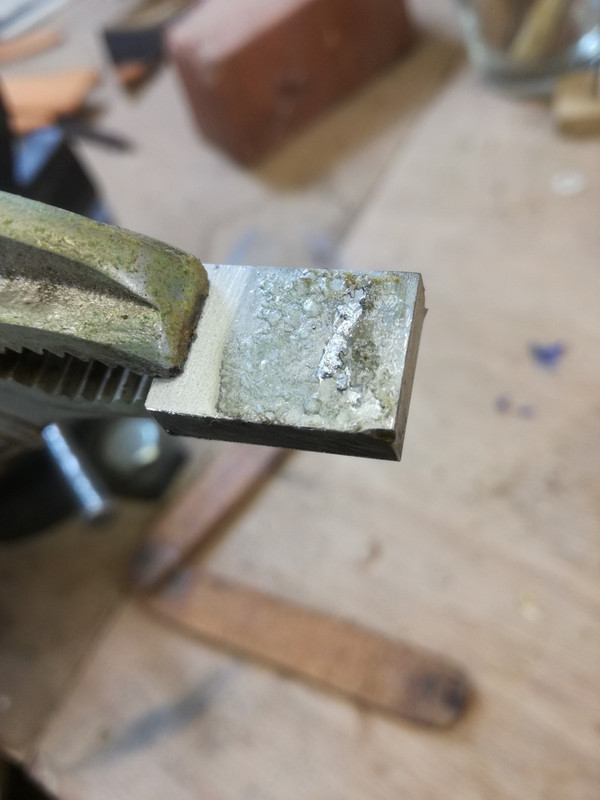
I just don't get it to flow properly.
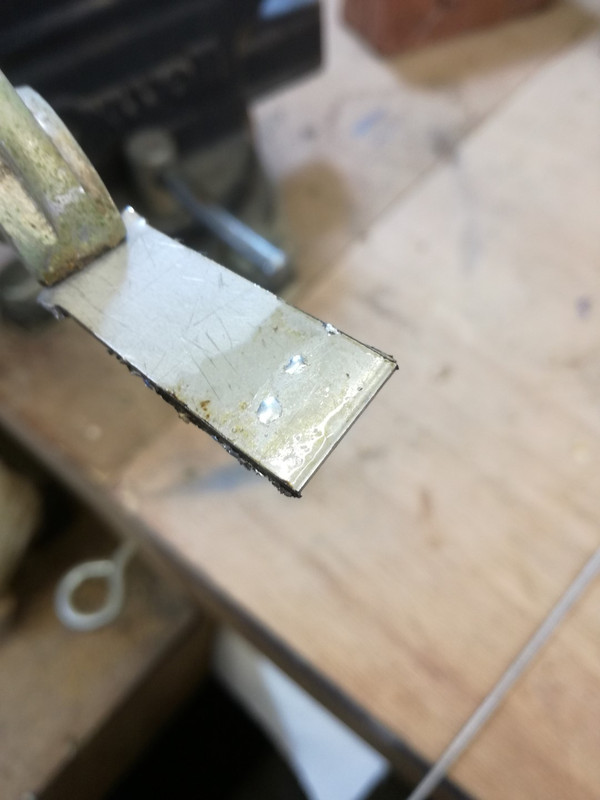
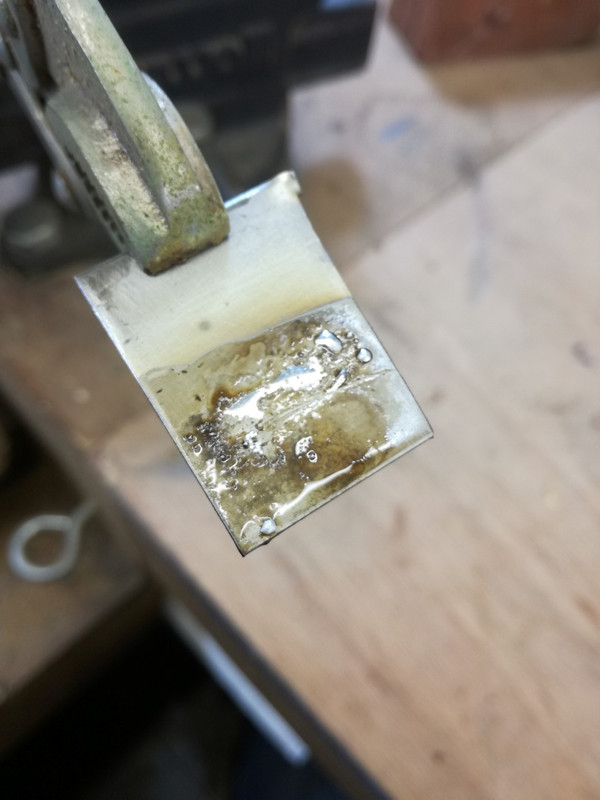
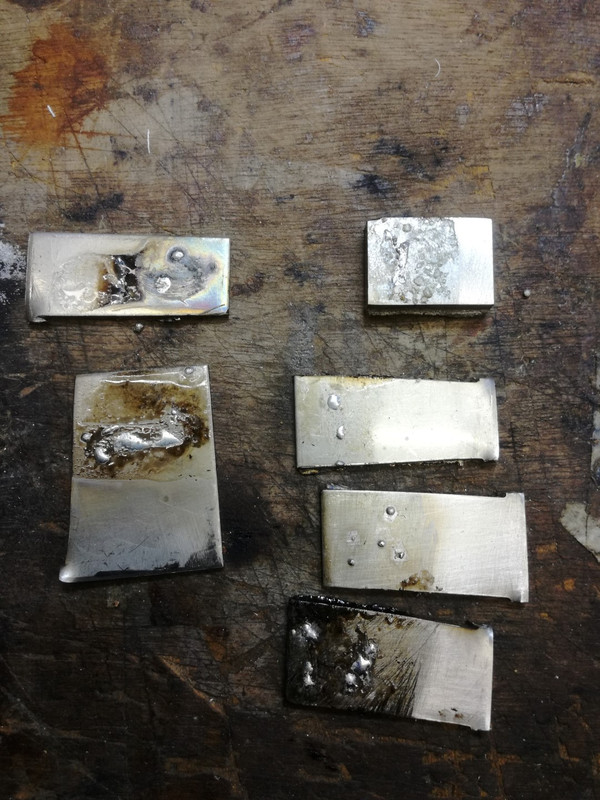
Sometimes it forms small balls. That means it preferst to adhere to itself over adhering to the steel.
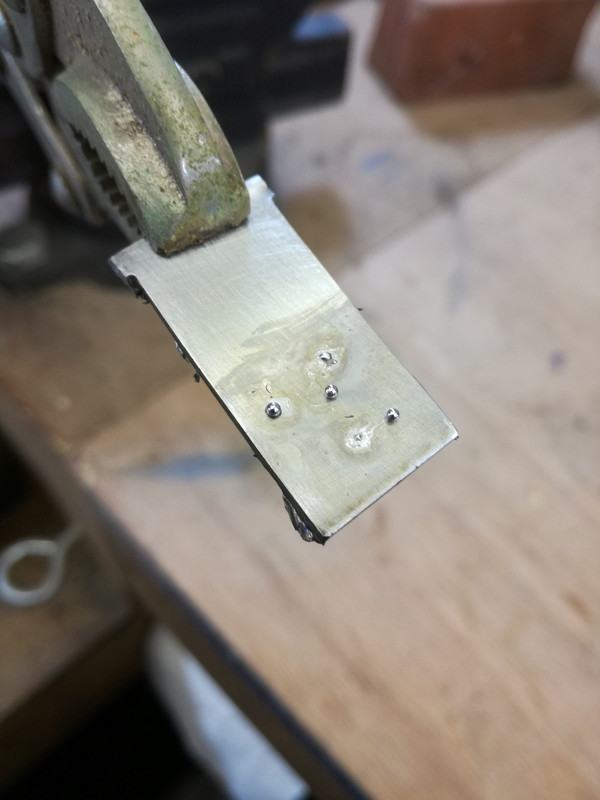
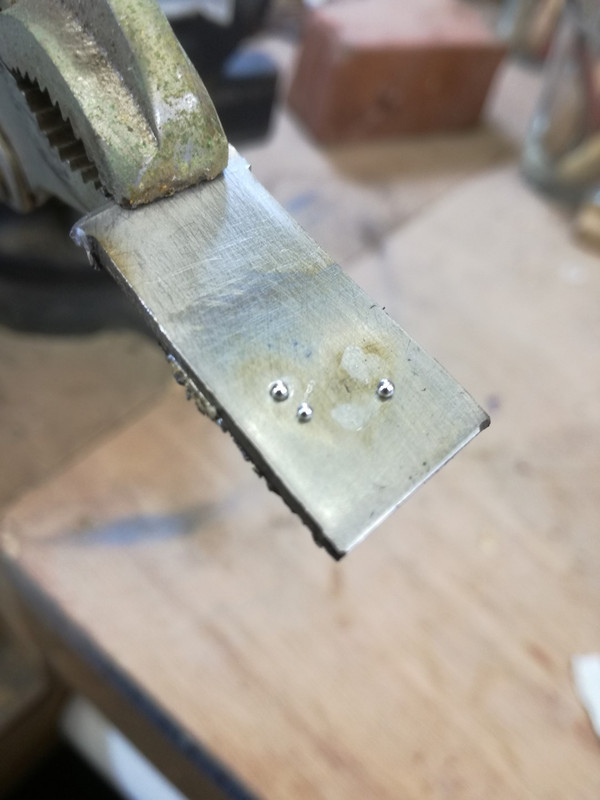
Other times it melts but hardly spreads. I try not to burn the flux then but sometimes it turns brown.

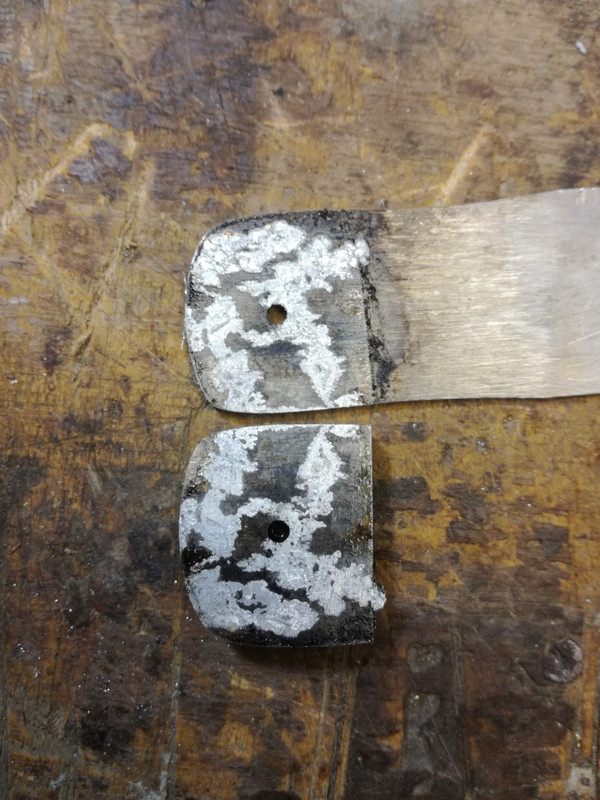
Here are some photo's of my test pieces.
What am I doing wrong?
Am I using to little solder? Is my flux bad?
My flux is a few years old but all shops are closed today over here.
I also tried a paintstripper but I don't get it hot enough to melt the solder.

IMG-20201003-105827.jpg


IMG-20201003-111055.jpg


IMG-20201003-112321.jpg


IMG-20201003-112940.jpg


IMG-20201003-120727.jpg


IMG-20201003-123301.jpg


IMG-20201003-123404.jpg
 
i would try roughing up my solder area only,maybe like 220 grit on both pieces the scale and bolster.
after both pieces have a small pool of solder on them ,put them in place with vise grip type pliers keeping pressure on them and heat from below with the smallest tipi could watching for the solder to become liquid on both parts at about the same time. move the flame around he area to be joined so the part is heated as evenly as possible.
i have had good success with putting the solder strip on then covering with a drop of flux over it... hope this works out well for you
 
Stop sanding and cleaning. By the time you have done all that, the stainless will have surface oxidation.
When you are ready to solder, file the mating surfaces bright. Flux, heat and apply solder. Heat all the parts evenly. Solder flows toward heat.
If you clamp clamp only with enough pressure to hold the parts in place and make sure your clamp does not act as a heat sink.
 
After reading it I was thinking you were using something like a candle and was going to say maybe your heat wasnt hot enough... then I googled crème brûlée burner , so ???

Stan do you bother with cleaning with acetone ? I have only soldered bolsters a couple times and used the method in Tony's tutorial But going to try your method. Looks like it uses a lot less solder and would be quicker too.
 
In my experience the number one cause of solder joint failure is overheating the joint. The solder we use melts at 400°F or lower. The solder type is also important. Your solder should have worked fine. I use TIX most of the time. It melts at 275°F, stays bright, and is quite strong.

A crème brulee burner has a very hot flame made to caramelize (burn) sugar. Some deliver several thousand BTUs.

I use a small jewelers torch with a tiny barely hot flame. The Smith Torch and Little Torch are the most common ones. They have clones available online that are really low cost. They can be run on disposable oxygen and propane bottles.
 
Hot air gun with regulation of temperature ............it heat fast , clean end evenly .
 
Last edited:
Stacy ... my xperience with soldering is mostly electronics and copper piping ... but I’ve done a few fixed blade bolsters, and the principles seem universal. Sand the parts, apply flux, heat (no solder) until the part is hot enough to melt the solder ... then apply solder. To me, given the “rounding” of the solder, these look like “cold joints”. ... the solder was directly melted, but the part never got hot enough to melt the solder given its own heat. Not sure how this jibes with your “overheating” comment .... but that is what this looks like to me.

there is an old adage- “heat the part not the solder”. Try this again with no solder on the joint. Heat, periodically just touching the solder to the part (not in the flame) until you see the solder melt. At that point As you “feed” the solder, it should just flow out to the points that have been fluxed, and which are hot enough to keep the solder melted. Also, once the part gets hot enough to melt the solder, you can remove it he flame
 
Natlek hasd a good alternative. A heat gun works well.

Cushing, I do pretty much exactly what you describe.
"there is an old adage- “heat the part not the solder”. Try this again with no solder on the joint. Heat, periodically just touching the solder to the part (not in the flame) until you see the solder melt. At that point As you “feed” the solder, it should just flow out to the points that have been fluxed, and which are hot enough to keep the solder melted. Also, once the part gets hot enough to melt the solder, you can remove it he flame"
 
Yeah .. you learn that lesson quickly with electronics. If you just melt the solder directly, all you get is a mechanically brittle joint that is also electrically Speaking junk.
 
Stan do you bother with cleaning with acetone ? I have only soldered bolsters a couple times and used the method in Tony's tutorial But going to try your method. Looks like it uses a lot less solder and would be quicker too.
No I didn't clean with anything, just a quick sanding before fluxing.
It worked well for me, but now I make all integral .
 
Thnx for all the replies.
I've watched Tony Bose's vids a few times.
One thing I noticed is that is looks like he uses a lot of solder to tin the pieces, a whole curl.
Or am I mis-seeing it?

I am making progress but I'm not there yet.

Here are the two torches I have. I tried the large one but I don't like the flame that comes out of it.
I'll buy a new one if that is the problem but I know close to nothing about them. And American brands are hard to get or very expensive in Europe.

IMG-20201005-164203.jpg


This is how I prepare the two pieces, both pieces fluxed and flattened 4%Ag.

IMG-20201005-161427.jpg


Then all clamped in the vice and heated from underneath.
After a while the solder gets soft and the spring pressure from the clamps squashes it. You can see the gap disappear.
But this seems to happen before the bolster is hot enough to melt an extra piece of solder I touch the bolster with to check.

IMG-20201005-161717.jpg


And this is the kind of result I get.
To me it looks like the solder melts but doesn't flow.
It does take strong blows with a hammer to get the pieces apart.

How to go from here?
More heat? More solder? More/different flux?

IMG-20201005-164334.jpg


IMG-20201005-192941.jpg
 
Forgot to mention, I sand the parts to be joined with 100grit paper on a marble plate and immediately flux.
The idea is that where there is flux the stainless can not oxidize
 
From what you say, my impression is that you are not getting the part hot enough. I also think This business of pre-placing solder inside the joint is really bad practice (you don’t really see when it flows, and you don’t know if you have added enough) I’m going to capitalize what I write next to try to make this really clear.

SAND AND FLUX THE SURFACES AND PUT THEM TOGETHER. DO NOT ADD SOLDER. HEAT THE PART UNIFORMLY UNTIL SOLDER TOUCHED TO ONE SIDE OF THE JOINT BEGINS TO MELT AND FLOW INTO THE JOINT. IF HOT ENOUGH, SOLDER WILL WICK INTO AND FILL THE ENTIRE joint. CONTINUE TO FEED SOLDER INTO THE SIDE UNTIL YOU SEE THE ENTIRE JOINT FILLED. REMOVE HEAT AND STOP SOLDER FEED.

if fluxed well, and hot enough, solder will very aggressively wick into and throughout the joint. There is a little bit of a trick to not adding so much solder that it makes a mess by seeping out and pooling outside of the joint ... but that comes with practice
 
Last edited:
True what Cushing said.
Still, what color is your soldering flame? All blue is what you want, a yellow flame means you're not burning all your fuel (propane, aceteline, butane etc.). A yellow flame leaves residue which inhibits the flow of the solder. Lastly I suspect too low a heat, or the wrong flux/solder combo.
 
Back
Top