Son of Blubenza

Maprik

Gold Member
Joined
May 17, 2012
Messages
2,772
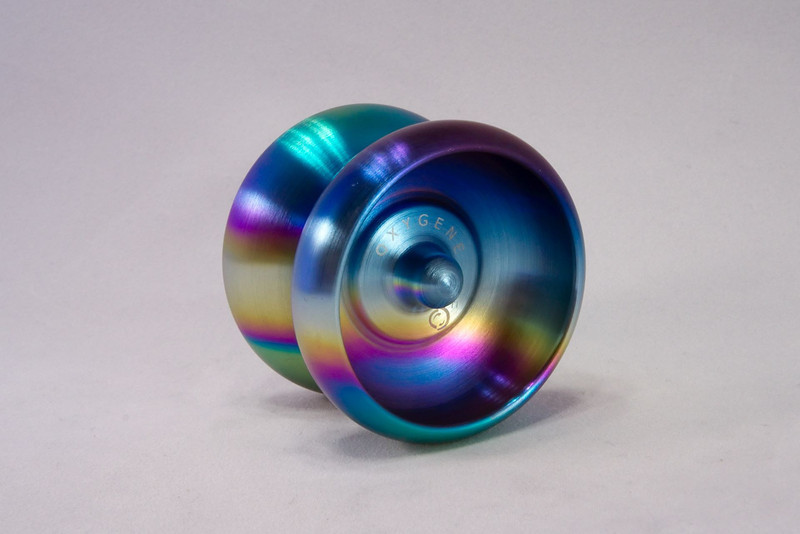
I hit the blue I was looking for today. Stonewashed cobalt blue at 24.6V and I left the lockside stonewashed and anodized the clip. I'm figuring this out. Fanatical degreasing prep and careful handling during the anodizing is critical to an even color. I had to redo this 4 times today and stonewash twice... but I'm happy with the result. Darker marks on the handle are from finger oil AFTER the anodizing. I wonder if there is some way I can coat the handle afterwards with a clear coat that will protect it from the color changes from finger oils. Any ideas?


Son of Blubenza by GermoneGold, on Flickr


Son of Blubenza 2 by GermoneGold, on Flickr
 
Last edited:
I actually really like the aggressive stonewash. I love exaggerated, extra scratchy stonewashes, and I especially like how the blue is deeper around the hardware and on the lockbar.
 
Sorry Rob - I deleted the first pic of the super aggressive stonewash. This one right?


IMG_0461 by GermoneGold, on Flickr

That finish no longer exists. While I too like the aggressive stonewash look that one just looked like the handle was dirty and almost abused because of the intense scratching... I'll post pictures in natural light tomorrow and you'll see that this current version still has a nice noticeable scratchy stonewash...
 
Would a rinse in acetone aka fingernail polish remover (unscented) remove all the finger oils prior to anodizing?
 
Would a rinse in acetone aka fingernail polish remover (unscented) remove all the finger oils prior to anodizing?

Actually I used a combination of a first toothbrush scrubbing and rinse with Glass Plus and then another scrubbing and rinse with Folex Carpet Cleaner. This really fixed the splotchiness of the anodizing and this current scale is near perfect. The darker marks on the handles now are caused by my finger oils on the finished scale. From my reading it seems that the lower voltage bronze, purples and blues are very affected by fingerprints. I'd like to find out how to coat the scale with some kind of clear coating to eliminate this. Not that it's really that bad, some might actually like how the colors can vary slightly from light blue to dark blue. I've found similar posts by other amateur anodizers asking this same question for the same issue and so far I've seen one person suggest Pledge furniture polish. I may try that although it may make the handle slick feeling...
 
I love the work you are doing with anodizing the sebenza! It really looks great. I would love to see where else you can take this.

I did a google search and found a photo of a Sebenza with the 'splash' anodizing that I mentioned in your other thread...

sebenza01.jpg

sebenza02.jpg


If you do a google search for anodized YoYo and anodized Titanium YoYo, you will find some incredible anodizing jobs involving multiple vibrant colors.

Here are some examples anyways.. the first two were done on aluminum and the next three were done on titanium...

DSC01780-L.jpg

DSC02540-L.jpg


4042030700_b7c55357e1.jpg

DSC02551-L.jpg

DSC02553-L.jpg


And here is a Sebenza that was anodized and sharpened by Tom Krein (It looks very similar to the technique used on the titanium yoyos pictured above)...

blue2.jpg


I could see you taking custom anodizing to a whole new level with the Sebenzas and Umnumzaan! I'd get in line for one without a doubt!
 
Last edited:
Can you do the splash thing through a stencil? That would open up a lot of possibilites.
 
I love the work you are doing with anodizing the sebenza! It really looks great. I would love to see where else you can take this.

I did a google search and found a photo of a Sebenza with the 'splash' anodizing that I mentioned in your other thread...

sebenza01.jpg

sebenza02.jpg

Jackson Pollock would be proud:thumbup:

(drunk and angry, but proud in his own kind of way:D)
 
Can you do the splash thing through a stencil? That would open up a lot of possibilites.

I've seen it done on aluminum YoYos but not on titanium.

From what I have seen, it looks as though it is very hard to do and it seems that it can get very messy/hard to keep within the lines. That would be incredible though!
 
Burnside - Thanks!!!! I have much to learn! The great thing is that I'm finding that the Sebenza handles are basically the perfect surface for artistic exploration. They can be returned to a clean slate so easily with scotch brite, stone-washing, bead-blasting, sand blasting, etc. I stripped and re-did my knife 4 times yesterday because I am pretty nit-picky about things. Each time I scotch-brited and stonewashed the handles I marvelled at how good they can look in so many finishes. If I had more $$$ I'd have a collection of bronze, blue, plain stonewashed, plain scotch brited, green, and maybe some splash anodized color combinations for my favorite sports teams like that first pic you posted of the classic seb. Green/Yellow (UofO Ducks), Black and Orange (Beavers), Red White and Blue (Pats), etc....
 
I did see a YouTube video where a guy used a stencil to anodize a purple lightening bolt onto a Ti pipe using a small rag soaked in Pepsi. It does definitely open up a huge realm of designs, patterns, etc. Rubber cement could be painted onto the handles as well to create all kinds of multicolored options. Just gotta plan carefully to start with the low voltage colors and then move up while covering parts of the handle with stencil or rubber cement or hot glue.
 
Red White and Blue (Pats), etc....

I want a Superman Sebenza! An etched UG Superman logo with red, white, and blue anodizing would be epic!

I did see a YouTube video where a guy used a stencil to anodize a purple lightening bolt onto a Ti pipe using a small rag soaked in Pepsi. It does definitely open up a huge realm of designs, patterns, etc. Rubber cement could be painted onto the handles as well to create all kinds of multicolored options. Just gotta plan carefully to start with the low voltage colors and then move up while covering parts of the handle with stencil or rubber cement or hot glue.

rubber cement if usable would open up a ton of design possibilities! I like where you are going with this.
 
splash anodizing looks complicated but its not actually that hard.

All it takes is nail polish and an anodizer.

The nail polish blocks the oxidizing of the ti while your getting the other color on the bare ti.

The nail polish can be any color, doesn't matter.

I believe John Grimsmo on youtube has videos of splash anodizing. look it up.
 
Back
Top