Stabilized wood fail

Joined
Aug 4, 2008
Messages
88
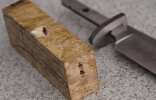
Has anyone had this (see attachment) happen before to a piece of stabilized wood as they were drilling it?

You can see my drilled holes for the tang hollow.. I didn't see it happen but when I took it out of the vice I saw that the side of the block had basically blown out.

I drilled slowly, brand new drill bit and I was using a drill press.

These blocks cost a lot of money to get down to Oz and it was my last one... I was hoping to finishing this knife tomorrow but looks like I'll be waiting a few weeks to get some more wood. I don't want to have the same thing happen again next time, so is this just bad luck or was I maybe doing something wrong?

Cheers all,
 

Attachments

  • exploded.jpg
    exploded.jpg
    38.2 KB · Views: 202
I had one break in half on me yesterday, just as I was finishing up and doing a test fit:( I contacted the place I bought it from and it turns out that even just drilling slowly can cause the stabilizing agent to expand and split the wood along a fault/grain line. There say to drill a 1/4" back out the drill and clean it off, repeat till you are at the depth you want. I am lucky though they are replacing my piece for free. You can crazy glue the piece back in place and still use it though, but the damage may be done already.
 
Ok, well at least it's not just me then ;)

I did back it out 4 or 5 times to clean the drill bit, but perhaps it still wasn't enough... I probably drilled an inch or so at a time so I guess it builds heat faster than I thought. 1/4" steps for next time then... slow and steady.

Thanks for the advice, I'll start with a fresh piece and see how I go.
Steve
 
Chip-out is normal...for any wood. Soft woods that have been stabilized can have a nice size piece pop out. Use a backing board when drilling to prevent the drill from starting the chip. Choosing the type of drill bit can make a big difference,too.

I do have to ask - Why is there a hole in the top of the handle? That hole looks like you drilled the butt hole too far, and drilled out of the top of the block. What is the purpose of that hole?

One thing that you should do is try to allow for material to be ground away. I see that the top of the handle is at the top of the block. If there was a bit of sacrificial wood, you could grind past any chipping. On the same note, many folks accidentally grind into the tang holes when shaping a handle. So, remember to leave a little wood to remove, but don't remove too much either.


Now, as to how to make lemonade from this:
1) If that hole is supposed to get a pin or something, grind the handle down past the chip. Since the edges of a block are ground off, it may not be as bad as it seems
2) Carefully drill/mill out a recess, and epoxy a plug into it. Either a piece of the same wood, or a contrasting wood ( ebony,blackwood,etc.) or a different material ( MOP, brass,silver, etc.)
3) Carefully cut the block in two at the bad place. Sand/saw out the bad area. Re-assemble the block with another piece of wood ( contrasting) added, thus making a composite three piece handle.Adding colored spacers to the joints looks good. Epoxy this up and grind off the excess new wood. Re-drill the holes more carefully.
 
Chip-out is normal...for any wood. Soft woods that have been stabilized can have a nice size piece pop out. Use a backing board when drilling to prevent the drill from starting the chip. Choosing the type of drill bit can make a big difference,too.

I do have to ask - Why is there a hole in the top of the handle? That hole looks like you drilled the butt hole too far, and drilled out of the top of the block. What is the purpose of that hole?

From the photo it looks like the hole that was drilled came to about 1/8 of an inch from the surface. That and the wildly changing grain direction of the burl is probably what lead to the blow out. I have done similar to this when drilling for pen inserts.

My advice for any woods, natural or stabilized would be to drill a short distance then back out to clear out the shavings, then go a bit farther making sure not to get too hot. I also use some masking tape as well as a backing board when drilling all the way through.

This may not be considered the correct way to do things. But after wrecking lots of good wood I find I destroy a lesser number of pieces this way.
 
This would not be unusual for a stabilized wood block. Stabilizing will prevent most swelling and movement of the wood and it certainly hardens soft wood, but it will not repair flaws or fill large voids. It does not make the scales into some invincible hard polymer slab.

What Stacey said about a backing board is critical, because drilling over the opening in drill press table almost guarantees a tear-out.

One of my mentors explained that making great knives is half using good materials - half doing good work - and half knowing how to fix your screw-ups. Sometimes it's tough to get all three halves on the table at once. :D

How about an inlay over the pins?

Rob!
 
3) Carefully cut the block in two at the bad place. Sand/saw out the bad area. Re-assemble the block with another piece of wood ( contrasting) added, thus making a composite three piece handle.Adding colored spacers to the joints looks good. Epoxy this up and grind off the excess new wood. Re-drill the holes more carefully.

I vote for stacy's 3rd option
What's the name of that beautifull Australian dark brown hard wood again?
Tasmanian Black wood?
You'll know what I mean, that would look good at an 30degree angle
 
All great suggestions, thanks guys. I think the drill bit did creep closer than intended, probably splitting along an existing fault. My Bad.

I just cut up some eucalyptus burl that I've had sitting in the shed for 8 years into blocks, so I may just use that instead for now. It should be well aged by now.

Thanks for all the tips guys - I'll be sure to take them on board for next time.
 
Back
Top