Important Info! Sticky Threads - All The Good Info You Want In One Place

Status
Not open for further replies.

Stacy E. Apelt - Bladesmith

ilmarinen - MODERATOR
Moderator
Knifemaker / Craftsman / Service Provider
Joined
Aug 20, 2004
Messages
37,010
The stickies have all been condensed into this new super-sticky. This will free up the top of the forum, but make all the good info just a click or two away.

Each will have its own segment, and all the info is still there.

Any additional info that you folks think should be added to the stickies can still be added by a moderator. Just send Mark or me a PM with the thread or info that you would like stickied.
 
Last edited:
How to post a photo

Newbies-Good-info-Here
Look here for basic info and things that most new makers want to find out.


How to find a thread that comes up "OOPS"

How to post a link


Membership Rules on selling and related conduct:

Shop-safety-tips


Knifemaker's Suppliers List - Parts, Supplies, Kits, etc.

Japanese blade and HT info and refference material


Adhesion - Making Things Stick and Stay Stuck
A great discussion by Cushing H.


TIP: The solvent for uncured epoxy is alcohol. When cured the solvent is acetone. Super glue solvent is also acetone.
 
Last edited:
SOME BASIC HT AND METAL CHOICE INFO

A lot of threads deal with choosing and heat treating files, leaf springs, and things around the farm.

Lets discuss some basic metallurgy 101:

1) CONTENT - A knife made from an unknown steel may be problematic in HT. Your steel choice probably isn't the cause of poor results, but this is always a concern with second use steel. Beyond the carbon and alloy content, which one can guess at somewhat reasonably based on its past life, there is the internal condition from the former use and HT...which you can't know. The grain size is unknown, and there may be many microscopic disruptions in the grains from repeated use and flexing. Consider a leaf spring or harrow tine. The steel may be assumed to be 5160 for a leaf spring and 1080-1095 for a harrow tine. That will be good enough for a guestimate HT regime. A grain reduction cycle will reduce any possible large grain size. The problem is that the flexing over many years of use may have done things to the arrangement of the grains that will not be repairable easily, if at all. This is why using a new and known alloy content steel is recommended.

2) CONDITION - If a blade is forged, it goes through many long and high temperature cycles, followed by cooling as it is forged. The normal forging range for a high carbon steel is between 2100°F and 1500°F. At that temperature and repeated cycles, the grain will grow...sometimes to huge size. This is of no concern until it is time to harden the finished blade. If you just austenitize ( heat up a little past non-magnetic) and quench in oil, the resultant grain will be roughly what it was before the quench - usually large. Large grains disrupt (break apart) much more easily than fine grain. A grain refinement cycle is how to reduce the grain size ( and subsequently the brittleness). Start with a soak at a temperature that is well above the HT target. For simple high carbon steels, the HT target is between 1450F and 1500F, so start about 1600F. Heat evenly and hold at that temperature for about 5 minutes ( if using a forge, heat as close as your eye can guestimate and hold for a minute or so). Air cool to black and cool off in water. This will get everything in solution and set the grain size at a starting point. Re-heat to 1500F and when the hold is done, quench in the appropriate oil. Reheat to 1400F and quench in the appropriate oil. Now the grain size has been reduced to a much smaller size, and the steel is in a condition that will allow a good final hardening. Heat to the target temp, usually about 1475F, and hold for up to five minutes, then quench. Temper twice for one hour each at around 400F. Cool between the tempers and after the second by dunking in water or holding under a running faucet. Judging the HT temperature by eye is very inaccurate...often by several hundred degrees too high. A magnet helps get you in the ball park, but you are still guessing in a critical place where 25° can make a lot of difference.

3) TEMPERING - Tempering converts the very brittle fresh martensite into a tougher tempered martensite. This is very important, or the blade will fail in use. Most people temper far too low. A properly hardened steel like 1095 will be at Rc663-64 with a temper of 400F, and at Rc60-61 with a temper of 500F. The words to notice are "properly hardened". Most people don't get the full potential from their steel. Unless using a non-standard knife steel, all tempering should be at or above 400F. Tempering will make the grains a bit less likely to come apart ( break/chip), but it won't cure large grain size. Blade steel is in thin sections, and the HT and temper are fairly basic, so two one hour tempers are all most blades need. A few very high alloy steels need other treatments ( sub-zero/cryo) and longer or additional tempers.

4) CARBON DISTRIBUTION - Lets discuss what we really need/want to happen in the steel. The carbon combines with the iron to make iron carbide - AKA cementite. The rest of the iron either stays as ferrite ( plain iron) or combines with excess carbon as other structures. Often things are added to the steel to make it harder or tougher......but it is the carbon-iron bonding that makes the steel work as a knife. There is a magical sweet spot in the balance of carbon and iron...called the eutectic point. It is when there is .77-.83% carbon ( .80% for basic knife steel discussion). Our beloved 1084 steel is at that ratio nearly exactly, and is called a eutectoid steel. This eutectoid property means that there is no extra carbon to be dealt with. That means no soak time to allow things to get into solution, a simple and complete hardening with minimal effort, and reliable/repeatable outcome. This is why 1084 is recommended to all smiths who use a forge for HT.
Steel below this point is called hypo-eutectoid, and steel above it is called hyper-eutectoid. Hypo-eutectoid steel is pretty fool proof. Once all the carbon is in solution, it combines with the iron and forms whatever percentage cementite it can, leaving the rest as plain ferrite. Hyper-eutectoid gets more complicated, as we have to direct the carbon to go where we want it and not where we don't.

5) PUTTING IT TOGETHER - The above info tells us that the best mix of carbon and iron in out blades is about .84% carbon....so why do many steels have more carbon? The carbon is there to make the steel do different things and to alloy with other elements. In truth, we need a tad extra carbon to account for carbon loss, and to tie up the manganese and a few other minor elements that are in almost all steel. A tenth of a percent or so takes care of that. Any excess is going into carbides with other alloys, or remains as austenite. The subject of exactly what and how it combines is way beyond this simple explanation, so suffice to say that only about .85% of the carbon gets used to make a steel blade. The rest goes into making it have other attributes. That little tidbit tells up that we really don't want...or need....to dissolve all the carbon from where it is happily sitting when we harden the blade....if...IF...IF...we have properly conditioned the steel before the final HT. In the final hardening, lower austenitization temps will allow enough carbon to be available to form a perfect steel, without breaking up nice hard carbides that have already formed and well distributed. In some specialized hardening processes, like forming a hamon, this is a critical part of getting the maximum results. This is part of why different steels have different carbon and alloy content makes the target higher of lower. For basic simple carbon steels - 1050 hardens properly at 1525F, 1084 at 1500F, and 1095 at 1475F....see a pattern. The more excess carbon, the lower the austenitization temperature.


SUMMING IT UP - This is all a big part of why using found steel and judging temperature in HT by eye is not recommended for newer smith with simple equipment ( or at all). The steel will probably be hardenable, and the eyeball HT and quench will probably harden it....but how much of what makes a knife blade good is being accomplished ??? 30%, 50%, 75%.....you don't know......and it is a guarantee that it isn't 100%.

This isn't going to stop people from using old farm tools and car parts for making knives, or doing HT in a simple home built forge....and it should not be read as saying such.
By using as much of the above information as possible a smith can control the outcome to a higher degree.

Adhesion - Making Things Stick and Stay Stuck
A great discussion by Cushing H.

https://www.bladeforums.com/threads...-stick-and-stay-stuck-on-blade-tangs.1672342/

STEEL YOURSELF - An in-depth discussion on steel and all its complexity by Brian Evans

 
Last edited:
How-to-instructions-for-making-a-knife
Basic starter info and instructions for making a knife by hand.


Method for installing peened rivet pins handles
https://xf.bladeforums.com/threads/peening-pins-and-handle-construction.1544794/#post-17755391
 
Last edited:
Metallurgy and more - Lots of HT info here
This is where you can start to understand what is happening inside your blade when doing HT and working hot steel


Heat Treat University:
 
Last edited:
PID CONTROL; FORGES; SALT POTS;........and more
The title says it all!


basic PID controlled Forge Diagram - See above link for more info.
 

Attachments

Last edited:
WIP STICKY


Virtual-BBQ and Hammer-In ; Multiple WIPs and Tutorials


Last edited:
Here is a short treatise on sharpness from this kitchen knife thread - https://www.bladeforums.com/threads/advice-on-steel-selection-for-kitchen-knives.1113235/page-2


OK, Let's talk a bit about what makes a good kitchen knife into a superb kitchen knife.

1)Geometry. Primarily in a kitchen knife this means THIN. Distal taper and a full flat grind usually accompany that.
2) Edge - Low angle edges and a thin blade behind the edge make the knife cut well. Choppers will be slightly steeper and thicker, of course.
3) Hardness - The blade on a kitchen knife is usually a bit harder than a general use knife. This will allow the edge to last longer by being more resistant to wearing away by abrasion.
4) Toughness - Not to be confused with hardness, the steel needs the ability to resist the edge breaking down.
5) Matching the steel to the task.
............A Sashimi blade like a 180mm long yanagi-ba can be very hard and have a very low edge angle. All it ever should do is cut in a straight slicing line against clean and soft tissue. The finest grain and highest practical working hardness are key steel choice considerations.
............A 100mm veggie cutter will have a slightly less acute edge, and be not as hard. It will be used to push cut ( chop) firmer and dirtier cellulose based objects.Moderate toughness and medium hardness are the steel parameters here.
............A 60mm paring blade will be even less hard, less acutely edged, and made from a steel that takes more lateral force ( tougher). These knives are turned in use, and cut a variety of objects.

All the above except geometry are a product of steel choice and HT.

The place where most people go wrong is thinking hardness equals sharpness.
Sharpness is just a function of how finely angled we can make the edge bevel. If you draw a huge sketch of the blade edge, you will see the apex as a single point. This is the theoretical edge. In reality, the edge is back a bit from there. The size of the steel grains and the carbides will make the theoretical edge impossible to attain. Tougher steels usually have larger grains, and large super hard carbides. Harder steels have a composition that allows for hard martensite to form, but too much hardness will allow the thin edge to chip away, leaving a microscopically ragged edge. Grain size will also limit how fine the edge can be. The perfect kitchen knife steel would be hard and tough. Choosing the alloy to meet the task is part of this, and HT is the other half.

Lets make some imaginary blades.
A) - This blade is made from bricks. Each brick is tightly mortared to the next. When we sharpen the blade, we needed to use a lot of effort to knock off bricks until we have a stair step to the edge where it is only one brick wide. This blade will cut a bit rough because of the stair step sides, and no mater what we do, the edge can only be one brick wide. This blade will be very tough, but not all that sharp.
B) - This blade is made from concrete. The mix is small rocks and fine cement. The rocks are held in place by the surrounding cement. Sharpening will wear away the rocks at the edge pretty fast, and with some work and stopping we can get the cement worn down to an edge much thinner than the brick blade. However, the small rocks at the edge will pull out in use fairly easily, leaving the edge irregular. It will be sharper, but not as tough as the brick blade. The edge is still limited to the size of the rocks.
C) - This blade is made out of cement. It is a mix of fine sand and Portland cement. Each grain of sand is bonded to the next by the Portland in a strong bond. This blade will be harder to abrade, but will also sharpen down to an edge that is as fine as a single grain of sand. Because all the sand grains are about the same size, they wear away slowly and evenly. This will be a hard and tough blade.

All will get sharp, and cut your imaginary fingers easily. So how do you decide what steel to use?

Blade A is like one made from a very hard and tough steel. A blade made in a steel that has large carbides, and/or large grain structure is like this. D-2, and other super wear resistant steels are often picked for this reason....They make great knives.....but it will not make the best kitchen blade.
Blade B is like most regular knife steel having a bit of alloy. The carbides are moderately sized, and the grain can be made fairly fine. CPM steels also help keep the grain size reasonably small and distribute the alloy evenly.. These knives will be good performers, and make up the bulk of good kitchen knives. They can be hardened a bit harder.
52100, CPM-S35VN, 440C, etc.
Blade C is made from a steel that has no extra alloying to make larger carbides, The grain structure is very fine. These knives can be hardened very hard and the edge will still hold up with the right edge geometry and proper use. AEBL, 1095, W2, and some of the very pure Hitachi steels are in this class. With some real careful HT and testing, 52100 can be brought here, too. These steels have the toughness to hang on to the martensite grains and carbides while still being hard and resisting abrasion. The main reason one maker gets superb results from these steels and another doesn't is almost always in the HT.
 
Last edited:
Warpage !
There are many ways to straighten warpage. The best way is to prevent it from happening.

1) Grind evenly.
Forge evenly.
Avoid sudden shifts from thick to thin. Have even tapers and bevels

2) Stress relieve the steel before Heat Treatment. (Actually, stress relief is part of heat treatment).
There are several methods of cycling steel to get a fine grain and evenly distributed carbides, but simple methods will also relieve stress.
Sub-critical annealing is the simplest. Heat the steel to 1200°F and hold for two hours. Cool at 100° per hour to 800°F and then quench (or let air cool) to room temp.
For any steel, stainless, hypo, or hyper eutectoid...it will remove any stresses in the steel.


Here is metes method recommendations for stainless steels:

When you get the steel do a subcritical anneal ,1200 F for two hours. Straighten if necessary.
Grind etc then another subcritical anneal for 2 hours
Quench , if in oil agitate spine to edge. Air hardening steel can be quenched in plates using 3/4 to 1" aluminum.

If you attempt to straighten a hardened knife heat to at least 400 F !

Here is a good thread on straightening during temper and more:
 
Last edited:
Japanese Blade info:


These are some basic terms ( there are probably 100 more words, but these will cover most all major areas):

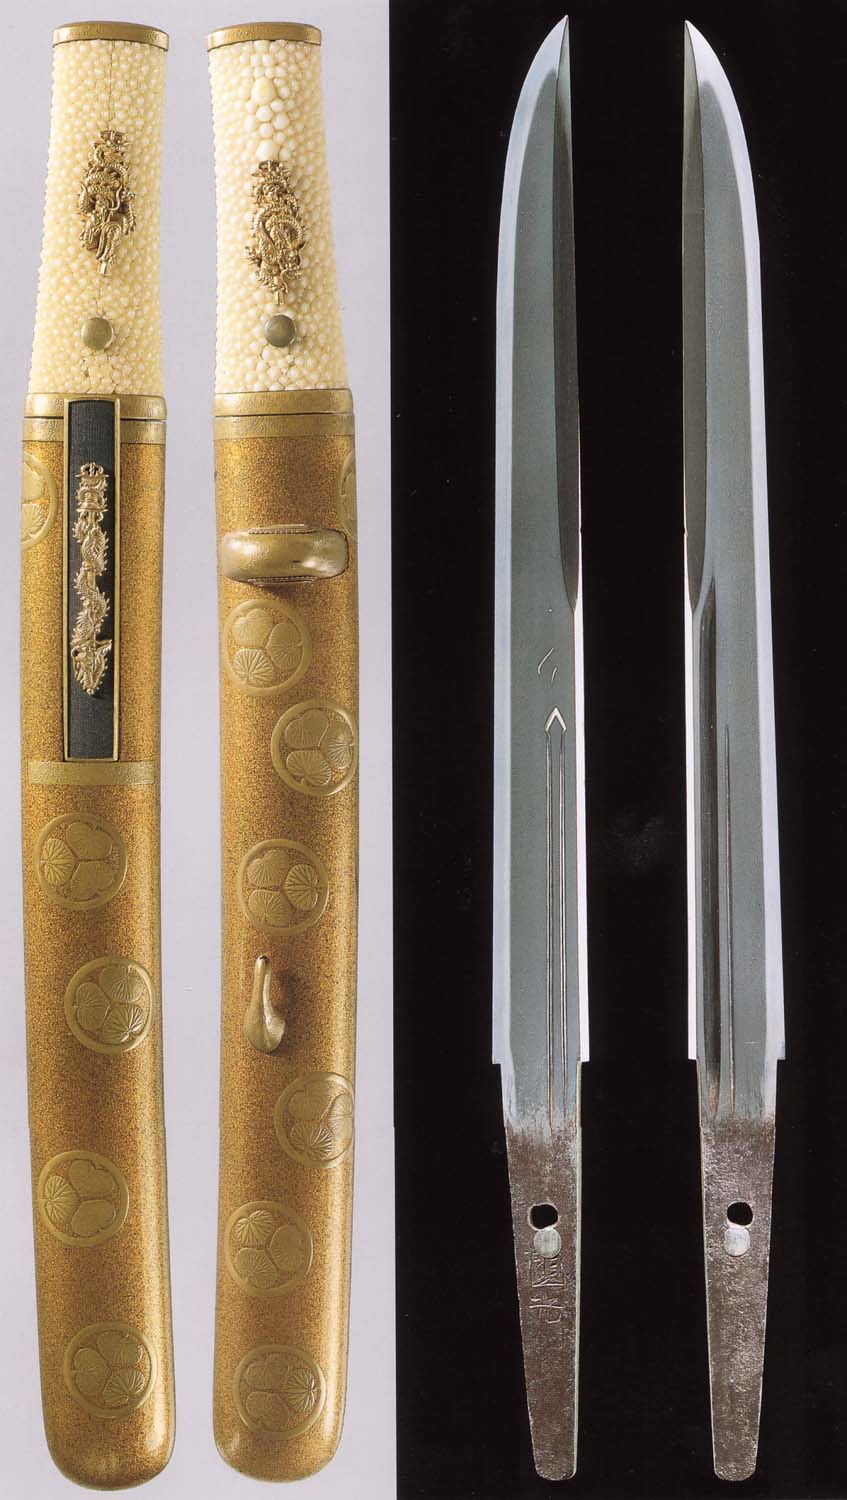
ha - the hardened edge of the blade
ji - the surface between the hamon and the shinogi
habuchi - the line between the hamon and the ji ( AKA nioi-guchi)
hamon - the line indicating the border of the hardened edge. This is a group of crystals ( nie and nioi) that form in the hardening process.
ashi - lines of nioi extending from the hamon toward the edge
nie - small visible martensite crystals. Often seen as bright specks and little "islands" just above the hamon.
nioi - minute/microscopic martensite crystals visible in a groug as a milky/wispy cloud.
shinogi - the ridge line of the blade
shinogi ji - the surface between the shinogi and the mune
mune - the spine of the blade

Blade parts ( very simplified):
Top/spine - mune
edge - ha
tip - kissaki
tang - nakago
handle - tsuka
guard - tsuba
Blade collar that guard rests on - habaki
shoulders habaki and tsuba rests on - machi
where the tip and edge meet - yokote
where the bevels meet - shinogi
curvature of blade - sori
fuller on blade - bohi
blade length - nagasa
sheath - saya

Japanese Blade info and terms:

Here are some sites that will give a lot of info.
https://www.bing.com/images/search?...84529EEA24AD64BB7476BE5ABF3835FB9&FORM=IQFRBA


This is great for figuring out Japanese kitchen knife terms and names;
 
Last edited:
Japanese Blade info and terms:

Here is an excellent site with pictures and explanations of many types:
http://zknives.com/knives/kitchen/misc/usetype/all/index.shtml

And here is a Japanese Knife terminology site:
http://www.zknives.com/knives/kitchen/misc/jpnktknvterms.shtml

Click on the "diagram" info and it will pull up a detailed sketch and parts diagram.
Example - Ago - http://www.zknives.com/knives/kitchen/misc/jbladeant.shtml

http://www.japaneseswordindex.com/nihonto.htm


Here is a list of fifty basic terms.

Basic blade parts:
ha or ba = edge
mune =spine
kissaki ( saki) = tip
nakago = tang
mekugi = pin or peg to hold handle on
shinogi = grind/ridge line
habaki = blade collar
tuska = handle
tsuba = guard
seppa = spacer or washer
saya = sheath
machi = shoulder
fuchi = bolster/collar
kashira = butt cap
ana = hole
Jiri = end ( as the end of the tang or sheath)
hamon = temper line ( there are hundreds of special words and descriptions referring to the hamon)
ji = blade surface or bevel ( usually refers to the area between the ha and the shinogi)

Blade items:
omote = outward/face/show/use side. Maker name is normally signed on this side
ura = inward facing or body side, personal side, hidden side. Date and other info is normally placed on this side
sugata = blade shape
sori = curvature
nagasa = length from tip to handle
haba - width
kasane - thickness
saki = width
bo-hi ( or just hi) = fuller or groove
tsukuri ( zukuri) = grind type or structure/shape of blade ( hira-tsukuri, shinogi-tsukuri, kiri-ha tsukuri,etc.)

Basic terms:
Nihonto = Japanese sword ( Nihon- Japan, To - sword
hada = the grain pattern on the blade surface.
mokume = "wood grain". It can refer to the pattern in the steel, or to mokume-gane (wood grained metal) which is a decorative metal mixture.
Mei = signature
Diasho = a set of swords. Dia is long, and sho is companion or small.
tanto = knife/dagger ( blade less than 1 foot)
wakizashi = short sword ( blade between 1 and 2 feet)
katana = long sword ( blade over 2 feet)
to = sword
ken = sword
tsukiri/zukuri = sword
Mu = none or no
Shoto = short
Ko or Sho= small
Chu = medium
O = large or long
suguha = straight
hira = flat
kiri = double beveled
kata - single beveled ( chisel grind)
maru = round
ichi = 1
ni = 2
san = 3
mai = layer
gane = metal ( steel)
togi - polishing/finishing
 
Last edited:
Difference between a hamon and a temper line:

When the steel is quenched fast enough to pass the pearlite nose, the structure remains austenite ( too slow and it becomes pearlite at 900F). As it cools on down and reaches around 400F, it suddenly starts converting to martensite ( the Ms). When the temp has dropped to about 100-200F this conversion is finished on carbon steels (Mf). The structure is now an untempered martensite called "brittle martensite". Anyone who has tried to straighten a blade at room temp right after the quench knows why it is called that

The first temper tempers this into "tempered martensite", which has a structure a tad like pearlite...and thus is much tougher. When the first temper was done, there was also a small amount of retained austenite that never converted in the initial quench. During the rise to 400F and cooling in the first temper, it converts to martensite. The cooling from temper should be rapid and done in room temp or cooler water. This assures the retained austenite converts (slow cooling from 400 between tempers may help stabilize the RA). This new martensite is still brittle, and the second temper converts and toughens it. A blade with only one temper won't snap in half, but the edge may be chippier. Tempers should be at 400F or higher, and there needs to be two. One hour each is sufficient for carbon steels.

During temper, the steel needs to rise back to the Ms to make the changes it needs. Tempering below that will relieve most of the stress, but the blade isn't fully tempered....and thus still has some brittleness. Some people think they are getting a harder blade by staying below the Ms, and tempering at 325-350, even 375F. The thing they don't know is that the hardness isn't appreciably dropped until the Ms is reached. A temper at 350 and one at 425 may only be one or two Rc points apart.


A hamon is the junction of structures mixing pearlite and martensite. There will be wisps of one or the other going both ways, and pockets or dots of hard martensite crystals in the pearlite matrix. The old name for this mix was troosite. (Larrin laughs at me when I say that name because it hasn't been used since before he was born.) A hamon forms when the entire blade is heated to the austenitization point, and the entire blade is cooled in quench. What forms the hamon is the cooling speed is varied in some areas due to clay and/or blade thickness.

A temper line is more properly called a quench line, and is a line of demarcation where the heating and cooling has separated the hardened area from the unhardened area. They are normally formed in an edge quenched blade. Quench/Temper lines will be pretty much straight, as they form along the radiated heat border between two temperature ranges. A quench/temper line forms when the pearlitic blade is heated to austenitization only along the edge. It gets its "temper" name from the older method of tempering where the "temper line" was walked down the blade from the spine by gently heating the spine with a torch or hot piece of steel. This line was stopped when it got about 1/3 away from the edge. The resulting temper colors on the blade had a similar look as the line formed in edge quenching. However, a quench line is deeper into the steel, and the temper colors are only on the surface.

A hamon will vary a lot depending on how fast the martensite forms and how much rapid cooling happens above the hamon. A temper line varies almost none....just a darker line.
 
Last edited:
Is knifemaking worth it?

A good discussion of the pros and cons of trying to make money making knives. This is a definite required reading for all new makers who are thinking of knifemaking as a career or second job.


Last edited:
Basic forging info for beginners

There is a lot more to it than this, but this was from a previous thread and was suggested to be a sticky:


To learn to forge first, don't start on a knife.
Just start by learning what the hammer does to the hot steel. To learn forging, plain mild steel from HD or Lowes is good. You shouldn't start on a knife.

Only work the steel hot. It should be orange-red to yellow-orange to start with, and you stop hammering when it is plain red. Forging range on most steels is 1600F to 2200F.

Use the peen to make the bar longer, then try making it narrower ( like making a hidden tang), then work on how to compress the tip back to make it rounded. What I do to teach hammer technique is give a 3/4" square bar of 1070, and first have them make a round bar from it. Then they make it square again, then the make it a flat 1.5X1/4" bar. Then we start making a knife from it.

Don't expect perfect results. It takes time to learn forging skills.

Tip - When you start to forge the bevels, the blade will curve up like a banana. To counter this, start by curving the bar down a good bit. Then as you forge in the bevels, it will lift up to be straight ( more or less).


Other tips:

Power does not replace skill. A knowledgeable smith with a 2# hammer can move more steel than a novice with an 8# sledge. Take the time to learn how steel moves and how hot it needs to be to work right. Most people forge steel far too cool. This is why you want to start with a simple steel and preferably with square bar or round bar. You will learn so much more in a couple hours with those than trying to shape a 1/4"X2" bar of steel into a knife with no skills.

Put the blade billet back in the forge when it isn't moving under the hammer easily. It is a lot easier to forge hot steel.

When working from bar stock, plan on the final blasé size and allow a little extra for grinding the edge and spine clean. Forging rarely leaves perfect surfaces. You will have to grind the dings out of the bevels, and grind the spine and edge straight and dent free. If planning on a blade that is about 1/8" thick and 1.5" wide. start with 1" by 1/4" stock. Forge the blade and bevels to about 3/16 by 1.75" and grind the final blade clean from that. You should end up right at 1/8" by 1.5".

When you put the blade in the forge, take that time to wipe off the anvil face of any scale. You don't want to be beating the scale into the hot blade. Always forge on a clean anvil.
Have a heavy wire brush at the anvil, and brush the red-hot blade before each forging heat. This knocks off the scale on the blade. Brush/wipe off the anvil as needed if a lot of scale comes off in a forging heat.

Make your like easy. Only forge what you need to forge. A hack saw can cut the tip off at a 45° angle, and a grinder can shape the handle part of the tang. What blade forging mainly does is shape bevels to prepare them for filing/grinding.

When done forging for the day, normalize the blade/billet. Heat to bright red and let cool to black ( about 900F). Repeat a time or two. The last time, when it gets to black, water quench to rapidly cool off. The blade is now softened and stress relieved. Brush it clean and dry it well.


Last and biggest tips:
At some point in learning the billet/blade will slip out of the tongs or start to fall off the anvil. DON'T try to stop/grab/move it . Just let it fall. If the grass or the floor gets scorched, that is OK. You won't remember I gave you this caution when it happens, but you will remember it when you stick your burned fingers in your mouth.

NEVER, Never, never, forge with a wet/damp glove. If you grab a hot bar of steel, it will turn the moisture into steam and burn the H@!! out of your hand. If you gloves get wet, put on a dry pair.


Mostly, just have fun learning to forge. It is my opinion that you should make some fun and decorative things first, before making a knife. Make a plant hanger to hang a pot from a tree limb. Twist some 1/4"X1" flat stock and make pretty curlicues. Make some hot dog/marshmallow roasters from 1/4" square stock...and twist the shafts. Make coat and hat hangers. Make hooks/brackets for the shop wall to hang belts and hats on.


Stacy E. Apelt, FSA Scot
 
Last edited:
Wood and handle finishing info:

Here is a good tutorial on filling cracks and voids in handles.


Handle Finishes:
 
Last edited:
Status
Not open for further replies.
Back
Top