Struggling with guard shaping/design, input requested

Joined
Sep 16, 2002
Messages
1,577
I'm kind of stuck here, and could use input on both my design and execution. I will try to keep this convoluted story as concise as possible...

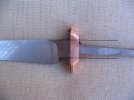
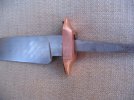
I am working on completing my first forged blade (which is also my first stick tang and guard.) I forged this knife to be a hunter, but once I cleaned up all the scale, etc. on the grinder I ended up losing part of the blade to the dust gods. At first I was ready to toss it in the scrap bucket, but after looking at it for a while, I decided it looked like a 'mini' fighter or bowie, so that's what I decided I would try to make out of it. As usual, I'm trying to do something beyond my skill level.

I've been tinkering with the guard for quite a while now, and the following issues are stalling me:

-proper shaping of a guard

-shaping a guard in the proper fighter or bowie style

-accomplishing the above, while successfully achieving a balance between it looking 'right' with the scale of the 'mini' blade, but also having a handle that will fit the hand when all is said and done. At the moment, I'm not sure I'm successfully accomplishing either, specifically with regard to the width and height of the guard.

-how much shaping/finishing to do before installing the wood (ie, have I done too much, not enough, or about right?)

I think that pretty much covers things. I would like to receive input on all of the above issues (or anything else you may see that I haven't thought of. If it helps, I can also remove the tape from the front and take another pic. Thanks in advance for the help!

IMG_1442.jpg

IMG_1439.jpg

IMG_1423.jpg
 
PS cutting edge is about 4 3/8" long x 3/4" at it's widest point if that helps. I've been working on, and staring at, this one long enough that I could use some fresh eyes and perspective.

Thanks again,
Paul
 
I think that looks pretty damn good PJ . I myself ( this is just me ) would put a sanding drum in the drill press and put a little more curve into the upper and lower portion of the guard if that makes sense
 
I would suggest making the shoulders of the guard even with the Ricasso shoulders. (see pic)
 

Attachments

  • GuardTemp.jpg
    GuardTemp.jpg
    94.6 KB · Views: 143
I would suggest making the shoulders of the guard even with the Ricasso shoulders. (see pic)

Thank you Stephan. I could go a little further but not all the way there due to the guard slot width. Aside from that, I wasn't sure if that would leave enough thickness in the handle at that point and/or if some should be left to remove and blend after assembly with the wood block. Would you recommend doing that now as opposed to after glue-up?
 

Attachments

  • IMG_1441.jpg
    IMG_1441.jpg
    90 KB · Views: 178
Last edited:
I think that looks pretty damn good PJ . I myself ( this is just me ) would put a sanding drum in the drill press and put a little more curve into the upper and lower portion of the guard if that makes sense

Thanks, Jack. I first put the curve in with the belt and a dremel, than I rounded/radiused everything on the backside (if that makes sense.) Is your advice based upon it being too thick, or you would prefer it flatter without the rounding, or is it a combination of both???
 
To my (untrained) eyes it looks as if the guard should be perpendicular to the long, flat, straight edge of the blade. The tilt looks kind of funny right now, but I suppose that could change depending on what the handle looks like.
 
Nice looking blade PJ. :thumbup: I can't help you out with the guard as I have never attempted one. Good luck on the completion.
 
Weird. I'm working on a knife right now that looks almost just like your design.

That's funny, Dustin. Do you have any pics, and was yours on purpose or happenstance like mine?

To my (untrained) eyes it looks as if the guard should be perpendicular to the long, flat, straight edge of the blade. The tilt looks kind of funny right now, but I suppose that could change depending on what the handle looks like.

It's just on there loose right now, hasn't been glued yet, although when pressed up tight it does sit ever so slightly with the top forward of the bottom. I don't think it looks too bad like this, but I'm thinking I might be able to make it square when I glue it.

Nice looking blade PJ. :thumbup: I can't help you out with the guard as I have never attempted one. Good luck on the completion.

Thanks Rob. Even if you haven't done one, if you have any input as to how it might or might not fit the fighter or bowie style, please chime in. I've been fiddling with it so long, it's hard for me to be objective anymore.
 
PJ, that is looking sweet bro. You are really progressing. When you figure out the guard problem let me know.


-frank
 
Thank you Stephan. I could go a little further but not all the way there due to the guard slot width. Aside from that, I wasn't sure if that would leave enough thickness in the handle at that point and/or if some should be left to remove and blend after assembly with the wood block. Would you recommend doing that now as opposed to after glue-up?

i generally do my shaping after glue up, unless it's a stag piece like :

stagset3.jpg


Then I get it close by eye, the scribe the joint and do ALL shaping and finishing before glueup


As far as having a forward slant, it's not uncommon for the spine side to be slightly forward of the edge side (like yours appears to be) but not the other way around, if that makes sense
 
I'm thinking I might be able to make it square when I glue it.

Get everything square (or however you want it) before you ever mix up the epoxy. When things fit well, you can assemble the knife with just a pin or threaded tang nut and it would be fine. (I use epoxy as well as pins, but it can be done, look up some take-down models for inspiration)

Next time, cut the guard slot so the spine/edge sides of the hole are angled/sloped the same as the shoulders on the tang. It will fit much more solidly and won't interfere with your handle design. As it is, that's going to have a very thick handle in relationship to the blade.

I'd start over and save that guard for a bigger knife, to be honest.
 
Last edited:
Get everything square (or however you want it) before you ever mix up the epoxy. When things fit well, you can assemble the knife with just a pin or threaded tang nut and it would be fine. (I use epoxy as well as pins, but it can be done, look up some take-down models for inspiration)
I'd start over and save that guard for a bigger knife, to be honest.

I agree, try - try again.
Practice makes perfect. This stuff is not easy, but it gets easier as you go...:)

Look at this knife I made, had to have it all profiled.
Because I took it apart and did file work on it.
Keep going you will get better, do not give up.

Todd


Bowie_AA.jpg
 
"Start over" were the last words I wanted to hear but I thought that might happen. What do you guys mean specifically by "start over":

-Toss the knife in the trash?
-Start over on another guard with this knife?
-Start over on the guard in a different style?

Also James, I'm not totally sure I follow this part...could you clarify a bit:

"Next time, cut the guard slot so the spine/edge sides of the hole are angled/sloped the same as the shoulders on the tang. It will fit much more solidly and won't interfere with your handle design. As it is, that's going to have a very thick handle in relationship to the blade."


As far as being square, it sits now at a very slight top forward rake which I don't find unappealing, but if it came up more square during glue-up I wasn't going to be disappointed.

Thanks much.
 
Last edited:
Do not toss the knife or the guard.
Just make another guard for that knife and save the one you have there.
If you want? It's your knife you do what you want?
We just give advice - NOT trying to tell you what to do.... :rolleyes::D

I'm sure you will get it done, and it will be great.
Should of seen some of my early work..... :eek: :D

Todd

Thank you Todd. I sincerely hope my response didn't come across as defensive...I came here looking for advice on what to do next, good or bad, and I was prepared to hear things along the lines of 'start over' although of course I didn't relish that possibility.

I've got no other prior experience with any other hands-on, 'crafty' hobbies or work to draw upon before I dove head first into this (I've been a desk and computer jockey for most of my life), so sometimes I find myself in the dark and uncertain what to do next or wondering if I'm even heading in the right direction. Without this forum and the advice from its members, I would have never even finished my first blade much less be working on number 5.

Thanks again, I appreciate it!
 
Paul,

You are very welcome - now get some knives made. --- :D:thumbup:

Todd
 
I've got no other prior experience with any other hands-on, 'crafty' hobbies or work to draw upon before I dove head first into this (I've been a desk and computer jockey for most of my life), so sometimes I find myself in the dark and uncertain what to do next or wondering if I'm even heading in the right direction. Without this forum and the advice from its members, I would have never even finished my first blade much less be working on number 5.

I understand completely. I'm a computer jockey too, but I've branched out a LOT in the past several years.

I did notice you're in Chandler. You have a great number of excellent knifemakers not too far from you. D'Alton Holder is around there, and Ray Rybar recently moved to Camp Verde from the Phoenix area, but it's worth the drive to chat with him. There are more, but I'm blanking at the moment. You should really try to get in touch with some of the makers in your area. A few hour shop visit can save you months of learning on your own or via the 'net.

Don't worry about having to start over on the guard. I used to have (and sometimes still have...) what I called the "rule of 3". Every knife I made ended up getting 3 of SOME part. Sometimes the blade, some times a guard, sometimes a handle. It's part of the learning process. The good news is that it gets easier and faster the more you do it. :)

-d
 
deker, I've recently begun thinking about how to go about approaching some of the local makers. I've talked briefly with Ray Rybar at a hammer-in, but haven't gotten up the courage to start asking about lots of shop visits. I emailed another local maker (not anyone you listed above) last week, and he agreed to let me watch him grind sometime or he could charge me for a lesson. I'll see how that pans out and go from there. I hope you've figured out how to break that Rule of 3 for the most part...sounds like an annoying one!

The good news is that I'm braced and prepared to start over if needed on the guard. The less than good news is that I'm not 100% sure what to do differently the next time :-) Is the primary problem the height of the guard slot preventing me from bringing the shoulders down as Stephan Fowler drew, thus also allowing a slimmer handle? If not, where else have I gone off the rails?
 
Back
Top