Sword Build

Stacy E. Apelt - Bladesmith

ilmarinen - MODERATOR
Moderator
Knifemaker / Craftsman / Service Provider
Joined
Aug 20, 2004
Messages
38,524
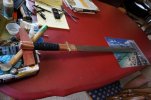
As I mentioned in the snake rasp thread, the lad I was working with had designed a sword he wanted to make, and I did it with him as a graduation present. He was valedictorian at his high school this year, and will be attending VA Tech on full scholarship.

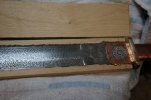
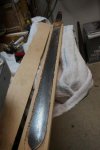
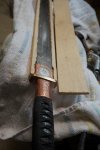
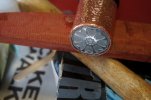
He had drawn a stylized Chinese jian ( pronounced Chien or Zen, depending on pinyin or mandarin). He had no idea of the complexity and cost of building such a sword, and I didn't tell him. We started with his drawings, and then made some necessary changes. He wanted a layered blade, and I already had a sword blade that was low layer with a coarse raindrop pattern that was perfect. This greatly shortened the time and complexity of the build. He had drawn a chrysanthemum shape that he had made into two aluminum medallions that he wanted to incorporate.

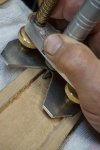
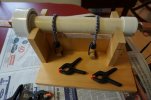
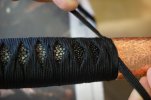
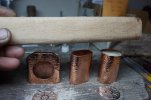
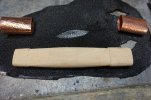
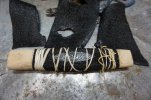
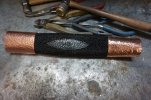
We started with making the fittings from copper pipe couplings. They were annealed, hammered on a tapered mandrel, re-annealed, hammered more, and when about the right diameter, shaped to the final shape and peened for a hammered finish. The fuchi was a basic oval, and the kashira was oval flaring to a round pommel, which was made to fit one medallion. A wooden plug was made to fill the kashira top to seat the coin on. The habaki was cut with an opening to allow a press fit of the other medallion. Tsuba was a plain short bronze bar, with mosaic pins, and tuska was alder wood. Wrap was same'-kawa ( ray skin) with silk ito.
Saya is under construction, but will be plain black lacquer with matching copper fittings to the sword.
 

Attachments

  • DSC00344 (1024x682).jpg
    DSC00344 (1024x682).jpg
    53 KB · Views: 120
  • DSC00345 (1024x682).jpg
    DSC00345 (1024x682).jpg
    91 KB · Views: 120
  • DSC00346 (1024x682).jpg
    DSC00346 (1024x682).jpg
    90.2 KB · Views: 113
  • DSC00347 (1024x682).jpg
    DSC00347 (1024x682).jpg
    71.3 KB · Views: 111
  • DSC00349 (1024x682).jpg
    DSC00349 (1024x682).jpg
    79.9 KB · Views: 117
Last edited:
Shots of the saya construction getting started. This should be after the next post, but was out of order.

Last shot shows why you can't have too many clamps. For about a year I got five whenever they were on sale at HF ( once a month or more). I have about fifty of this size in the clamp box, and another fifty of larger and smaller sizes. When clamping saya, you need a clamp every two to three inches. Strong pressure isn't as important as equal pressure.
 

Attachments

  • DSC00389 (1024x682).jpg
    DSC00389 (1024x682).jpg
    62.1 KB · Views: 148
  • DSC00390 (682x1024).jpg
    DSC00390 (682x1024).jpg
    28.2 KB · Views: 143
  • DSC00391 (682x1024) (2).jpg
    DSC00391 (682x1024) (2).jpg
    32.5 KB · Views: 142
  • DSC00393 (682x1024).jpg
    DSC00393 (682x1024).jpg
    29.7 KB · Views: 126
  • DSC00395 (1024x682).jpg
    DSC00395 (1024x682).jpg
    61.8 KB · Views: 141
Last edited:
Photos of the sword and assembly of the parts.

First shot is the sword handle wrapping fixture. The sword is insw4erted into the jig, or the handle is placed on a short piece of metal that fits like the tang, called a mandrel. The sword or mandrel is wedged in the tube by tapered cedar strips. The bungee supplies just enough grip to hold while tying the cord and pulling tight, but allows rotation to the other side for the next wrap/knot.
Pommel photo shows rim partially peened over the medallion to lock it in. It was then peened down tight. The shot of the medallion in the habaki shows the tight fit. It has epoxy behind it for strength, but is a very tight press fit.

A tip on making a wrapped handle strong and permanent is to use epoxy to set the wrap. This works really well on paracord wrapped handles, too.
Check the wrapping over carefully, and make sure all is right. Re-wrap if needed until you get it perfect. Then mix up some thin and slow cure epoxy. I like System Three Clear Coat, but West System 105 resin with the 206 or 207 hardener is also good.
Paint it on with a small disposable flux brush ( cut the bristles to about 1/4" long) an paint the resin on lightly. You just want to see a sheen on the wrap. It will soak in almost immediately....which is what you want. It should not look wet after a few minutes. Take an old tee shirt or lint free cloth and squeeze the handle if you think there is too much resin. Brush again with a dry brush, and let sit to cure. rotate every 10-20 minutes and check for any drips. Any excess or drips can be removed with denatured alcohol before curing. Once set, let cure 24 hours. The cord should end up looking pristine, but be rock solid and not move or unravel.
 

Attachments

  • DSC00364 (1024x682).jpg
    DSC00364 (1024x682).jpg
    52.2 KB · Views: 120
  • DSC00374 (1024x682).jpg
    DSC00374 (1024x682).jpg
    41 KB · Views: 122
  • DSC00375 (1024x682).jpg
    DSC00375 (1024x682).jpg
    54.9 KB · Views: 139
  • DSC00376 (1024x682).jpg
    DSC00376 (1024x682).jpg
    41.9 KB · Views: 123
  • DSC00377 (1024x682).jpg
    DSC00377 (1024x682).jpg
    44.1 KB · Views: 123
Last edited:
WOW Stacy - I can see why you're called "The Master" - VERY impressive with great attention paid to detail. did I say "IMPRESSIVE"!!!?

Ken H>
 
You know, I saw this post and didn't pay attention to who posted it, thinking it was some numbskull wanting to make a dragon slaying sword as his first go at knife making. Butttt then I clicked on it and saw what was inside. An amazing display of what we all hope to achieve. That thing is marvelous
 
That's one helluva graduation gift. Thanks for the tip on the epoxy cord wrap. Good stuff. Lu.
 
Thanks for the kind words, but this really is a simple "knocked together" project. There is nothing here that a person with a basic shop and who took their time couldn't do. I plan on doing a tutorial on just how simple and cheap these rather stunning looking fittings are to make. I have about $9 in copper couplings and maybe 5-6 hours work into all except the blade. The blade would look just as nice made form 1070 or 1084 ( the damascus was just whistles and bells). A paracord handle would have been just as impressive as silk ito. A sword like this can be done in a month of weekend time by most makers for less than $50, including abrasives.

I know a few folks are saying, "Sure, easy for him!", but really, there is no magic in this build.


I'm glad you didn't call me an expert. I always reply that an ex is a has been, and a spurt is a drip under pressure.


One of my oldest friends ( who sadly no longer remembers me or anyone else) used to reply when someone said to him "Your The Best",..." No, I am not the best.....but I am one of the good ones." He helped me build skills when I was young and learning, and he worked for me when he was old and starting to forget. When he could no longer run a business, I put a bench next to mine and would hand him jobs one at a time, and explain what the job entailed. I knew his secret - he could not read. In his earlier years, he would remember all the info the customer told him, and his wife would write everything down. When we worked together, I would speak English mixed with Spanish, and he would speak Spanish mixed with English.
I have used his "the best" response hundreds of times over the years, and it always makes me smile with fond memories of our past together making jewelry side by side.
 
Stacy - Is that a simple square knot you used to finish the tsuka-maki?

Its always wonderful to see some of your work.

-Peter
 
Really nice of you to walk the young fellow through the process. Our country needs more folks willing to mentor the younger generation in actual physical creativity. My hats off to you for that.
My eyes were drawn to the blade and I would like to hear a little more about its process.

Jonathan
 
Yes ... Aces all around . I like it when people give back . This kid will remember this for a lifetime !
 
Peter,
It is just a tightly puled overhand knot. It matches the wrap next to it quite well. I left the ends on so I could pull them tight as the epoxy cured. As the epoxy hardened to a gel state, I cut the ends with a scalpel, and tucked them back under. The finished wrap shows no end to the knotting that way.

Jonathan,
The billet was a 100 layer ( give or take) plain damascus billet I got from a contact in Pakistan who wanted to make damascus for me. His stuff was actually pretty good. This was 203E and 1095 according to him, and over 3/8" thick. It was so plain, that I drilled hundreds of 1/4" dimples in it, forged it back to flat, and ground this very simple sword from the billet. For years I had a pigmy bison ( extinct) shin bone as the handle. It was so close to his desired blade dimensions, that it was a no brainer to whack the bone off and make it the blade for this build.


Brandon has a younger brother that is also a good kid. I have had him over to help me work on the yard, and he works hard and takes directions well. He always drifts to the smithy when taking a break, and looks longingly at all the cool stuff there. He has been heavily in his brothers shadow for the last several months, with graduations, parties, swords, and college. He has wanted to make a tanto, and I have put him off until he was a bit older. I think he is ready now, and that we will make his tanto as our winter project. In a month or so, I will have him over to do some fall yard work and we will start doing drawings. I may use some of my dearly guarded Hitachi White steel for this project and we will go for the hamon and sori .... water quench and all.
 
The younger brother will love the tanto build, Stacy. It will be like magic to him.
 
Peter,
It is just a tightly puled overhand knot. It matches the wrap next to it quite well. I left the ends on so I could pull them tight as the epoxy cured. As the epoxy hardened to a gel state, I cut the ends with a scalpel, and tucked them back under. The finished wrap shows no end to the knotting that way.
Thaks for already answering the next question that I was getting ready to ask. :thumbup::D
 
Hi Stacy,when grinding bevels on a sword do most makers use a jig of some sort? Thanks,Lu
 
Back
Top