Takedown nuts?

Joined
Jun 5, 2008
Messages
3,195
I'm shooting for something crazy for my 300th knife. I've never done a takedown knife, but as I advance my skills and ponder increasingly complicated spacers, guards, filework, and such, I think it's time. I'm to the point where I need to take a knife apart and put it back together more precisely. I've used guide pins before, so alignment shouldn't be a problem.

Several questions come to mind.

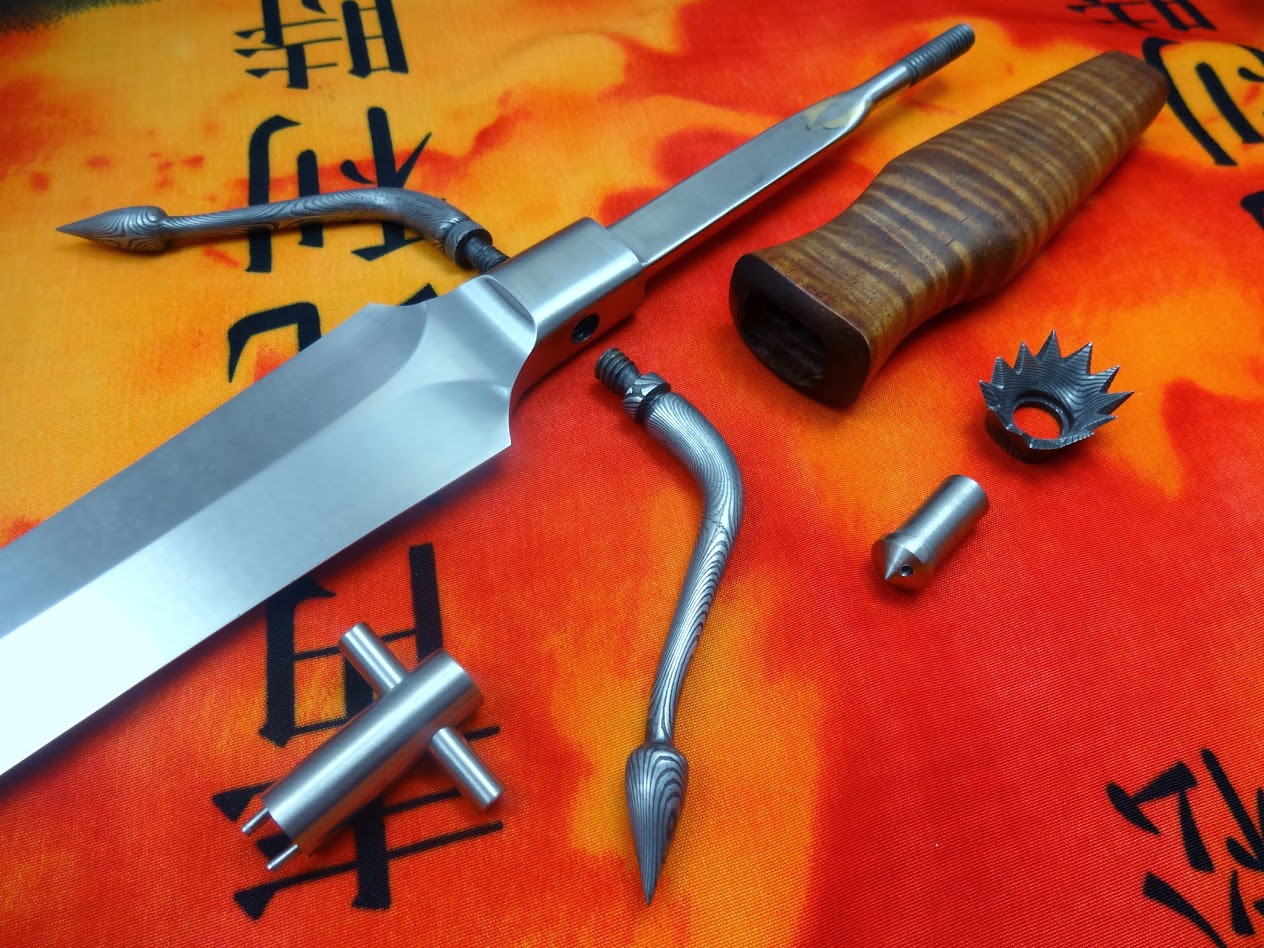
I know I'll need a threaded (something) on the end of the tang. Some folks thread the tang itself, while some solder? a piece of threaded rod. What kind of solder are we talking about? I've got stay-brite from soldering bolsters on slipjoints. Will this work? I'm assuming that the threaded part should be narrower than the ricasso, so that the guard will slip on over it. Is this correct?

I know I'll need some kind of finial, nut, or whatever on the butt end of the knife. What kind of tap does it take to thread the hole? I'm assuming the hole only goes partway through?

I've seen John Doyle do a modified takedown, where he puts it all together takedown style, then after glue-up grinds off the top of the nut flush. Could I use the female end of a corby bolt that way?

Any other pointers on takedowns before I dive in?
 
Karl Anderson makes some incredible takedowns as you probably know. There are many videos within his site that show his takedown system. He threads the tang instead of soldering on threaded rod for a clean look throughout.

http://www.andersenforge.com/introduction.html

The fitment seems super tight throughout the whole construction.
 
I have seen people use a female Corby for that purpose and it looked good. You could either grind it flush like normal or cut a deep slot in it so it could be taken down later. (I keep a couple pairs of deep-slotted Corbys around just for fitting up scales on full tangs before final glue-up)

Mike Carter has a simple way to add a no-weld threaded extension onto a full or narrow tang. It could be used for a buttcap or a nut. Here's his tutorial.
 
I've seen that Carter tutorial before and was planning a similar joint. Since I'm pondering a glued up takedown knife, is it any surprise I want to solder a Carter-style mechanical joint :)
 
I think you may want to look into brazing rather than just soldering for that application. I'm no expert, but I'm told that it's much stronger.
 
Jason, just extend the tang all the way to the butt and thread the end. As far as the nut, you need a tapered tap to start the thread and a bottoming one since you don't have much dept to work with. I even grind a few threads off my tapered ones. They make the tapered part awfully long sometimes. As long as you leave enough taper to easily start the tap.
 
Stay Brite and similar solders will be useless in this situation. Real silver soldering, brazing, or welding will work.
The simplest method is to just thread the tang.
 
I like that you are pushing Jason. Nice job.
 
Yep. :thumbup:

I was afraid you'd say that. That's one area you forgers have a distinct advantage over us stock removal guys. You can take a tiny bit of tang steel and draw it out. I've got to grind away 3/4 of a bar of steel to get to the same point.

But we know that the steel itself is cheap relative to the time and skill of the maker, and relative to the final price of the knife. Another 3 inches of bar stock ain't gonna kill me.

What it does, however, is make the heat treated blade I had in mind for this project not workable for this knife.
 
Pops will sell you just the female side of his corby bolts. I bought a bunch of them off him about a year ago and love doing the threaded tang construction. I have also notched the end of the tang and welded a short piece of thread into it. Worked out very well also. Karl is the inspiration for me trying this and I have done most all my knives that way the last couple of years. -Burton
 
It's not too difficult to braze a threaded tang extension on. I tend to use 1/4 x 20 allthread a lot. The tang is usually thinner than the allthread- so I either grind the sides off the threads, or braze the tang after installing the guard the last time. I use a deep v-joint and then braze for the strongest joint.

The tang slot in the handle block often will have a 1/4" hole down the middle for the tang end to pass through, while the rest of the slot is as wide as the tang.

I have used corbys for buttcap bolts, works OK- if you have a lathe, you can turn something a bit fancier to suit. I start with stainless round stock, say 3/8" diameter, drill a #3 blind hole (over recommended size) with the tailstock, start the tapping with the tailstock and finish by hand. As Pat says, two taps. Then I turn the barrel of the nut down to pass through size for the butt cap, with a step- like a corby. The finial can be whatever shape you like after that.

Here's a few examples. the last one is a blind drilled and tapped hole directly in the butt cap.

DSC02523.JPG


IMG_6763.JPG


IMG_0144.JPG
 
I was afraid you'd say that. That's one area you forgers have a distinct advantage over us stock removal guys. You can take a tiny bit of tang steel and draw it out. I've got to grind away 3/4 of a bar of steel to get to the same point.

Jim Siska finishes all his blades with a wide tang stub with a dovetail cut into it. He then makes a mild steel tang extension
with a matching male dovetail and brazes the parts together after heat treat. He does it this way because he roughs the
blades in advance and doesn't know what shape of tang he'll need until someone orders the knife.

All of these are assembled with a female tang nut and threaded tang. Some are takedown, some aren't but the basic
construction stays the same.
 
And Jim was taught by the same guy I was - Jerry Rados.


Jim Siska finishes all his blades with a wide tang stub with a dovetail cut into it. He then makes a mild steel tang extension
with a matching male dovetail and brazes the parts together after heat treat. He does it this way because he roughs the
blades in advance and doesn't know what shape of tang he'll need until someone orders the knife.

All of these are assembled with a female tang nut and threaded tang. Some are takedown, some aren't but the basic
construction stays the same.
 
You can heat it up with a torch on the end to soften it up...at least that's my plan.
Good afternoon, ElyMan.
This thread is over 6 years old, so it's highly unlikely that (a) you helped Jason with his project, or (b) you'll get any pertinent responses. This is oftentimes referred to as necroposting. If you are looking for advice, I suggest starting a new thread.
 
Back
Top