Tang Shape & Placement???

Joined
Feb 28, 2006
Messages
3,494
Hi Friends,

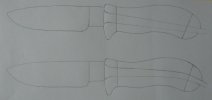
I've got another funky question for you. What would be the best shape for a hidden full tang for a handle such as illustrated here?

The top one seems like it would be easiest to drill and shape the hole because it is straight. But it's close to the handle edge and puts the tang stub exiting the butt cap at an angle.

On-the-other-hand, the bottom tang shape stays more to the center of the handle and exits the butt cap perpendicularly. But being curved, it will be more of a challenge to ream the hole through the handle.

So which would be best? Or would some other shape be more appropriate???

Thanks so much, Phil
 

Attachments

  • Tangs.JPG
    Tangs.JPG
    10.9 KB · Views: 174
I'm not the fella to ask about hidden tangs, but if it were me, I'd go for the second one where the tang terminates perpendicular to the butt cap. It will make for a better seat for the tang nut against the cap as well as avoiding any weak spots in your handle material. Doesn't drilling and reaming the handle to fit the tang build character? :D

--nathan
 
Phil, all of mine (in that style) are done like your second drawing.

You really need the tang to exit the handle perpendicular to the end of the block in order to get everything to snug up nice and tight without gaps.

There is an alternative. You can run the tang most of the way through, but have a piece of all thread pinned to the end of the tang in such a way that it can swivel just a bit. That will give you some lee-way when snugging it all up.

I normally hard solder a threaded sleeve to the pommel material so that I can use a thin pommel to get good overall balance.

If you've got access to a decent lathe, you can turn down a solid piece so that it has an integral threaded sleeve.
 
You can make a pommel/buttcap out of stainless stock as thin as 3/16th and attach it with a stainless Corby ground flush. I do it with a step drill. Though I do eventually have to figure out that hard soldering thing:D
 
That's another great alternative Joe! This is what I mean by a thin pommel. There's actually about 3/4" worth of threads on each of these pommels...but it's hidden in the antler.

fatherandson.jpg
 
On this style i do the same as Nick if you do the top drawing there is a good chance of grinding through when shaping the handle.

Bob
 
That sketch gave me goosebumps. The way I've done it is to drill from each end at the proper angle. The trick is making the holes line up right, but with a vise for your drill press it's doable. (I can't even imagine holding an antler well enough to drill that though.) Like Nick, I've used all thread on the end of the tang, but unlike Nick, I can't solder worth my spit so have always drilled through the butt cap and let it be ugly. There's always a couple of small gaps where the threads don't fill each other. I like the corby bolt idea much better, I just never thought of it. :)

Handle broach; now there's a worthwhile tool that can make this process much easier to bear. I made mine by grinding away all but a few of the teeth of a wood rasp, and sticking the ground-round tang in a scrap wood handle. If you want to see a picture of it, I'll get one and post it here, but the key is - don't try to live without one! It saves so much aggravation it's worth even buying one if you'd rather not make it.
 
I agree on the broach, the only way to go, to buy or make, easy to make and you will never regret it. I have about 3 of different widths and have made some for friends, makes the through tang a much more pleasant handle to make.
 
That's another great alternative Joe! This is what I mean by a thin pommel. There's actually about 3/4" worth of threads on each of these pommels...but it's hidden in the antler.

fatherandson.jpg

Hi Nick,

Do you thread the thin pommel simply by friction or do you use indentations so you can use a tool to tighten the pommel?
 
For one like this, I leave the material just a little proud before glue up, so that I can use a pair of vise grips to tighten it down. Then just clean everything up once it's all together.

For a seperate "nut," I use a pair of pliers with micarta jaws to tighten the nut without marring it up.
 
Wow, thanks everyone!

I intuitively liked the curved tang the best, but my laziness wondered about the possibilities of doing a straight one. It'll be more fun forging in the curve anyway. I'm planning on rounding out the end of the tang and threading it. I was planning on making a fairly thick butt cap. I thought to either drill and tap it or drill it clean through, counter sink it from the outside and make a threaded plug/nut of the same metal to screw in and grind off. What do you think?

Dave Sylvester: I'm hoping to make it up your way this summer from NH. Hope it can work out. I sure would deeply VALUE hanging and working with you some more.

Dave Larsen: Good points about the reamers, Dave Sylvester told me the same last summer. I'm not sure what your goosebumps were about though????

That sketch gave me goosebumps.

Nick: Your tips are much appreciated. I like you soldered tube/nut idea, although am not sure I'd like to go that thin with the cap anyway. My main worry is that I won't get the handle and butt cap surfaces to fit perfectly flat against each other. What metal did you use for the knives in those photos?

Thanks again folks, --Phil
 
Handle broach; now there's a worthwhile tool that can make this process much easier to bear. I made mine by grinding away all but a few of the teeth of a wood rasp, and sticking the ground-round tang in a scrap wood handle. If you want to see a picture of it, I'll get one and post it here, but the key is - don't try to live without one! It saves so much aggravation it's worth even buying one if you'd rather not make it.

I want to see it, Dave...

Mike
 
Someone just did a tutorial on how they do a curved tang assembly. They used a piece of chainsaw chain, cutters removed, pinned to the tang and brazed to a piece of all thread. This will give a great deal of play and it will snug up square. Once the void is filled with epoxy it will be very solid. However brazing a piece of all thread to the tang and bending it around the curve will work also. This is how I do most of my handles.
 
Ya I saw that, http://www.bladeforums.com/forums/showthread.php?t=601645. It was pretty cool.

I'm not too worried about forging out the curved tang and threading it. Here's one that's forged out OK (not threaded yet though). I got the antler drilled and the tang fits through fine. It's the handle end and screwed on butt cap fit I'm stressing over.

attachment.php


I guess if I drill my but caps square with a press, grind the handles flat on the end and square the tang stubs to them, then the knives should go together fine. Maybe I just worry too much?!
 
Ya I saw that, http://www.bladeforums.com/forums/showthread.php?t=601645.I guess if I drill my but caps square with a press, grind the handles flat on the end and square the tang stubs to them, then the knives should go together fine. Maybe I just worry too much?!

3rd paragraph in post #3 is the fail-safe method. A small amount of all-around-play in the riveting accommodates imperfections in square, both "x" and "y" axis.

Mike
 
Back
Top