that is amazing!!!
what do you use to get such a nice finish?
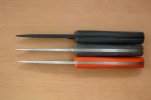
Yeah, me likey the Satin with Blk/Tan!
It is actually not hard to put that Satin finish on. The hardest part is first removing the dimples from the flats and then regrinding the primary bevel. By the time I am done removing the dimples from the flats I lose about 1/4" off of the primary bevel near the spine. This is bound to happen if you try to remove all of the dimples from the flats on the entire knife. You can probably short cut it by just focusing on the flats that will show and leave the dimples that are gonna be covered by the handle slabs.
Ok, here is how I put on the satin finish after the the dimples are removed.
Items need are the following:
1pc of leather on top of wood or leather strop. I just epoxy the leather onto a piece of flat wood.
1 sheet each of 80, 150, and 320grit sandpaper. I prefer to use the SandBlaster Paper from 3M because it clogs less.
Start off with 80grit and first work the flats from tip to butt (horizontal). When everything is nice and even I move on the primary bevel. I do the flats first because if I reverse the process the scratch patterns sometimes intrude onto the bevels.
Note: I use the edge of the leather with the sandpaper folded over at 90degrees to first work on the area of the bevel near the plunge first. When that is all cleaned up I them move out towards the main bevel with it flat on the paper. You will also need to raise the butt of the handle and pivot the point towards the the paper to get to the tip.
That is all that is to it. The 80grit is the most important so I tend to spend the most time on that one. I use the 80grit until I remove every single vertical 220grit scratches from the belt grinder. If everything looks nice and even at 80 then you are home free. The rest is a breeze and only requires about 20mins on each side with higher grits. DO NOT move on until everything looks nice and clean from the 80grit. Trust me on this one. I have done my fair share already.
Hope this will help some of you out.

 :thumbup: Very nice job on that 'Skunk Warden. It is a cool one, and that satin really looks good with it! Thanks for the pix... Man you're really showin' us some seriously cool modding on these Busses's lately! I like 'em all.
 !
!")
