The *Unofficial* Fiddleback maintenence, care, optimization, and improvement thread!

Knife Tip Field Repair, Part II

If you had more time, you could select a more acute angle to grind on the spine. The goal here is to match the curve of the spine on the whole knife to the curve of the spine at the tip.

To do so, you will need to grind further down on the spine. This one takes a bit of care, as you will want to remove as little metal as possible. If you begin here, the tip will be the last thing you are repairing with the stone, with most of your effort going to restoring the curve of the spine down to the tip.

On the KE Bushie, a drop point knife, the angle of the spine has a curve, therefore your motion on the stone will also curve. Pull a portion of the spine on the stone towards you, grinding it, and then lift the handle up as you approach the tip, near your original fix (or the unfixed broken tip), to create a sloping angle. Then push it along the stone in reverse, using a back and forth, up and down motion.

For many knives, only the pulling motion should be used. Avoid resistance against the stone. Go slow. Inspect every few passes.

After a few minutes, you will have something similar to this:

YpNJrVN.jpg


Metal has been ground off the spine so that the angle of the tip repair matches the sloping angle of the spine and the original grind of the knife.

To remove grind marks from the spine that you have worked on, simply strop the entire spine with black compound, along the slope of the spine, until the finishes match.
 
Last edited:
Strengths of this method:

In less than 2 minutes, you can restore a functional tip to the knife in the field, which could be used for anything the original tip would have been used for.

In 5 to 10 minutes, you can restore it to the point that no one would know the tip was ever broken.

The cutting edge remains unaltered.

Weaknesses of this method:

There will be fairly substantial removal of material from the spine.

Due to this, the "rounded spine" effect on current Fiddlebacks will be lost on the restored area of the knife.

If damage is extensive and you grind deep, you may damage the maker's mark on the spine.

You will likely cut into the stone a little bit on the initial restoration, and you may need to level the stone later if you plan to use it extensively on another project.

You will create dry, dusty metal (or, if the stone is wet, a slurry), and you will need to wash the knife off before it goes back in the sheath or pack. Unless you wear respiratory protection, you will also be exposed to fine metal dust particles for a short period. Wipe off the slurry or metal dust as it accumulates on the knife and check your work.

Let me know if you have any questions or suggested modifications to this field grade tip repair :emot-yarr:
 
Last edited:
Awesome new sharpening video that my good forum buddy Schmittie sent my way, demonstrating an alternative method for sharpening scandis.

Enjoy :thumbup:

[video=youtube_share;mMShtaDPI1g]https://youtu.be/mMShtaDPI1g[/video]
 
Last edited:
Also, since its been a while, a quick shout out to Triple T for a text book example of tip repair. While I haven't had to do this to any fiddlebacks, I've used this exact method (version II) on several kitchen knives and beaters to bring them back to their original profile!

Nice post!
 
Here is a before and after pic of cleaning up micarta with a "Magic Eraser". The handle on my Fletcher BOXL was getting dingy. It was starting to take on a dark, smooth appearance from dirt and oil build up. It looks new again after a 30 second scrub. It even brightened the white liners.

Before
20160520_141321-1_zpsvepe4msp.jpg

After
20160520_141601-1_zps69wd4xse.jpg
 
Awesome tip Dave, I'm a big fan of the magic erasers as well; all sorts of handy uses for cleaning up scales and removing field "gunk" from blades, although on 01, they will sometimes leave a light hazy patina behind due to chemical composition of the eraser. Either way, good stuff :thumbup:
 
Awesome tip Dave, I'm a big fan of the magic erasers as well; all sorts of handy uses for cleaning up scales and removing field "gunk" from blades, although on 01, they will sometimes leave a light hazy patina behind due to chemical composition of the eraser. Either way, good stuff :thumbup:

Will I've mentioned them before and I don't mean to be redundant but they're such an inexpensive and easy way to bring a knife's appearance back. This Fletcher handle looks new but also feels great again. The "grippy-ness" :) is much better.
 
Awesome sanding recap from the folks at the forge; indispensable knowledge for scale refinishing!

http://www.bladeforums.com/forums/showthread.php/1414289-OT-Hand-sanding-shadetree-burlap

Here is a post i made a while back

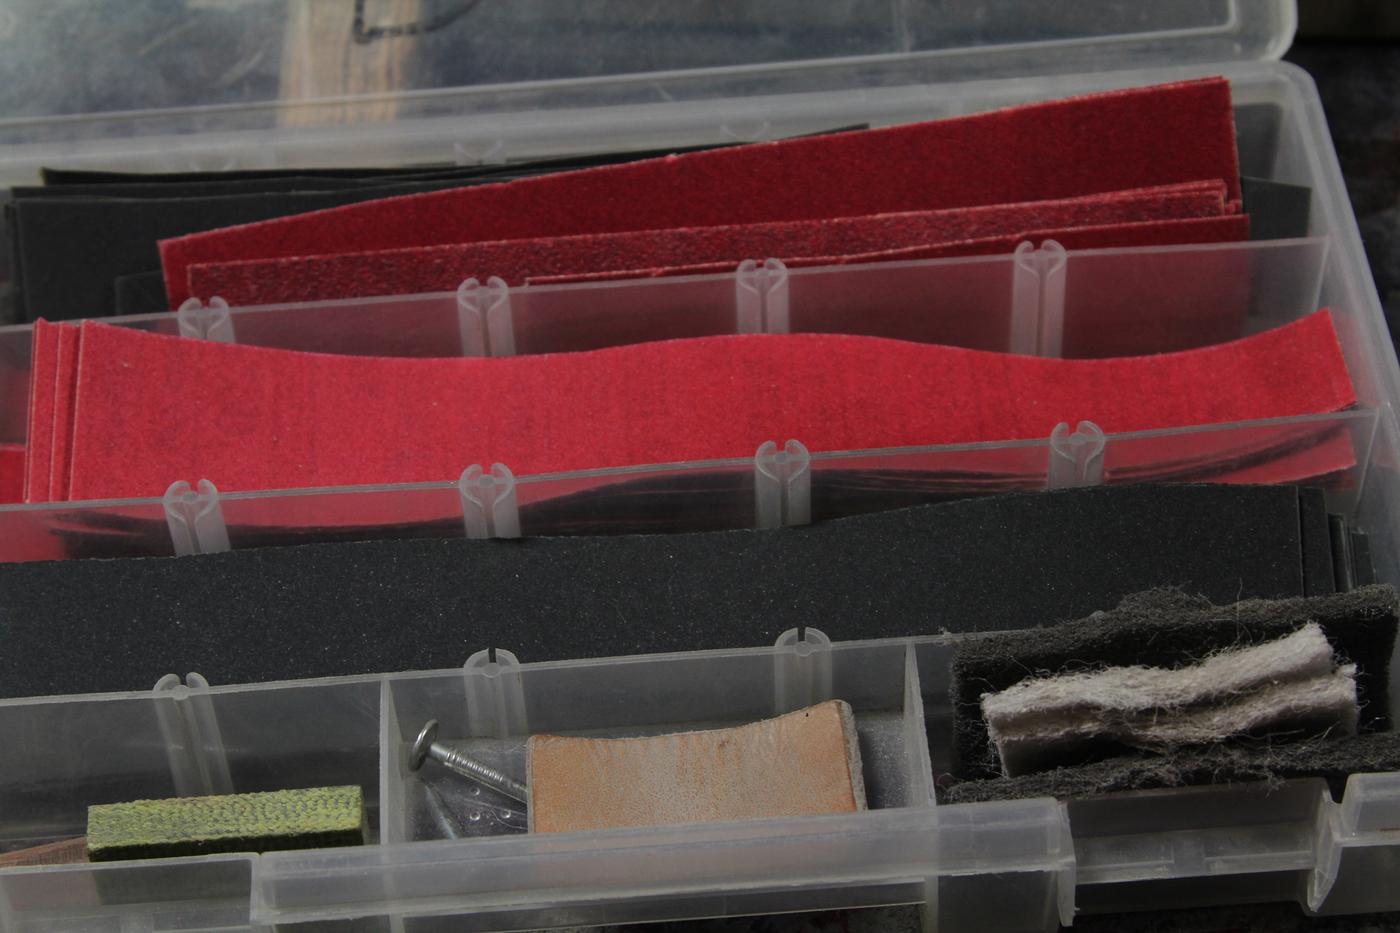
I get quite a few emails/PM’s regarding minor sanding issues so i took a photo of my sanding box to give a visual explanation that i sometimes feel i am not describing very well in text.
Here is what is going on in the photo….

Top section
This is where we start w/ the straight burlap scales. Skip to the middle section if you have wood scales or a bolster & wood combo.
150 grit in red (no longer used) and 600 grit in gray. There is a piece or 2 of 80 grit but ignore those unless you know what you are doing. Please!

Middle section
Here I have 220grit. This is where we start all the wood scales and bolster/wood combos. This is also the second step on the burlaps.

Bottom section
This is the 400grit. This is last step of sandpaper on the scales. Hopefully, If fine scratches just wont go away head back to the “Top section” and grab the 600grit.

Bottom right cubby
These are the scotch brite pads that are often mentioned when sanding advice is given. The gray (Scotchbrite #7448) is the next step after the 400 grit followed by the white (Scotchbrite #7445) to finish off your sanding. At this point all you have to do is add “Howard’s Feed & wax” for that fresh from the factory finish. Please allow approx. 15 minutes for the Howards to soak in and wipe w/ a clean cloth or paper towel.. take a break because you are done!!


Bottom middle cubby
This is my “leather backer”. We use these to make sure the pins do not become “proud” while sanding. This is an important piece of kit. The pins are not needed unless you want to volunteer to come and help us sand the “tops and fronts” before glue up. Don’t be shy we are always looking for help.


IMG_3722-vi.jpg
 
Last edited:
As a new Fiddleback Forge owner, I've found this thread incredibly helpful and great resource for info.

I will be proposing a question and photos later today regarding the finish/care of my (new) A2 Leuku. This is the only blade I have in A2 and have found it to be quick to oxidize in the wet PNW climate I live in. I will need some advice to care for the blade (and hopefully remove some light scratches on the blade left from a scotchbrite pad).

Until then - I want to contribute a VERY handy link that I've referenced many times over the years. A fellow member on MossbergOwners performed a very extensive comparison/evaluation of 30+ "gun-care" products with control-tested results for each. This is a great Thread - and can hopefully provide some additional info./insight about a few existing products and their pros/cons when it comes to protecting your metals.

Results of Gun Care Product Evaluation:
http://mossbergowners.com/forum/index.php?threads/results-of-gun-care-product-evaluation.11811/

*Note* I hope this is not violating any rules for this sub-forum, but please let me know if I need to remove this external link or reference.

Thanks for all the great info. and I will post up later with a couple questions and pictures! :)
 
I’m gonna bump this thread up, although we have lost so many good pictures. But the info is still there and it works.

I have learned some good tips here that I still use.

Example-

This knife by Allen is a dedicated kitchen knife that wifey and I use daily/weekly. It doesn’t get the careful attention it should, as a custom knife, just used as a tool. We love it. About once a year, I’ve got to bite the bullet and give her some tlc.

Evidence- A2034773-7AAC-43BC-AE2A-140FF2BC0C4C.jpeg


I followed many of the tips here, cleaned her up the best I could in about a half hour and put her back to use :)

3C970555-7ACC-478C-B71A-D13D2C971EDB.jpeg

No, she’s not picture perfect, stain free and polished l like when I got it from allen456 allen456 years ago but, I don’t mind the stains. Scars (which I’m personally full of) remind us the past is real.
 
Back
Top