The Whittling Corner

Status
Not open for further replies.
Thanks for the posts so far, everyone. In a short time we've already had a nice mix of finished and in-progress projects and fixed and folders. :thumbup:

BenHarris, JSCHENK, and kamagong those are great looking spoons. I'd like to try making one some day. I looks like all three of you have special knives for cutting the concave part of the bowl. Is such a knife a must, or can a reasonable spoon be achieved using a standard curved edge blade like a clip or pen blade?

Mr. Chips I like those cottonwood bark figures. Is carving bark much different than carving wood? How thick was the bark before you start whittling it?

BTW, I was happy to see a copy of your book in Zolthar's photo. I also own a copy and would recommend it to others. The introductory material on knives, sharpening, and basic cuts is much better than in the other books I've seen and there is a wide variety of projects to try. I'm hoping to try my hand at one of your hummingbirds soon in the New Year.

Zolthar and JSHENK, I'm looking forward to seeing more of your in-progress projects as they continue to take shape.

You can carve out the bowl without the crooked knife, but it makes it a lot easier. I've done it with the Spey blade on a stockman, but I also have a home made crroked knife that works a lot better than it looks (like most of my home made stuff, it's Ugly with a capital U).
 
You can certainly use a regular blade to carve the bowl of a spoon, but it's much easier and faster to use a dedicated tool for the task. As the cost of a good spoon knife is less than the price of a GEC, I decided to bite the bullet and order one. I already have plenty of pocketknives, but this unique blade is able to do things no other knives I own can. As it is likely to last my lifetime I consider it a wise purchase.
 
BTW, I was happy to see a copy of your book in Zolthar's photo. I also own a copy and would recommend it to others.

I second this, it's my only whittling book and I think it's great. It's illustrated with a lot of pictures explaining each step (and caveats) very clearly.

To keep up on the knife content, I use an Opinel #8 for the 'heavy' work and an Imperial Congress for the detailed cuts:
3146e6f292258469549699ec3363e559.jpg
 
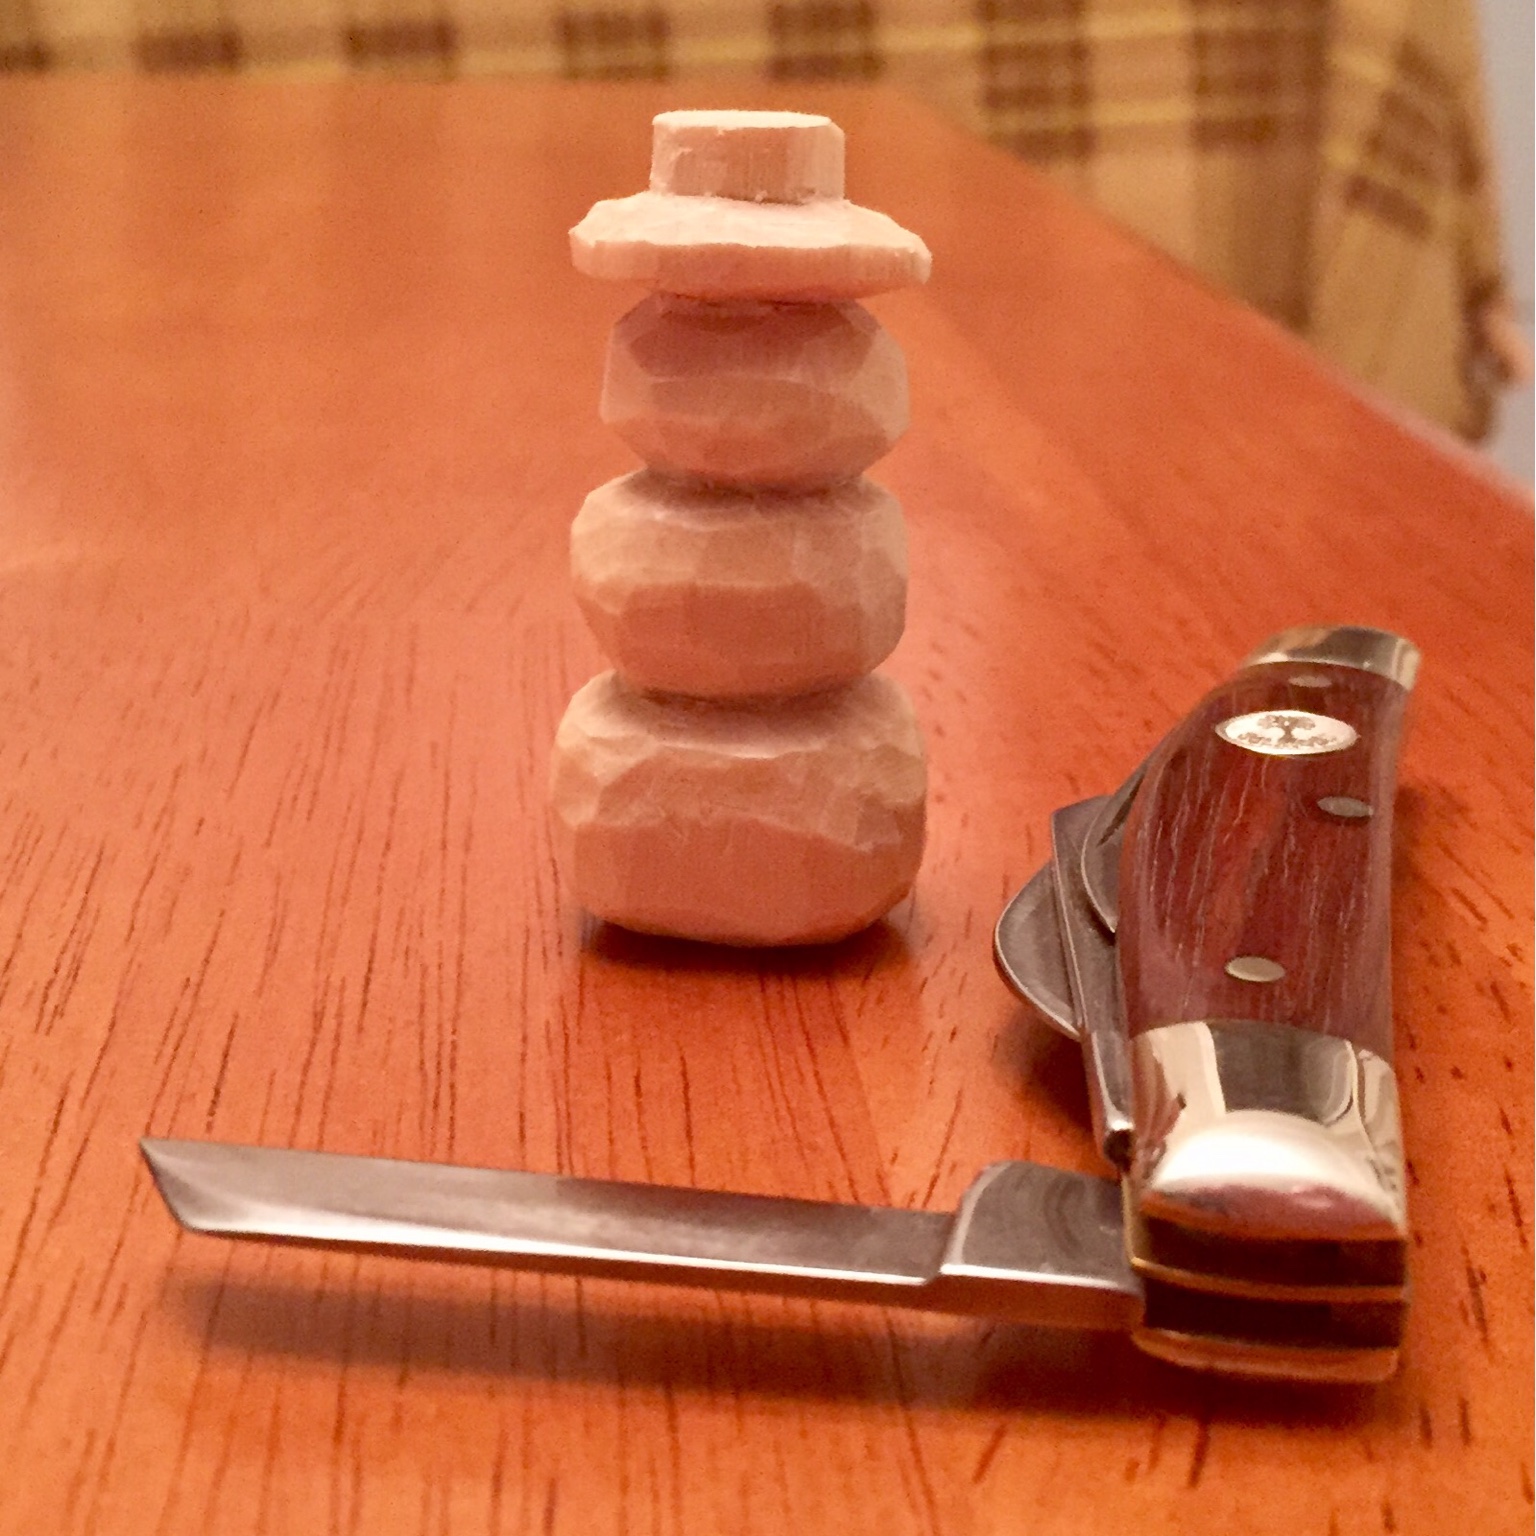
Well, this thread got me inspired to pull out the Congress Carver this evening. I only had really small basswood blanks, so I worked on this little guy. I might decide to paint him up and turn him into a tree ornament.
4a1dca3fa625b34c22891760cfb9c1fc.jpg

Nice work on the snowman and the Santa, Trout Hound. Very cool to have something you carved hanging on your tree every year.

We had an ornament exchange at work this year and I'd hoped to have the time to whittle a snowman as my contribution. Unfortunately that didn't happen. Seeing your ornaments, though, makes we want to try anyway, even though it's too late for this year.

How do you like the Böker Congress Carver?

You can carve out the bowl without the crooked knife, but it makes it a lot easier. I've done it with the Spey blade on a stockman, but I also have a home made crroked knife that works a lot better than it looks (like most of my home made stuff, it's Ugly with a capital U).

You can certainly use a regular blade to carve the bowl of a spoon, but it's much easier and faster to use a dedicated tool for the task. As the cost of a good spoon knife is less than the price of a GEC, I decided to bite the bullet and order one. I already have plenty of pocketknives, but this unique blade is able to do things no other knives I own can. As it is likely to last my lifetime I consider it a wise purchase.

Thanks for the information and advice yablanowitz and kamagong. What you said makes a lot of sense. Maybe I'll try one with what I have available and then look into making or buying a more specialized knife if I catch the spoon bug. :)
 
Thanks for the information and advice yablanowitz and kamagong. What you said makes a lot of sense. Maybe I'll try one with what I have available and then look into making or buying a more specialized knife if I catch the spoon bug. :)
If you get the bug, pinewood forge is the way to go, totally worth the money and wait. Approx 2 months.

Sent from my SM-T350 using Tapatalk
 
After I made my first spoon I realized two things. Making a functional spoon is fairly easy. Making it look good is the hard part.
 
So many of you have posted such interesting whittling examples. I have never been one to do a lot of whittling, but seeing these has inspired me. I'll post back in a few weeks with something to show, I hope...
 
So many of you have posted such interesting whittling examples. I have never been one to do a lot of whittling, but seeing these has inspired me. I'll post back in a few weeks with something to show, I hope...

A word of advice: get yourself a cut-proof glove and some leather finger guards. I won't post the picture of my index finger when I sunk a coping blade into the end of it, almost halfway down the fingernail, last year. A whittling knife, to do its job, will probably be the absolute sharpest blade you own, and you will be breaking Rule #1 by cutting toward yourself, on relatively small pieces of wood, that can sometimes break or tear out unexpectedly.

I now have one of the red Level 5 gloves that you can literally saw on with a serrated edge without cutting through. PM me if you need a good source.

Man, my wife sure was irritated when I woke her up from her nap to help me stop the bleeding!


Sent from my iPhone using Tapatalk
 
Spoon carvers, consider getting a couple of carving gouges for hollowing out spoon bowls.

I have several bent knives/hook knives etc., but I find that in most cases I like gouges better for that work.

If a deep ladle, kuksa or bowl is the project, then a short bent gouge will be needed.

Bent knives certainly work, but I think that tradition is the main reason they are popular. In the past, it was a lot easier to make a bent knife than a gouge. It still is if you are making it yourself.

By the way, it is not all that hard to make your own bent knife. Wear eye protection and gloves for this stuff. You need a small flat file to make the blade (search flea markets etc for old worn out ones). With a propane torch, heat the old file to non magnetic heat - when the magnet won't stick it is hot enough. Let it cool slowly. This will render the old file soft enough to file with an unsoftened file.

Now with a nice new file (or an old one that is still sharp), file off all the teeth on the old file, and shape the edge with a nice long smooth bevel on the side that will become the outside of the bend. This shaping can be done more efficiently with a bench mounted belt sander and a new 80 grit belt, later finishing with 120 and 220 belts. I cannot recommend a bench grinder for this - though it can be done. (If you can do this work with a bench grinder, you do not need advice from me!). If you have not done this kind of work a lot, stay away from the bench grinder! It is a tool wrecker for edged tools in the hands of the vast majority of people. No bench sander? The file will work just fine, and you absolutely will not burn the steel. A vise will be very useful in this process.

Once you have the blade shaped the way you want it, sharpen it up. This will save time later. No need to get it super sharp by stropping it at this point.

Get a piece of round steel bar or a pipe of the radius that you want on your blade and clamp that firmly in the vise.

Heat up the blade again to non magnetic and maybe just a little more, and then using that pipe as an anvil (use an anvil if you have that! I am guessing that if you do have an anvil, forge etc., you already know a lot more than I do about this process), using a hammer tap the blade to shape. You can hit it pretty hard with no danger, as long as the steel is red hot - non magnetic. Re heat and re tap if necessary. Make sure that the bevel on the blade (bevel on one side only) is on the outside of the bend.

Now get a bucket of water ready. Room temp. is OK. Heat up the blade to non magnetic again and then put it quickly into the water. The steel should be very hard at this point and could break if you drop it on concrete. Test it by trying to file it with the sharp file (in an inconspicuous spot). The file should not bite. If it does, reheat and re quench. The blade will be too hard a brittle to use in this state.

Now you need to shine up the blade in preparation for tempering. Us find sandpaper etc. Now heat the blade slowly and carefully and watch the colors form on the steel. You may want to practice this on a scrap piece to get a feel for this. Some people like to do this on a stove.

When the edge turns a light straw color take away the heat and quench it.

Make a handle and attach using whatever approach you like, sharpen and use.

I know that real knife smiths will consider the above to be way oversimplified, and that experts can do a lot better, BUT every tool that I have made using the above approach has worked just fine for a long time. You can do it too, and it will cost you very little, you will have fun doing it too. If your time is worth too much to do it, (I assume you don't have time to watch TV or play video games either then), then the ones that are commercially available are a really good deal.
 
Nice work on the snowman and the Santa, Trout Hound. Very cool to have something you carved hanging on your tree every year.

We had an ornament exchange at work this year and I'd hoped to have the time to whittle a snowman as my contribution. Unfortunately that didn't happen. Seeing your ornaments, though, makes we want to try anyway, even though it's too late for this year.

How do you like the Böker Congress Carver?

Thanks! I rather surprised myself with that Santa. It was one of the first projects I ever finished, and I did it without a pattern or anything. Just kinda eyeballed it.

I really like the Congress Carver so far. I just really enjoy whittling with a slipjoint, as opposed to a fixed blade. I saw a lot of rave reviews on it when I was looking for a dedicated whittling knife. It took me awhile to get the blades sharpened the way I wanted them, but that Solingen 1095 gets SHARP. It's downright frightening. Blade selection, size, and profile is great too. And for the price, you really can't beat it.


Sent from my iPhone using Tapatalk
 
Spoon carvers, consider getting a couple of carving gouges for hollowing out spoon bowls.

I have several bent knives/hook knives etc., but I find that in most cases I like gouges better for that work.

If a deep ladle, kuksa or bowl is the project, then a short bent gouge will be needed.

Bent knives certainly work, but I think that tradition is the main reason they are popular. In the past, it was a lot easier to make a bent knife than a gouge. It still is if you are making it yourself.

By the way, it is not all that hard to make your own bent knife. Wear eye protection and gloves for this stuff. You need a small flat file to make the blade (search flea markets etc for old worn out ones). With a propane torch, heat the old file to non magnetic heat - when the magnet won't stick it is hot enough. Let it cool slowly. This will render the old file soft enough to file with an unsoftened file.

Now with a nice new file (or an old one that is still sharp), file off all the teeth on the old file, and shape the edge with a nice long smooth bevel on the side that will become the outside of the bend. This shaping can be done more efficiently with a bench mounted belt sander and a new 80 grit belt, later finishing with 120 and 220 belts. I cannot recommend a bench grinder for this - though it can be done. (If you can do this work with a bench grinder, you do not need advice from me!). If you have not done this kind of work a lot, stay away from the bench grinder! It is a tool wrecker for edged tools in the hands of the vast majority of people. No bench sander? The file will work just fine, and you absolutely will not burn the steel. A vise will be very useful in this process.

Once you have the blade shaped the way you want it, sharpen it up. This will save time later. No need to get it super sharp by stropping it at this point.

Get a piece of round steel bar or a pipe of the radius that you want on your blade and clamp that firmly in the vise.

Heat up the blade again to non magnetic and maybe just a little more, and then using that pipe as an anvil (use an anvil if you have that! I am guessing that if you do have an anvil, forge etc., you already know a lot more than I do about this process), using a hammer tap the blade to shape. You can hit it pretty hard with no danger, as long as the steel is red hot - non magnetic. Re heat and re tap if necessary. Make sure that the bevel on the blade (bevel on one side only) is on the outside of the bend.

Now get a bucket of water ready. Room temp. is OK. Heat up the blade to non magnetic again and then put it quickly into the water. The steel should be very hard at this point and could break if you drop it on concrete. Test it by trying to file it with the sharp file (in an inconspicuous spot). The file should not bite. If it does, reheat and re quench. The blade will be too hard a brittle to use in this state.

Now you need to shine up the blade in preparation for tempering. Us find sandpaper etc. Now heat the blade slowly and carefully and watch the colors form on the steel. You may want to practice this on a scrap piece to get a feel for this. Some people like to do this on a stove.

When the edge turns a light straw color take away the heat and quench it.

Make a handle and attach using whatever approach you like, sharpen and use.

I know that real knife smiths will consider the above to be way oversimplified, and that experts can do a lot better, BUT every tool that I have made using the above approach has worked just fine for a long time. You can do it too, and it will cost you very little, you will have fun doing it too. If your time is worth too much to do it, (I assume you don't have time to watch TV or play video games either then), then the ones that are commercially available are a really good deal.

Thanks for sharing this. I always enjoy learning new things.

That said, I enjoy working wood much more than I do sharpening steel. Part of me hates getting a new slipjoint because that always means a reprofile before it works properly. Making a spoon knife from start to finish, and then bringing that weird shaped piece of steel to the proper level of sharpness is much more work than I want to do.
 
4d46dd80feb5b32ff245614136047971.jpg
3e1de569497b91e76c7759b0408d6da4.jpg
f51f9b2de7574b005085e68f80e8154e.jpg
3f07bb4afd2726650b17f2bf4b988dbf.jpg

My first spoon. Got the spoon and sloyd knife from pinewood forge. I accidently ran the spoon over with my car right after I finished it. As you can see there are still a few dents in the weave pattern.

Sent from my XT1585 using Tapatalk

I don't want to side track but who makes those tools you are using? My son and I made a similar styled spoon recently and "attempted" a pattern like that for the first time with a Mora Carving knife...it definitely didn't look clean.
 
I don't want to side track but who makes those tools you are using? My son and I made a similar styled spoon recently and "attempted" a pattern like that for the first time with a Mora Carving knife...it definitely didn't look clean.
Del Stubbs at pinewood forge

Sent from my XT1585 using Tapatalk
 
I don't want to side track but who makes those tools you are using? My son and I made a similar styled spoon recently and "attempted" a pattern like that for the first time with a Mora Carving knife...it definitely didn't look clean.

I think it requires an eye for design, or barring that, lots of practice. My first spoon didn't look anything like that. I can make things like a ball-in-cage, but I struggle with things requiring an artistic touch. I don't think I'm wired that way. I figure if I persevere I might eventually be able to fake it.

Your Mora 106 or 120 shouldn't be holding you back. I use my 106 as often as my PF sloyd knife. I do highly recommend their spoon knife.
 
A word of advice: get yourself a cut-proof glove and some leather finger guards. I won't post the picture of my index finger when I sunk a coping blade into the end of it, almost halfway down the fingernail, last year. A whittling knife, to do its job, will probably be the absolute sharpest blade you own, and you will be breaking Rule #1 by cutting toward yourself, on relatively small pieces of wood, that can sometimes break or tear out unexpectedly.

I now have one of the red Level 5 gloves that you can literally saw on with a serrated edge without cutting through. PM me if you need a good source.

Man, my wife sure was irritated when I woke her up from her nap to help me stop the bleeding!

Thanks for the reminder about being safe. I'd also add to always pay attention to where the knife would go if the wood suddenly disappeared, and keep your fingers and body clear of its path, even if you're wearing a glove. If the wood splits unexpectedly, that path will not be theoretical.

By the way, it is not all that hard to make your own bent knife.

...

Great stuff! Thanks for taking the time to explain the process in detail.
 
Spoon carvers, consider getting a couple of carving gouges for hollowing out spoon bowls.

I have several bent knives/hook knives etc., but I find that in most cases I like gouges better for that work.

If a deep ladle, kuksa or bowl is the project, then a short bent gouge will be needed.

Bent knives certainly work, but I think that tradition is the main reason they are popular. In the past, it was a lot easier to make a bent knife than a gouge. It still is if you are making it yourself.

By the way, it is not all that hard to make your own bent knife. Wear eye protection and gloves for this stuff. You need a small flat file to make the blade (search flea markets etc for old worn out ones). With a propane torch, heat the old file to non magnetic heat - when the magnet won't stick it is hot enough. Let it cool slowly. This will render the old file soft enough to file with an unsoftened file.

Now with a nice new file (or an old one that is still sharp), file off all the teeth on the old file, and shape the edge with a nice long smooth bevel on the side that will become the outside of the bend. This shaping can be done more efficiently with a bench mounted belt sander and a new 80 grit belt, later finishing with 120 and 220 belts. I cannot recommend a bench grinder for this - though it can be done. (If you can do this work with a bench grinder, you do not need advice from me!). If you have not done this kind of work a lot, stay away from the bench grinder! It is a tool wrecker for edged tools in the hands of the vast majority of people. No bench sander? The file will work just fine, and you absolutely will not burn the steel. A vise will be very useful in this process.

Once you have the blade shaped the way you want it, sharpen it up. This will save time later. No need to get it super sharp by stropping it at this point.

Get a piece of round steel bar or a pipe of the radius that you want on your blade and clamp that firmly in the vise.

Heat up the blade again to non magnetic and maybe just a little more, and then using that pipe as an anvil (use an anvil if you have that! I am guessing that if you do have an anvil, forge etc., you already know a lot more than I do about this process), using a hammer tap the blade to shape. You can hit it pretty hard with no danger, as long as the steel is red hot - non magnetic. Re heat and re tap if necessary. Make sure that the bevel on the blade (bevel on one side only) is on the outside of the bend.

Now get a bucket of water ready. Room temp. is OK. Heat up the blade to non magnetic again and then put it quickly into the water. The steel should be very hard at this point and could break if you drop it on concrete. Test it by trying to file it with the sharp file (in an inconspicuous spot). The file should not bite. If it does, reheat and re quench. The blade will be too hard a brittle to use in this state.

Now you need to shine up the blade in preparation for tempering. Us find sandpaper etc. Now heat the blade slowly and carefully and watch the colors form on the steel. You may want to practice this on a scrap piece to get a feel for this. Some people like to do this on a stove.

When the edge turns a light straw color take away the heat and quench it.

Make a handle and attach using whatever approach you like, sharpen and use.

I know that real knife smiths will consider the above to be way oversimplified, and that experts can do a lot better, BUT every tool that I have made using the above approach has worked just fine for a long time. You can do it too, and it will cost you very little, you will have fun doing it too. If your time is worth too much to do it, (I assume you don't have time to watch TV or play video games either then), then the ones that are commercially available are a really good deal.
Luckily, I'm a whittler, not a carver, so I won't be needing gouges anytime soon. My spoon knife was a lot less work than that. I just heated a blade for a Stanley 10-049 utility/pocket knife, bent it into a U shape and dropped it into a pan of oil. Ugly? Check. Functional? After five years of use, gotta check that box too. Would I warranty it to someone else? No way, but it works for me. And if it does break, I'm out a buck and a half and 15 minutes of labor. Pretty sure I've gotten my money's worth out of it already.


Luckily, I'm a whittler, not a carver, so I won't be needing gouges anytime soon. My spoon knife was a lot less work than that. I just heated a blade for a Stanley 10-049 utility/pocket knife, bent it into a U shape and dropped it into a pan of oil. Ugly? Check. Functional? After five years of use, gotta check that box too. Would I warranty it to someone else? No way, but it works for me. And if it does break, I'm out a buck and a half and 15 minutes of labor. Pretty sure I've gotten my money's worth out of it already.


If that works use it!

Does this thing keep an edge after this treatment?

If it does - wonderful.

I may have to do some experiments with some of the utility knife blades in this connection.

If this works it would sure speed things up, and provide people with really inexpensive crooked knife possibilities.
 
Nice thread Greg, It had been a little while since any new projects had popped up on the porch and in only a few days this has been both inspirational and educational. Really awesome stuff everyone!! I have sadly had very little time as of late to work on my basic skills but I'm still sticking with the same plan which is to take a step back and work some very simple projects.
 
Luckily, I'm a whittler, not a carver, so I won't be needing gouges anytime soon. My spoon knife was a lot less work than that. I just heated a blade for a Stanley 10-049 utility/pocket knife, bent it into a U shape and dropped it into a pan of oil. Ugly? Check. Functional? After five years of use, gotta check that box too. Would I warranty it to someone else? No way, but it works for me. And if it does break, I'm out a buck and a half and 15 minutes of labor. Pretty sure I've gotten my money's worth out of it already.


That's pretty slick. Do you magnet test etc or did you just wing it and it all turned out?
 
If that works use it!

Does this thing keep an edge after this treatment?

If it does - wonderful.

I may have to do some experiments with some of the utility knife blades in this connection.

If this works it would sure speed things up, and provide people with really inexpensive crooked knife possibilities.

Does it hold an edge like O-1 at Rc 60? Nope. Did it ever? Nope. Can I carve a spoon bowl without stopping to sharpen it? Yep. As far as I can tell, it's no better or worse than before I mangled it. It's made of some unknown stainless steel so I don't expect a lot from it, but it is adequate for my limited and simple needs.

That's pretty slick. Do you magnet test etc or did you just wing it and it all turned out?

Just winged it. All that magnet testing and air cooling stuff is needed to soften a file enough to work it, but it isn't necessary just to bend a utility knife blade.
 
Status
Not open for further replies.
Back
Top