How To Thin a 110 (or I might be out $28)

Rupestris

Gold Member
Joined
Mar 1, 2006
Messages
28,891
First, my disclaimer. I've disassembled and/or assembled things with just about any type of fastener. I have never, in my 49 years, peened anything together. This might be an exercise in futility but, I thought I'd share.

I've had this run-of-the-mill 110 collecting dust for a few years. It's a WM blister pack special with a blade so off center that it rubs. I believe it's a 2011. I didn't check. I'll confirm later.
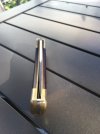
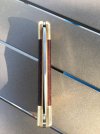
IMG_4621.JPG IMG_4622.JPG

There are plenty of disassembly videos on YouTube so I won't bore you with that.

I will say, I wanted to do this without spending more than the knife is worth as I consider this more of a learning experience.

I tried to remove the scales without damage but, as I carefully drilled then tapped the lock bar pin out, the scale on the opposite side chipped out.

I was forced to shop for an alternative.

At the local science and surplus, I found this 1/8" thick, natural green G10 fiberglass circuit board for a whole $1.30. That'll work.
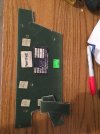
IMG_4686.JPG
 
After cutting and fitting the G10, I found I'd have to take at least 1/16 off each bolster. I cut them with a hacksaw as I don't have a band saw.

IMG_4687.JPG

Using a 4" X 32" single speed bench top belt sander, I took each one down slowly, checking often. I started with 80 grit, then moved on to 120 until I got them close to where I wanted them.

I did a little more rough shaping on the scales with the 80 grit belt.

IMG_4688.JPG

Concerned that the fitting of the scales might have tweaked the handle sides, I flat sanded them with 120 on the belt then flat sanded them with 320. I might go to 600 just for the fun of it.
IMG_4689.JPG

So far I have the overall width down to 1/2".

Tomorrow I plan on rounding the edges of the bolsters and beginning reassembly.

If I'm doing anything incorrectly or if someone has some helpful tips, I'm all ears.
 
View attachment 969863 You can put that knife together with screw sets. The barrels are 1/8” diameter. The internal threading is #2X56TPI. The barrels and screws come in various lengths. If you have to shorten a barrel and/or a screw, put the ragged ends together with red Loctite to turn the assembly into a T-nut. When using a T-nut assembled in this fashion, 2 screw driver bits will be required to assemble and disassemble the knife, but only one screw will be removeable.
 
Could someone remove the grips.
grind down the brass to level and hammer in the pins.
I'd like to handle an all brass 110.
 
Could someone remove the grips.
grind down the brass to level and hammer in the pins.
I'd like to handle an all brass 110.
that would be very thin and possibly weak. let us know how it turns out.....

edit part.....thinking about it I have a thin brass mercator that is plenty strong. it has hammered down, like a rivet shape, pins holding it together.
 
Last edited:
View attachment 969871 The bottom knife in this photo was skinnied up by grinding 1/32nd of an inch off the inside of each Titanium scale. The original thickness of the Model 560 was 7/16”. After the modification, the new thickness was 3/8”. The knife was reassembled using 4 screw sets. One scale was drilled and tapped for a pocket clip. A clamp type thumb stud was added.
The 186 was 1/2” thick as was the original 560. The second version of the 560 was 7/16” thick.
 
Could someone remove the grips.
grind down the brass to level and hammer in the pins.
I'd like to handle an all brass 110.

I ground the rear bolster from a 112 and the pins were not very firm in the thin brass that remained, so I center punched them to tighten the fit. I'm not sure that hammering the pins would be sufficient, especially at the pivot.
 
View attachment 969871 The bottom knife in this photo was skinnied up by grinding 1/32nd of an inch off the inside of each Titanium scale. The original thickness of the Model 560 was 7/16”. After the modification, the new thickness was 3/8”. The knife was reassembled using 4 screw sets. One scale was drilled and tapped for a pocket clip. A clamp type thumb stud was added.
The 186 was 1/2” thick as was the original 560. The second version of the 560 was 7/16” thick.

Very cool. I would do the same.


I ground the rear bolster from a 112 and the pins were not very firm in the thin brass that remained, so I center punched them to tighten the fit. I'm not sure that hammering the pins would be sufficient, especially at the pivot.

I don't have the tools but I might order a grinder so I might if I can go to my inlaws (I live in a city) I'd grind down a 110 and see what happens.

ALSO
I'm really excited about the OP's photos. Please keep us updated.
 
The neat thing about a screw set, especially in the pivot, is that it compresses the handle slabs against the pivot bushing reducing the side play of the blade. Rivets can slip when prying, spreading the handles. Screws not so much.
 
Reassembly.

I've cleaned the G10 and slabs, scuffed them thoroughly with 80 grit by hand to give the epoxy a little more bite. Re cleaned them with a heavy naphtha solvent to remove any oils or contaminants.

IMG_4701.JPG IMG_4703.JPG IMG_4705.JPG

Once the epoxy sets, I can clean it up, and finish the surface finishing and a little more thinning and contouring.

For those that have done this before, have I messed up yet? o_O

If so, I'd love some advice or tips. I'm somewhat winging this :p.
 
Nice job, Chris! I hope this takes care of the centering issue - it'll look great too!
Hope you are considering joining us at JK's on Sept. 22 for the gathering.

best

mqqn
 
I put a small piece of tape over the holes in the scales to keep the epoxy from running inside. Keep some solvent handy to wipe the squeezed out epoxy off the rocker bar. I use a little brake cleaner on a rag. I also shim the blade well, so that it the clamps don't flex the scales. Be careful to not glue the shim in place...don't ask.
 
Nice job, Chris! I hope this takes care of the centering issue - it'll look great too!
Hope you are considering joining us at JK's on Sept. 22 for the gathering.

best

mqqn

I wish I could be at John's. I leave for Michigan on the 21st.

Thanks for the compliment.

I put a small piece of tape over the holes in the scales to keep the epoxy from running inside. Keep some solvent handy to wipe the squeezed out epoxy off the rocker bar. I use a little brake cleaner on a rag. I also shim the blade well, so that it the clamps don't flex the scales. Be careful to not glue the shim in place...don't ask.

Thanks for the tips. I'll keep them in mind next time :p.

It was drying when I posted the last update.

IMG_4704.JPG
 
Back
Top