Tiiimmmmbbbuuuur.

meako

Gold Member
Joined
Sep 4, 2006
Messages
9,914
Cue violin music.
This is beginning to worry me.
I bought this as a Xmas present for myself. I have been seriously abandoned by my family which has me in pain and financial turmoil.
Selfishly wanting something to open on xmas morning apart from a vein I left it in its package til then.
I love the orange burl scales and lge stockman pattern. Its been my precious ever since. That plus its a Queen S&M so its like may not be seen again.Loving the patina it has grown.
Now this20180330_150144.jpg
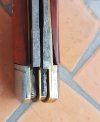
Warp factor 5.
Thinking supaglue and a clamp before it gets worse. But dammit Jim I'm a retired fireman not a cutler! Nor do I have access to any of my tools ,knives, and most other equipment nor possessions.
Seems lady luck has left meako at the pound.
Any clues for a fix on this most welcome and thanks in advance.
 
I'd fill that gap with epoxy. Clamping could give the risk of fracture unless done carefully...

What is it bone or horn? Badly cured scale material in the first place or your conditions are ultra dry.

Might be an idea to try and fix some of those other issues too for your peace of mind.

Regards, Will
 
If it's burl, I think that means wood from a union or root, with irregular swirly grain. And I think warping of wood always has to do with moisture. (I heard an arborist saying "union", so I fear that "crotch" has become a gratuitous sexual reference.)
I might try epoxy and two clamps, lest the stuck down end pop up when I clamp the curled up end.
Maybe our craftsmen will chime in with better advice.

Also, if it's burl and wasn't cut correctly, it might always warp. Furniture guys know about this - a twisted or knotted piece of wood continues to grow that way even after it dries. So even it you cut it flush, it's basically programmed in that piece of wood's DNA to twist. I don't know if that applies here.

glennbad glennbad ?
 
Wood needs time to dry and/or be stabilized. If this wood was cut and then used too soon, that would lead to that. Humidity can also play a big role in warpage/shrinkage. I think all of those factors are at play here. I have seen this happen with bone also.

As to the fix, I'm not sure you will ever be able to get that fully back in place, it even looks as though the material has shrunk smaller in that area, and has curled so much, that I don't think it will go back. I don't think it can be manipulated with steam like some woods can be. I'd try to dry clamp it under pressure to see if there is any movement of it back toward the liner. See how far it will go back over some extended time before stopping, then glue and clamp it, using the epoxy to backfill any gap. Sand and buff anything "sticking up" past the bolsters.

That's my take on it, anyway...
 
Hey meako, that's a real bummer, on many levels. I,m with Will, backfilling the space with epoxy is probably your best bet at this point. I've repaired some Ebony in the past by collecting a sample of sanding dust from a similar piece, and mixed it into the epoxy as a filler. Then I used a small spatula carved from a bamboo skewer to slather the epoxy into the crack...mask off any areas you don't want the epoxy getting into, and keep,a bit of isopropyl on hand with small pieces of paper towel to clean up any messes. Good luck, and hope things turn for the better for you.

P.S. It's also wise to use an epoxy resin with a longer cure time, with the five minute stuff, it can start setting up before you are done, patience can be a virtue...
 
meako meako , Best wishes through the difficult times. In regards to the covers, water or even moisture from the air could have caused the change. It may also have been oil. If the handles are saturated with oil, you may need to clean it up a bit before gluing. Heat, water, and pressure are sometimes used to straighten wood but I'm not sure how to best attempt this repair and avoid cracking the covers. I do agree with others that 2 part epoxy will work better than super glue.
 
Thanks for the advices you guys and many thanks for well wishes.I need that right now.
Most of what has been suggested for the fix has confirmed what I was thinking already.

Could be the dry Aussie climate too
 
Ideally - if you could pull the entire piece off - clean it and the opposing side THEN epoxy it back together you could end up with a solid fix. Just trying to pull the one end into submission would likely pop the other end.

It does have a bit of curl and the start of a crack so the idea of just filling the gap with epoxy has merit BUT you would then have a piece sticking out. If you aren't prepared to sand and change the patina this would be a pretty unattractive fix.

If you can get the side off - let it sit damp for a few days - maybe even resting on a screen over a pan of water. This could help
make it just a bit more flexible and won't compromise the effect of the 2 part epoxy which will cure even on damp.

PROTECTION - Yup make your knife wear a condom o_O As carefully as possible wrap the parts of the knife not intended for epoxy with a shrink wrap or saran wrap type of product. Use a band of painters or masking tape along the edges first and then tape the wrap to the tape. A good job of protection will save much aggravation later.

CLAMPING - I suggest that you use reinforced strapping tape (the kind of tape that has bands of fiber) as your clamp. AFTER you have the knife all protected except for the epoxy side - smear in the epoxy to the two surfaces then use the strapping tape as the clamp. Get a good starting wrap and then work the tape as firmly (tight-tight-tight) as possible around the entire knife. 12mm wide tape is better than the wider stuff as it will follow the contours better and I think, tighten more evenly.

ALTERNATIVELY Have a 2 pads of wood on hand 9 to 12mm thick that can be used as clamping blocks. Apply slick packing tape to the epoxy face side to keep the pad from sticking. Clamp the knife between these two pads and squeeze the scale tightly and evenly into position. It will be a challenge to keep the piece properly aligned while you are clamping especially as you will be obscuring the edges SO that's why I suggest using tape. The advantage of the clamp method though is the added pressure you can apply.

RESULTS - after the epoxy has cured you will do the unveiling and see that you accomplished: great things - nothing at all - ruined the knife irreparably. Hard to know how this will all come together.

Sorry for the long winded explanation. It will take less time to do the job than it took me to write this post :rolleyes: :)

Good luck! Have fun, be calm, be determined and otherwise just do your best. You will be soooo happy if you can save it.

Ray
 
Thanks Ray
Very informative post.
If i can get the very basic s together .Ill do the poxy n clamp. Probably clamp over the pin too. Upon close inspection of the grainit looks like that could be the issue.
Cheers everyone for the help.
 
Thanks Ray
Very informative post.
If i can get the very basic s together .Ill do the poxy n clamp. Probably clamp over the pin too. Upon close inspection of the grainit looks like that could be the issue.
Cheers everyone for the help.
If all else fails, cling to and share your humor. Keep us posted on how you are doing mate.
 
Aaagchh ghhkkk haggveeuugghcht brraappa haaaarrkkk haaarrk a..huk!!
Translated from Klingon:
"A Klingon finds humour when all others are weeping with grief ha ha ha a huk!!"

Good to see you haven't lost your sense of humour, hang in there mate. Sorry to hear you're going through some hard times.
 
Back
Top