Tool.... Not the band...

Joined
May 2, 2013
Messages
1,711
Today I had one of those moments where I said 'man, had xxxxx not told me about this tool, I'd have been hosed on this kind of stuff for years' moments in the shop. And this time I couldn't recall that specific tool being mentioned in a while. We see file blocks, sandpaper backing blocks, jigs, round vises etc all the time. The simple to make and really handy broaching tool though is a simple project that ends up getting used for everything after you make yourself one.

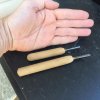
They're simple. Take a decently thick multi-purpose Sawzall blade and grind away all but about an inch of teeth. Grind it as thin as you dare, but it isn't like starting over is a big deal. You want it to hopefully fit down into as tight a space as possible but still be stiff enough to do some work.

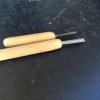
Here is the shape I described...
20160716_213910-1_zpsnwgldkfo.jpg


I am doing what the customer requested as his 'high end zombie Knife...' I first said, 'well, that should be easy. Won't the same tools kill lower, middle and high class zombies about the same?' Then I figured it out. He meant a decent Knife that had that oozing toxic sludge look without being cheesy and cheap. So a Ka-bar rebuild seemed perfect. If you have never done one, and are thinking about getting into Knife restoration, it's a good place to start. They're pretty easy with stacked leather 'washer' .... But for this one I decided on a solid 'ghost jade' handle. Itchy itchy g10...

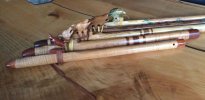
It's not done yet, but here is a picture of the rough hole that the above pictured tool will help you cut.
20160716_214007-1_zpspjvewgjw.jpg


Some people put handles on them. And it does help with comfort and I do have some that do. But it always seems like that ends up limiting the tool somewhere along the line. So I use tape when needed and peel off when not desirable.

Sorry if this one has been mentioned and I missed it somewhere. And I'll add a few actual how to photos if this isn't ridiculously simple to understand...

I'll have pics of the Ka-bar when it's done. Should be neat. Not really my thing... but neat.

Cheers.

-Eric
Overmountain Knife and Tool
Overmountain.us.com
 
Last edited:
Eric,

Thanks for this. Had I had this, maybe my deer antler hand would have come out a weeee bit better fitting/looking. I had used a Dremel and was a bit too aggressive.

I've read elsewhere of people using long drill bits and a drill press or a specially made horizontal jig along with hand drill. Nice to have a range of tools to use.

Best

Sent from my Sero 7 Pro using Tapatalk
 
A few people had suggested broaches when I asked about making an antler handle. I searched looking to buy one but only found a few that were home made and assumed the makers were actually cutting the teeth into them and hardening the broach. I don't have the stuff for that so I gave up. Didn't occur to me that I could use a sawzall blade. This makes it easy. Thanks.
Funny thing is I made a couple "rough cut pull files" by stacking 5 pieces of scroll saw blades together and gluing them into a handle. This isn't far off...I should have seen it.
I have some jigsaw blades I have done the same thing with. They are stacked and welded across the spine, teeth turned opposite directions. Then a handle smacked on the back. Gives me a 3" x 1" very rough rasp. With wood turning on a lathe it absolutely burns through it. Doing an axe handle now in curly maple and using it with the draw Knife to really remove some stock.

I love maker made tools. When I started tooling leather I bought a bunch of pattern stamps. Then I noticed all the old guys were using custom stuff. I asked and they told me to go get a bunch of heavy stainless steel hex bolts and carriage bolts. Then turn the threads off, shape the head to whatever pattern you like and have at it. I think I've got a few hundred bucks worth of tools (if I'd paid retail) for a couple of $20's and a $10 here and there.

Cheers!

-Eric
Overmountain Knife and Tool
Overmountain.us.com
 
I know I didn't search before posting this... Sorry....

But I'd love to see more maker made tools. I copied Nick's sanding bars with G10 handles years ago. And a few more here and there. Never know what a maker may have lying around and uses everyday that another of us may need and hasn't engineered....

If you've got something, post it. I'd like to see some bowling ball vises if anyone has conquered that. I have two big truck disk brakes and steel to do the pinched foot pedal style. Dunno what to use as a surface plate.... Pins and such or just a machine vise.

Cheers!


-Eric
Overmountain Knife and Tool
Overmountain.us.com
 
I have some jigsaw blades I have done the same thing with. They are stacked and welded across the spine, teeth turned opposite directions. Then a handle smacked on the back. Gives me a 3" x 1" very rough rasp. With wood turning on a lathe it absolutely burns through it. Doing an axe handle now in curly maple and using it with the draw Knife to really remove some stock.

I love maker made tools. When I started tooling leather I bought a bunch of pattern stamps. Then I noticed all the old guys were using custom stuff. I asked and they told me to go get a bunch of heavy stainless steel hex bolts and carriage bolts. Then turn the threads off, shape the head to whatever pattern you like and have at it. I think I've got a few hundred bucks worth of tools (if I'd paid retail) for a couple of $20's and a $10 here and there.

Cheers!

-Eric
Overmountain Knife and Tool
Overmountain.us.com

When you say teeth turned opposite directions do you mean you are alternating the direction of the teeth? Like one for pushing, one for pulling, one for pushing one for pulling. So you cut in both directions with it?
The ones I made out of scroll blades are set up to cut when i pull. I use them to rough out the air ramps when I make native american flutes.
I am interested in shop made tools too. I love using tools I made. I'm so excited to get home and finish my 2x72 grinder I am making.
Exactly. They hav the slightest directionality to them so turned opposite each other. I honestly just stacked them as such on a guess. I don't know that it made any difference in the manner I'm using them, but it works fine... May have to try them the same direction and see if it matters. Obviously by hand they are moving at a different pace than in a jigsaw, and moving differently, but it works pretty darn good. I'll try to remember to take a pic when we get back home next Thursday....

-Eric
Overmountain Knife and Tool
Overmountain.us.com
 
Eric,

If haven't been done yet, maybe a subforum here where people can showcase/swap ideas of their maker-made tools, jigs and all, including how-to guides if tool design is not self-evident (or link to an 'structible showing same).

Sent from my Sero 7 Pro using Tapatalk
 
Exactly. They hav the slightest directionality to them so turned opposite each other. I honestly just stacked them as such on a guess. I don't know that it made any difference in the manner I'm using them, but it works fine... May have to try them the same direction and see if it matters. Obviously by hand they are moving at a different pace than in a jigsaw, and moving differently, but it works pretty darn good. I'll try to remember to take a pic when we get back home next Thursday....

-Eric
Overmountain Knife and Tool
Overmountain.us.com

I'm not home till Saturday. I will take a picture of mine then. Basically running the teeth all the same direction makes it cut in one direction....like a saw or file. I wanted one that cut when I pulled so I set the teeth that way. I expect yours cuts in both directions.
 
I'm not home till Saturday. I will take a picture of mine then. Basically running the teeth all the same direction makes it cut in one direction....like a saw or file. I wanted one that cut when I pulled so I set the teeth that way. I expect yours cuts in both directions.
It does. But I can see how unidirectional would work well. I'm picturing something set up like a draw Knife but as more of a rasp. That could be handy.

Cheers.

-Eric
Overmountain Knife and Tool
Overmountain.us.com
 
Here are the two "files" I made using jigsaw blades. Teeth all alined to cut when I pull. I use them to form the air split area on the native american flutes I make. I put my hand in there to give an idea of how big they are.

Randy
 

Attachments

  • IMG_5190.jpg
    IMG_5190.jpg
    40.9 KB · Views: 13
  • IMG_5188.jpg
    IMG_5188.jpg
    42 KB · Views: 10
  • IMG_3487.jpg
    IMG_3487.jpg
    42.2 KB · Views: 12
Back
Top