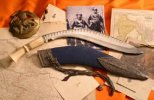
Here's a picture I sent to Bill for photographing indoors, but later realized it could go here for everyone to enjoy.
The biggest problem with novice/amateur level photography is the lack of adequate lighting. There seems to be a great divide between them and the pros in term of lighting packages.
Well, I found a page online that gives what could be called "The Poor Man's Lighting Setup".
I bet that everybody here has these 2 items:
Flood light
Umbrella
And that's all you need to get good lighting for photographing knives.
Here's the pic:
Here's a link to how this guy came up with his "poor man's" setup.
http://www.parisdesignonline.com/dpc/
You could actually create this same effect in many different ways with different lights and materials. Just stay true to these 3 rules:
- 1 - don't point the light directly at the knife - point it directly away from it
[*]2 - use a brightly colored (white prefered) object to reflect the light back onto the knife
[*]3 - use lightly colored backgrounds
Pointing the light right at the knife is what causes those awful "hot spots" on your photograph and gives a harsh glare. That's why you point the light
away from the object - no glare.
You could actually use just about anything you could imagine to adhere to rule #2. I've used plywood painted different colors, posterboard held in an arc, styrofoam, the wall (or a corner), cloth, books, and the list goes on and on...
Simply put, lightly colored backgrounds reflect more light than darker backgrounds (which may look cool, but absorb all your light). You need all the light you can get and often pictures with too much background are distracting anyway.
Somebody else beside me try this out and come back and let me know how it worked for you!
Dan


") )
)