Tutorial - Designing a Knife Around the Handle - New photos and progress

Stacy E. Apelt - Bladesmith

ilmarinen - MODERATOR
Moderator
Knifemaker / Craftsman / Service Provider
Joined
Aug 20, 2004
Messages
37,752
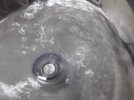
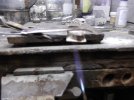
I am putting up a tutorial on making a knife from a special piece of handle material. It isn't uploading right, so I may have to put it up in pieces. Bear with me and keep watching this thread as it develops.

Sometimes a piece of handle material comes along and just yells "Make a Knife out of Me!". You have to respect that kind of moxie.

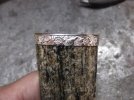
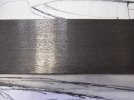
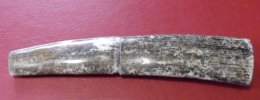
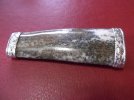
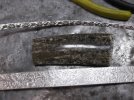
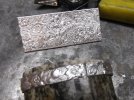
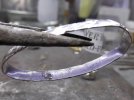
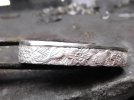
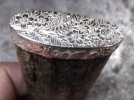
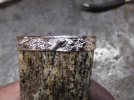
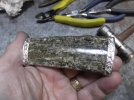
I regularly design a knife starting with the handle. I thought some of you folks would like to see the process. I started this project after coming back from Ashokan last week. I have had this fantastic piece of fossil walrus for a while, and decided to get going with it. I decided to make a dress sgian dubh and a belt knife that isn't quite a dirk, but would be a good companion for the sock knife. I added sterling silver bolsters and butt caps with an engraved floral pattern. They only project a tad above the ivory,....just enough to give a secure grip. Obviously, there can be almost no trimming or shaping done to this fossil material...so I designed the knife around the handle.
I'll post photos as I go as well as some from similar projects. The blank posts are for future photos and tutorials on making the caps.

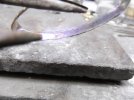
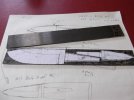
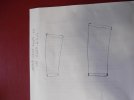
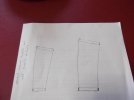
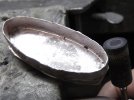
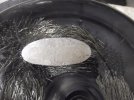
OK, enough for now. Here are some photos of the plans being drawn and the patterns glued up.

For some reason the photos loaded in reverse order.
 

Attachments

  • DSCF2466.jpg
    DSCF2466.jpg
    55.4 KB · Views: 172
  • DSCF2465.jpg
    DSCF2465.jpg
    43.3 KB · Views: 180
  • DSCF2464.jpg
    DSCF2464.jpg
    35.8 KB · Views: 173
  • DSCF2463.jpg
    DSCF2463.jpg
    37.4 KB · Views: 163
  • DSCF2461.jpg
    DSCF2461.jpg
    22.8 KB · Views: 152
Last edited:
1) Sit down at the drawing table with pens, pencils, a ruler, paper etc. As you can see, I just reuse the back of paper from copies and things I don't need anymore. If you need a little guidance, a book of graph paper is also good.
2) Look at the handle material. Turn it, flip it over, hold it in your hand, think how a knife should look with it on the end. Mark in pencil where the material will be trimmed ( if needed)....DON"T cut anything yet! Ideas change, but sawed off wood/ivory can't be unsawn.
3) Draw around the material on paper. Make any cuts/trimming/shaping on the PAPER first. Once you have it figured out, you can cut the material...but make sure the whole plan is thought through first. Sometimes a piece will make two handles alone, and sometime it will make two handles by adding bolster and butt blocks to make each half a little longer. I regularly do this with really nice pieces of wood that are too long for one handle, but too short for two.
4) Take the handle tracing and draw in any handle features that will be added. Just like in choosing the handle size,...... DON'T cut or grind anything yet. A pencil line can be erased, but a finger choil can't be unground. Make some copies of the handle sketches.
5) Add the blade to the handle drawing. Sketch it several ways and shapes if needed. Minor changes can be refined, over-sketched, erased, etc. Major changes should be drawn on a new copy sheet. The old one might be referred back to or used for a different knife. Keep all sketches. On the knife shown, I changed the blade shape on the sgian dubh from a drop point to a spear point.
6) Add blade features to the drawing as needed. Don't get crazy here, just the basics. Draw the tang and any attachment holes for rivets.
6A) Set the drawing down and take a break. Come back after an hour or the next day. Look at the drawing critically and see if something needs changing. Change it if needed...and then take another look. Don't cut anything until the drawing looks perfect.
7) Write notes on the drawings. Ideas and thoughts on what does or does not look right. Alternate ideas, measurements or things to watch out for, etc. Change again if needed.
8) Make a couple copies of the final drawing sheets. These will be your work sheets and pattern sheets. Keep the original in a folder that you can access easily.
9) Cut out the blade patterns from one sheet. Test fit the blade or blades on the metal stock. For this project I chose some tight pattern damascus by Delbert Ealy. It closely matches the black and silver look of the fossil walrus. Glue the patterns on the blade material with spray adhesive.
10) Cut out the blades leaving a bit of extra on the edge and spine area. Again, DON"T take off any material beyond the basics yet. Bevels can be modified, plunges and ricassos moved, spines raised or lowered, tips rounded....but steel ground away is gone forever.
11) Trim the tang as needed to shape and taper/thin it and cut the tang pocket in the handle. You want to be able to see the relationship of the blade to the handle. Carefully and slowly profile the blade to match the handle. Leave room to grind at the finer grits and add details like file work. Once you are happy with the overall shape and curvature, etc. set aside the handle and work the blade. Go back occasionally and check. Also, remember that there will be a fitting ( usually) between the blade and the handle. Allow for that in judging the looks. Placing the blade and handle on the work sketch is good here.
 
This is the fossil tusk. It is fairly thin, but perfect for this type knife. I cut it in half, make the caps for it, and put a photo of the drawings for reference.
 

Attachments

  • DSCF2467.jpg
    DSCF2467.jpg
    37 KB · Views: 131
  • DSCF2470.jpg
    DSCF2470.jpg
    67 KB · Views: 154
  • DSCF2469.jpg
    DSCF2469.jpg
    70.1 KB · Views: 131
  • DSCF2468.jpg
    DSCF2468.jpg
    50.1 KB · Views: 124
  • DSCF2462.jpg
    DSCF2462.jpg
    21.9 KB · Views: 114
Last edited:
Looks like this will be a fun project.
Can't wait to see how things progress.
Thank You Stacy.
 
Boy it's cool to see inside the mind of a gifted person. Thanks for posting this Stacy.

Very cool so far!
 
When I saw the headline, I was wondering if you had a nice piece of stag. "Building the knife around the handle" is pretty much what you ave to do with any stag carver and a lot of other animal sourced materials,but it sure can be fun. :thumbup:
 
Call it a bolster and end cap, fuchi and kashira, guard and butt cap, collar and pommel, etc.......it is just a simple bezel soldered to a plate.

I know a lot might look at the finished photo of these knives and say, "Sure, it is simple for you!", but it is much simpler than one would think. I am going to give away some of my trade secrets, and tell you how anyone with the basics of soldering skills can do it. When jewelers and koshirae makers say "soldering" we are talking about silver and brass alloys that fuse at 1000F and above. Most folks call it brazing, or silver soldering. Copper fittings solder well with silver solder, silver brazing wire/rod, or you can use a brass brazing rod/wire with high copper content and phosphorous. Sterling should be done with hard silver solder (1400F).

It starts with the materials. I use sterling for many knives/swords, and copper for others. Both can be left as they are in color, or patinated with sulphur to attain a deep shiny black.
You can just use sheet stock and cut what you want, or purchase strips in different widths and thicknesses. I like 18-20 gauge for most bezel projects, with the plate being a bit thicker ( 14-16 gauge).
The fancy engraving you see on some my knives is often from the strips of patterned wire I choose ( the industry name for thin strips is wire). These come in many patterns, from a Celtic looks to a floral motif. With some careful soldering and a little touch up engraving the pattern can be seamless all around the fitting. Add a patterned plate to it and suddenly the knife has real eye appeal, as well as an increase in selling price.

1) Start with fitting the strip to the handle. Wrap it around and mark the cut. Make it a little large and file to a perfect fit. I have found that when I think it fits perfect, I should file a little more off. Once it is soldered and shaped, it always ends up a little looser than I thought it would be. If using patterned wire, decide where to make the cut so the pattern is as undisturbed as possible. Sometimes that is between things, and other times it is right through the center of a decorative object. For example, I may decide to cut a flower in half and just touch it up afterwards to be a smaller flower.
2) Once the strip is cut, shape it so the ends meet flush and even. The final shape isn't important right now...just concentrate on the joint you are going to solder.
3) Solder the joint and clean up the excess on the inside. Don't worry about the outside of the joint and the pattern now.
4) Re-shape it to fit the handle so it is perfect. Tap all around with a plastic or rawhide mallet. This will "set" the shape. Slip it off and on until you are sure the shape is right and it is staying in that shape.
5) File or sand one edge so it is flat and smooth. This edge is where you will solder on the plate.
6) Cut the plate with a little extra for holding while soldering, and flatten it. Sand the inside surface so it is clean and check that the bezel sits close to flush. Make any adjustments needed, check the fit of the bezel to the handle one more time...and solder the bezel to the plate.
7) Clean the fitting up with five or ten minutes in Sparex, cut away the extra metal, file the lip to as close as you want ( sometimes a small lip is nice), and clean everything up. If you have a tumbler ( I use a magnetic tumbler, but a vibratory will work) give it a short tumble.
8) Check the fit to the handle. Hopefully it is good. If there is a little tightness, some gentle filing on the inside, or sanding on the handle will usually take care of it. If it is a tad too loose, tapping the bezel inward along the edge while off the handle will usually tighten the fit. If it is just too large or small...make another. This one can be used on another knife where you can shape the handle to the cap.
9) Touch up the joint now. On a plain bezel, just file/sand/cratex/etc. until smooth, then sand, and buff. If there is a pattern, use rotary tools with a fine edge ( 1mm knife edge or wheel burr works well), or use hand gravers. Once it is made so it does not show much, finish as just mentioned.
10) Fit both ends to the handle. Once they are clean and polished, set them aside and make the blade. The slot for the blade will be cut later, when you have the blade and tang ready to install. same goes for any holes in the butt cap that might be for a pommel nut of a through tang.


More later as I do the blades.
 
Last edited:
First group of photos is how to get started. The strip of patterned wire material, fitting it to the handle, and soldering the bezel.
( The bezel was slipped on for fitting and the photo. It ended up being flipped 180° in the final soldering to make the pattern look better. Not that anyone would notice the it is upside down right now, but if you did, I wanted you to know why :) )
 

Attachments

  • DSCF2479.jpg
    DSCF2479.jpg
    82.2 KB · Views: 81
  • DSCF2483.jpg
    DSCF2483.jpg
    87.9 KB · Views: 91
  • DSCF2484.jpg
    DSCF2484.jpg
    44.4 KB · Views: 94
  • DSCF2489.jpg
    DSCF2489.jpg
    47.4 KB · Views: 82
  • DSCF2493.jpg
    DSCF2493.jpg
    41.7 KB · Views: 97
Last edited:
Next we add the plate.

In the first shot, you can see the joint in the bezel ( still upside down right now). I placed it between a bud and a flower. This was touched up with a tiny knife edge burr in shot #4. Look at the final shots in post #17 - 4 and you can barely tell it was ever there. It will be completely gone when I do the final buffing before assembly.

I am trimming the edge with a 3/8" fine cut carbide cylinder burr. It gets hot while doing this and I have to dunk it in water a couple times as I go around the edge. Leave a tad extra for the clean up grind with a small Cratex wheel. I often go back in the final touch up steps before buffing and just kiss the rim very lightly with the cylinder burr to add a "rough" texture back to the rim. In some cases this makes the transition a bit less accentuated. In other cases, the shiny rim is a nice accent. My practice is to leave these minute details until the very end. That is when you can see where a place needs more or less detail.

In the final photo, notice how I placed the flowers on the plate so they were even and symmetrical. I turned the piece over as I placed the bezel on it and visualized the bezel under the plate. This helped me decided where it would be best placed. You can see in the soldering shot that I placed it at a diagonal to put the flowers where I wanted them. It would have looked much different if I had placed the bezel straight on the plate. It would still have been good looking, and many would not notice the difference, but a serious examiner would know....and more importantly, I would know. This is where the experience and eye of a master gold/silver/blade smith can really make his work stand out. The same attention to detail on a knife can be the difference between a nice knife and a Best in Show knife. Be it "clocking" the mosaic rivets or aligning the design on the butt cap...it can either stand out or be outstanding.... the difference is often just a millimeter or two.

Also notice how I left just a tiny lip on the plate/bezel joint. This will both help delineate the transition from one to the other as well as make the butt "grip" a bit better as the knife is pulled from the sheath. Again, a half a millimeter is all it took to accentuate that place.
 

Attachments

  • DSCF2494.jpg
    DSCF2494.jpg
    63.5 KB · Views: 68
  • DSCF2495.jpg
    DSCF2495.jpg
    45.6 KB · Views: 68
  • DSCF2502.jpg
    DSCF2502.jpg
    47.5 KB · Views: 67
  • DSCF2505.jpg
    DSCF2505.jpg
    46.6 KB · Views: 66
  • DSCF2507.jpg
    DSCF2507.jpg
    59.3 KB · Views: 71
Last edited:
Tumbling the finished fitting and final shots of it on the tusk.

The tumbler is a small 4" bowl magnetic pin tumbler. It works fine for things up to this size. It burnishes the surface to a bright shine. Burnishing also hardens the surface and makes it more scratch resistant. ( note - shots are reversed. Second photo is putting the cap in the tumbler, first is it being tumbled.
 

Attachments

  • DSCF2510.jpg
    DSCF2510.jpg
    65.3 KB · Views: 71
  • DSCF2511.jpg
    DSCF2511.jpg
    41.7 KB · Views: 69
  • DSCF2513.jpg
    DSCF2513.jpg
    52.2 KB · Views: 90
  • DSCF2515.jpg
    DSCF2515.jpg
    54.7 KB · Views: 73
  • DSCF2517.jpg
    DSCF2517.jpg
    60.5 KB · Views: 81
Last edited:
OK, I got the photos in the start of thread, but these last few posts #13, 14, & #15 I don't see photos..... and I really wish to see photos. This is sounding good and something I've wanted to learn.

Thanks for the WIP.

Ken H>
 
I don't understand???? They are right there ;)

I added the photos when I got home and had time to edit them. I will put finished photos in the beginning reserved slots. As I go along, I may post the tutorial as I do the task, and add photos later that day.

I can tell you that taking some of these shots single handed isn't always easy. Try taking a shot of the solder melting while holding a torch in one hand and a 3000F torch in the other.

I added a few more shots here, too.
The middle shot is the flame warming the piece up. I run it very rich at this point, as it heats up, I open the oxygen with my thumb and get a neutral flame. Shots 3 & 5 are sequential.
 

Attachments

  • DSCF2512.jpg
    DSCF2512.jpg
    38.6 KB · Views: 55
  • DSCF2487.jpg
    DSCF2487.jpg
    46.1 KB · Views: 56
  • DSCF2514.jpg
    DSCF2514.jpg
    52.5 KB · Views: 55
  • DSCF2496.jpg
    DSCF2496.jpg
    42.9 KB · Views: 50
  • DSCF2498.jpg
    DSCF2498.jpg
    49.7 KB · Views: 52
Last edited:
BTW folks, feel free to ask any questions about techniques, materials, tools ,etc. I can also provide other photos of any detail you don't understand.
 
Not sure if I should ask here, I've seen a fair few bolsters and guards soldered to a blade or tang post heat treat, is there a specific trick to this? I don't, in any of the videos I've seen, see the makers use a cooling agent for the blade I.e. A cucumber over the blade to prevent ruining the temper. Is it perhaps a lower melting point solder? Advice is appreciated :)
 
Back
Top