Tutorial - Designing a Knife Around the Handle - New photos and progress

Stacy, I'm happy to see you using that walrus, because if it showed up at Ashokan again next year in your for sale handle material... it'd probably be my walrus. When you first brought it 2 years ago, I wanted it, this year I almost pulled the trigger on it, and then you and I got talking about it and you talked about how it would be perfect for a project exactly like you are doing now. =P

Cant wait to see the finished product!
 
Justin - Yes, when we were done talking I picked it up and dropped it in my bag. It came out Monday morning and this project started.

Rapture - The solder used for joining/sealing guards and bolsters is also called "silver solder", but that is a misleading name. It is a low temperature "silver bearing solder". It melts at 400° or lower, and makes a good seal. Popular brands are Stay-Brite and TIX. They require a matching flux to the brand of solder. Their use is covered in detail in many threads and tutorials. Use this search engine to find all sorts of threads on any subject: https://www.google.com/cse/home?cx=011197018607028182644:qfobr3dlcra

For example:
http://www.bladeforums.com/forums/showthread.php/713723-Is-Stay-Bright-Silver-Solder-any-good

Here are a few comments I made on one of those threads:
The big tips are:
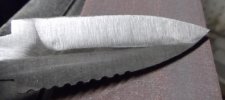
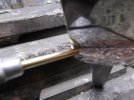
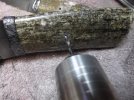
Before you start to do a solder joint the metal needs to be sanded/filed to a bright and smooth surface. Wash the blade and guard with soap and water, and then clean with denatured alcohol.
1) Use very little heat ( a torch can be several thousand degrees, but you only need to heat the blade/guard to 400F).Don't heat the joint, but heat the blade at the ricasso and bottom of the guard. Apply the flux and solder from the tang side ( opposite the heat source). Properly heated, there is no risk to the temper of the blade.
Too much heat will burn the solder. If it turns black, shut off the torch...take everything apart, clean it up, and start over.
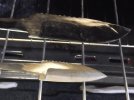
2) Use very little solder. The best way to avoid having to clean up a solder mess is to not have the mess at all. Pounding the solder flat into thin ribbons is a good way to use less. Cut tiny snippets from this ribbon. Apply four snippets to start with, and add more as needed when it starts to flow.
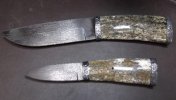
3) Make everything fit snug. The guard should be a tight fit to the blade. The perfect situation is to have to tap the guard down the last 1/4" or so. Solder will flow through a tight joint perfectly. If there is a gap, the solder will most likely not cover it.
4) The solder is not a structural ingredient. It is a sealant and cosmetic item. The joint should be firm and not wiggly. Don't expect solder to compensate for sloppy guard fitting.
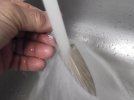
5) Clean up the joint after the solder is cooled. First, wash off the excess flux. Then ,using a clean up tool, cut the excess solder away from the joint. Make the tool like a tiny chisel ( flat graver) and make it from brass or bronze. Don't use a hardened tool, like a real chisel, or it may scratch the blade or guard.
 
Last edited:
There is no need to cool the blade when soldering, as the solder flows at 40F or lower, which won't affect the temper.
 
OK, got a bit of shop time this weekend.

Note - Order in photos isn't right... it is 1,5,2,3,4 in the thumbnails.

HT:
1) In the forge at 1500F
2) Ground a tad to clean up and check hardness post HT
3) Tempering
4) Cooling between tempers ( and again after the last temper)
5) Blades and components post HT ready for grinding and finishing

I got the blades ground and finished, and will take photos tomorrow after some fitting to the bolster caps. Teaser...they really came out great!
 

Attachments

  • DSCF2536.jpg
    DSCF2536.jpg
    22.5 KB · Views: 57
  • DSCF2550.jpg
    DSCF2550.jpg
    29.8 KB · Views: 73
  • DSCF2552.jpg
    DSCF2552.jpg
    43 KB · Views: 63
  • DSCF2554.jpg
    DSCF2554.jpg
    31.4 KB · Views: 69
  • DSCF2556.jpg
    DSCF2556.jpg
    41.1 KB · Views: 68
Got some work done this week. They have been sanded out, collars soldered on, etched, and need the final rub down with steel wool. The photos are just dry fitted. Once EVERYTHING is just right, I'll do the glue up.
The sgian dubh will be worn by me at the National Tartan Ball in DC next month. I am donating a similar sgian dubh for their auction. Last one I did for them brought $800.
 

Attachments

  • DSCF2558.jpg
    DSCF2558.jpg
    72.4 KB · Views: 56
  • DSCF2560.jpg
    DSCF2560.jpg
    48.7 KB · Views: 53
  • DSCF2574.jpg
    DSCF2574.jpg
    36.2 KB · Views: 53
  • DSCF2582.jpg
    DSCF2582.jpg
    55.1 KB · Views: 50
  • DSCF2587.jpg
    DSCF2587.jpg
    70.2 KB · Views: 55
Last edited:
Got some work done this week. They have been sanded out, collars soldered on, etched, and need the final rub down with steel wool. The photos are just dry fitted. Once EVERYTHING is just right, I'll do the glue up.
The sgian dubh will be worn by me at the National Tartan Ball in DC next month. I am donating a similar sgian dubh for their auction. Last one I did for them brought $800.

Stacy what method did you use to cut the tang hole in your bolster cap?
 
I mark the desired placement of the slot with a fine tip sharpie, and drill two holes inside each end of that mark. The holes are about 3/4 of the tang width. I take a jewelers saw and cut out the slot between the holes...again, leaving some room. I then use needle files to make the slot a snug fit for the tang. Once all is a good fit, I solder the cap in place. I clea up the joint with a 1/8" brass rod with the end filed to make a triangle graver. This cuts away any excess solder and leaves a perfect joint.

I fit all guards this way.
 
Back
Top