Twist Fighter from Beginning to End

Joined
Jul 8, 2001
Messages
3,623
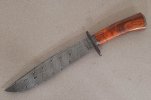
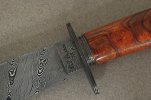
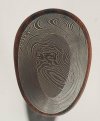
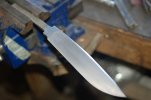
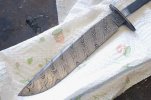
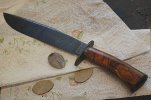
I've been working on this fighter for a while now and in the process decided to take a few pictures along the way to give those interested, an idea of how I went about making it. There are several pictures beginning with the materials I started with and as it moved along from day to day. I know there are many different ways of making a knife, this is just how I did it on this particular fighter. Please ask any questions you might have and I'll do my best to answer them as I go.
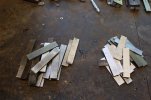
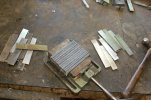
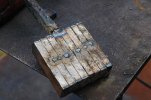
The first picture is of the materials used, 1080 and 15n20, I've ground them clean of any scale and there now ready to be stacked to make the billets.They will be stacked alternating from one steel to the other 1080 first, 15n20, 1080, 15n20 and so on.

Pic #2 is how I stack my materials and hold them to tack weld together.

I'm going to make 2 billets both with 25 layers each to start, I will combine the billets as there welded, this makes it easier for me to control the welds when first starting out and will give me a large billet to twist.

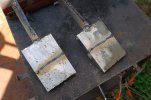
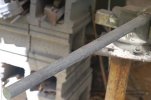
Pic #3 here's the 2 billets stacked with the ends tacked the sides ground even and also tacked. There ready forthe forge.

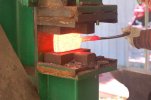
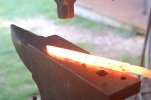
Pic#4 the welding process begins, after bringing the billets up to welding heat I take them to my 25 ton press ( which is named Leroy) to compress and draw out. This will take some time and several welding heats to get the 2 billets welded and reduced to the sizes I want to combine them.
 

Attachments

  • twistbowietut2.jpg
    twistbowietut2.jpg
    29.9 KB · Views: 119
  • twistbowietut3.jpg
    twistbowietut3.jpg
    34.9 KB · Views: 115
  • twistbowietut4.jpg
    twistbowietut4.jpg
    33.4 KB · Views: 130
  • twistbowietut5.jpg
    twistbowietut5.jpg
    24.1 KB · Views: 139
Thanks for doing this Bill!! I love it!! I look forward to seeing more!! :thumbup::thumbup::thumbup:
 
Pic 5 is one of the billets welded and stretched to 1 1/2" x 1/2", the second billet will be done the same and then they'll both be ground clean, cut and restacked combining the 2 billets.

pic 6 , heres the 2 billets combined and ready to be forge welded. Each piece is 25 layers so this billet will now be 200 layers when its welded up.

Pic 7 is the billet forge welded and stretched into a 1" square then rounded and ready to twist. I like to round my billets before twisting, for me it just works better.

Pic 8 is the bar in the forge coming up to welding heat. I rigged a devise on the back side of the my forge to hold the bar so I can twist the bar right in the forge.

Pic 9 is the bar twisted, next I'll slowly flatten the bar then grind it clean before cutting a piece to forge the blade from..
 

Attachments

  • twistbowietut6.jpg
    twistbowietut6.jpg
    20 KB · Views: 96
  • twistbowietut7.jpg
    twistbowietut7.jpg
    31 KB · Views: 102
  • twistbowietut8.jpg
    twistbowietut8.jpg
    22.2 KB · Views: 113
  • twistbowietut9.jpg
    twistbowietut9.jpg
    7.7 KB · Views: 112
  • twistbowietut10.jpg
    twistbowietut10.jpg
    22.9 KB · Views: 164
Pic 10. OK with the round bar flattened and squared up, I ground it clean and started forging out the blade, here I'm forging the tip and starting in on the bevels.

Pic 11 here's the blade rough forged to shape, I'll do 1 normalizing cycle using the forge to relieve any stresses built up during the forging process, then its into my oven for 3 controlled heat normalizing cycles, this will reduce the grain size and anneal the steel ready for the grinding process.

Now the blades been normalized and slow cooled over night in the oven.

Pic 12, shows the blade cleaned up a little on the belt grinder, the tapers are even, the ricasso area flat and the guard stops hand filed in, I also marked the center of the blade and grind in the top clips at this time.

Pic 13, heres the blade with the bevels ground in and cleaned up, its been hand sanded to 600 to remove any bad scratches, I know most don't take their blades to that grit before heat treating but it just works better for me, I'd rather to remove those scratches before the blades hardened.
 

Attachments

  • twistedbowietut11.jpg
    twistedbowietut11.jpg
    19.7 KB · Views: 99
  • twistedbowietut12.jpg
    twistedbowietut12.jpg
    25.5 KB · Views: 114
  • twistedbowietut13.jpg
    twistedbowietut13.jpg
    21.8 KB · Views: 134
  • twistbowietut14.jpg
    twistbowietut14.jpg
    24.1 KB · Views: 173
Pic 14, this is a picture of the hardening process, first off I heated and soaked the blade at 600 degrees for 10 minutes then applied an anti-scaling compound, this will keep the oxygen away from the steel while heating up and soaking at the hardening heat, which is 1490 degrees soaked for 10 minutes.
I know the picture doesn't seem to exciting, no fire and very little smoke but my shop is well lite so the bright colors of the hot steel won't show as if it was done in the shade or dark. My quench pan holds just under 3 gallons of parks 50 and as you can tell in the picture the oil is quite clean as you can see my quench plate, this blade is edge quenched.
As soon as the blade has cooled from the hardening process it will be placed back in an oven set at 400 for 3 - 1 hour cycles, cooling to the touch between cycles.

Pic 15. Blades all heat treated and cleaned up, here the blade has been hand sanded to 1500 grit. Time to start the guard.

Pic 16. heres the guard material, its a piece of the same twist billet that been flattened and cleaned up to approx 1/8" thickness, the row of drilled holes will be the slot for the tang in a little while, I'll use a dremel and a hand file to get it sized to fit nice and tight.

Pic 17. This shows the guard, still needs some cleaning up and I'm going to file a slot around the edge of it, then I'll put my mark on the blade, etch the blade and the guard and put the guard on.
 

Attachments

  • twistbowietut16.jpg
    twistbowietut16.jpg
    40.9 KB · Views: 107
  • twistbowietut17.jpg
    twistbowietut17.jpg
    18.3 KB · Views: 131
  • twistbowietut18.jpg
    twistbowietut18.jpg
    22.7 KB · Views: 75
  • twistbowietut19.jpg
    twistbowietut19.jpg
    27.4 KB · Views: 86
I'm gaining on it now.

pic 18. heres the blade etched with the guard in place, next up is a spacer.

pic 19. heres the spacer material, a piece of the twist billet. slots been drilled and filed in so now its time to grind it to shape.

pic 20. the spacer has been rough ground to shape ( forgot to get a picture) but now I need to slot my handle material so I can place the handle up against the spacer on the tang. Here's the ironwood material chosen for the handle. I've marked and drilled 2 holes though the block following the outline of the tang. I'll use my dremel with a spiral bit to carefully remove the materials inbetween the holes and open up the slot for the tang to slide through.

Pic 21. here's the handle material slid up against the spacer. I'll put a drop of super glue on the spacer so it will stay in place on the handle material and then I can drill and pin it so it will go back where its suppose to after I shape the handle.

Pic 22. here it is super glued in place and drilled so I can pin in in place so it can be removed for the handle shaping.
 

Attachments

  • twistbowietut20.jpg
    twistbowietut20.jpg
    35.1 KB · Views: 164
  • twistbowietut21.jpg
    twistbowietut21.jpg
    26.4 KB · Views: 66
  • twistbowietut22.jpg
    twistbowietut22.jpg
    20.7 KB · Views: 78
  • twistbowietut23.jpg
    twistbowietut23.jpg
    35.4 KB · Views: 86
  • twistbowietut24.jpg
    twistbowietut24.jpg
    15.7 KB · Views: 99
I love threads like this. It's always interesting to see how other makers do their work. I'm excited to see the finished knife. Thanks for sharing
 
WOW, that is most excellent Bill! You are moving right along, aren't ya?!
 
pic 23. Here's the handle ground to shape, the spacer has been finished with a little file work added and the next thing is to make the butt cap. The piece of steel laying beside the handle is going to be the butt cap, same twist damascus.

pic 24. heres the butt cap rough shaped, drilled and tapped for the 2 screws that will hold it securly after handle and all are glued into place.

Pic 25. heres the but cap finish shaped, it just needs some finish hand sanding, etched and then the handle will be ready to assemble. Notches will also be cut in the tang before assembly so the tang/ironwood will glue up securely. Next pictures should be the finished deal. I'm sorry for not taking more pictures but its tough on an old hillbilly to stop, take a picture, and then remember where he left off. ;)
 

Attachments

  • twistbowietut25.jpg
    twistbowietut25.jpg
    41.1 KB · Views: 165
  • twistbowietut26.jpg
    twistbowietut26.jpg
    31.8 KB · Views: 108
  • twistbowietut27.jpg
    twistbowietut27.jpg
    28.4 KB · Views: 120
GOTT DANG!

It's chopped up bars of steel at 12:11 pm and an all-but-finished damascus knife by 3:27.

If you sold that for $90, you'd be making a pretty good living!

:eek: :eek: :eek:

;)

Mike
 
Here it is.

Mike, just think how much quicker I could have made it, if I didn't stop to take pictures. :)

I hope you all found something interesting in this thread, let me know what you throught and again if anyone has any questions , just ask.

Bill
 

Attachments

  • twistbowietut29.jpg
    twistbowietut29.jpg
    91.5 KB · Views: 128
  • twistbowietut30.jpg
    twistbowietut30.jpg
    97.1 KB · Views: 87
  • twistbowietut31.jpg
    twistbowietut31.jpg
    61.9 KB · Views: 95
Great thread Bill. The knife is looking good so far and I am anxious to see the result.

Thanks,
Peter
 
:D:D You must have been posting the final pictures as I was typing.

Fantastic.

Pleasure to see it.

Peter
 
awesome thread Bill --- thanks for taking time to post all those pics and explanations.

that's a GREAT knife!
 
Thanks for the progress thread, Bill. These are great and so informative. Great looking fighter! Appreciate you taking the time to do this one in front of us.

- Joe
 
Great thread Bill - and a beautiful knife. It was a pleasure seeing this one come together.

Roger
 
With all the fancy patterns out there, twist is still one of the most beautiful. Thanks for showing us how it's done.

The knife looks great.
 
Well, now I see that you should really quit yapping about how hard it is to make a living with knives. Seeing how you banged this one out in a few hours, I think you are almost as fast as China.

I might start farming out my work to you Bill Buxton.

:p

I'm real glad to see you participating in this forum and in such a big way Bill. You do great work and deserve for more folks to recognize it.

I've done a lot of this type of thread and know how much of a huge pain it is to stop what you're doing and take a picture or twelve. You did a great job on it, and you are REALLY smart for making sure it was all done before posting any of it.

Like I said in my private message

That is as good as any of the best forging to shape I've seen, and your twist work here is simply superb. Oh sorry. I mean.... you sure done good. ;)

Now show me your twisty dealy bobber before I take back all this nice stuff I said about you! :p ;) :D

Great work and a fantastic knife my friend!!! :thumbup: :thumbup: :thumbup:
 
Last edited:
Back
Top