It is a pretty simple process, and yes, a router will do it. It does not need to be a perfect fit, as the epoxy fills the void.
There are two methods:
1) cut a half the tang thickness deep inlet on both scales and assemble on the tang with rivets and epoxy. This keeps the glue line down the center.
2) cut the inlet into one scale only and assemble with epoxy and rivets. This is the method used on Japanese blades and scabbards.
Properly done with well matched scales, the grain should make the glue line almost invisible. When cutting the scales, mark the sides and direction so they go back together the same way they were cut. Sand them on the inside only the amount needed to assure they are flat. I don't flatten until after the inlets are cut.
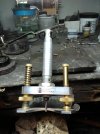
While a full size router will work, it is a bit unwieldy and requires using extra boards, the same thickness as the scales, placed on each side to keep things straight. Many folks use a Dremel router, or a special router made for guitar/luthier and marquetry inlay. It fits on your flex shaft unit. See image below.
While power tools are fun, the most common way is with a 1/4" or 1/2" chisel. You can make a special chisel for inletting saya and tsuka ( sheaths and handles) by heating a 1/4" tip, long shank chisel and bending it a bit about 3" back from the edge. If you put the cutting end in a potato, you can do this and not ruin the cutting edge temper.
Making a set of saya chisels from a 12" long pieces of 3/16" thick 1095 in 1/4", 1/2" and 3/4" widths is a good project for any smith. It is simple and the HT and tempering are pretty straightforward.
There is a third option that is popular and really simple:
Take a piece of thin wood that contrasts with the handle scales you picked. I like a dark wood like African Blackwood or cocobolo. Sand it flat and parallel to about .02" thicker than the tang. Mark the tang on this and saw out the tang outline. It does not need to be a tight fit, and a tiny bit of slop is actually a benefit. When assembling the handle , make a sandwich of the two scales and the contrasting center piece. This makes a nice looking handle. One pin/rivet through it will be all that is needed to retain the blade securely. In some uses, you don't even need the pin ... just the epoxy.
The image close-up makes it look bigger than it is. The unit is 5" tall and 3" wide. I have a 1/16" up-cut router bit on it.