Well, 1ST KNIFE DONE!!!!! here's the WIP and things I've learned... Wathcha Think???

Joined
Mar 18, 2012
Messages
28
I got the bug about a month ago. While looking for a new camp knife I was inspired by the becker-necker and ESEE izulla, but I thought to myself "these are almost perfect but not quite". I stumbled across Bladeforums and people stripping their necker, then while perusing, found "Shop Talk" and the stickies!!! That was it. I was OBSESSED. My wife thought I was Crazy. I am pretty good at making things and, having never used a file or worked with metal, I knew I could make my own knife using the knowledge gained here. So I did, and here's the Work In Progress (after the fact ;) ).
Before I start, I would like to thank everyone who has shared their knowledge and passion for knife making with the world, through this forum.

The materials:
1084 bar 3/16 x 1.5 x 8ish- Ebay
Apple wood handle blanks (un-stabilized)- Ebay
1/4 hollow ss pins- Ebay
gorilla glue- Lowes
(from now on I will probably get my steel from Admiral, wood from Ebay, and pins-sheath-ect from KnifeKits or Jantz)

The tools I will list as I go through this WIP.

So.. Here we go...

The steel and original design:
1084- I hear its the most forgiving in heat treat
(1084,1075,1080 all seem to be so close in chemistry that a little batch variance could make any of them the same steel... if that makes sense)
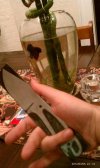
The design is kind of an Izulla in a RAT3 size. It is not an exact clone but I like the way the handle comes down for cutting power.
I did all my designing with a Sharpee and used alcohol pads as an eraser when needed- worked great.
It didn't end up skelatinized and the bottle opener on the handle was tossed, as I can open a bottle with just about anything :D
 

Attachments

  • kevsphone4-4-12331-1.jpg
    kevsphone4-4-12331-1.jpg
    24 KB · Views: 126
  • IMAG0100.jpg
    IMAG0100.jpg
    31.8 KB · Views: 220
The only power tool used was a cordless hand drill- That sux use a press!

Hand tools used for profiling:
12 inch Nicholson flat bastard mill
A sweet 3 dollar taskforce hacksaw from Lowes
Various old files from a pawnshop- rouund, triangle, 8" double cut, ect
A set of mini files
2 3" C-clamps
A wood hand-screw clamp
sanding block

1. I drilled out some holes and cut em with the hack saw to get the rough shape
th_kevsphone4-4-12335.jpg
My sweet 3 dollar hacksaw
th_IMAG0109.jpg
2. cleaned up the shape with files
You can see my file handle- and old cork! worked great!
th_IMAG0107.jpg
3. Drilled over-sized holes for pins and lots of divots for ballance
th_IMAG0118.jpg
4. Sanded the sharp edges.
 
Last edited:
Sorry about the photos guys... I'm trying to figure it out...

The bevels:
Lots of sharpee applied throughout the process to measure my progress.
I put in the plunge line with a round and a triangle file.
I drew the centerline on the edge with a drill bit on my counter.
Lots of draw filing with the big nicholeson (about 5 hrs!! man I need a grinder) .
You can see how I used the wood handscrew clamp as a file guide, and I didn't mess up my ricassos!!
The bevels ended up mostly flat with a slight convex, better than I expected really : )

kevs phone 4-4-12 1029.jpg kevs phone 4-4-12 1030.jpg kevs phone 4-4-12 1031.jpg
 
Last edited:
Did this before I got mini files...
Used an 8" round
Lesson learned: GO SLOW WITH FILEWORK. Your taking off so little it goes faster than you want...

The handle front and back had to be finished before gluing. I had to thin them quite a bit and used just sand paper- really messed my shoulder up doing this... man I gotta get a grinder...
kevs phone 4-4-12 1038.jpgkevs phone 4-4-12 1041.jpgkevs phone 4-4-12 1043.jpgkevs phone 4-4-12 1044.jpg
 
I did a backyard heat treat with my fire pit and a hair dryer... didn't get enough pictures of this as I was running around like a headless chicken...
this is my workshop:
kevs phone 4-4-12 1058.jpg

I tried a Hammon using Rutlands fireplace morter, think I used too much because it didn't turn out. (maybe I polished wrong...)
kevs phone 4-4-12 1050.jpg

I made some tongs with a pair of pliers and 1/2" steel tubing I smashed on the handles.
This is where I'm missing pictures...

After burning the fire for a couple of hours and putting the coals aside, I had a nice pile of hot coal. when a hair dyer was blown on this pile it got hot, real hot, and my blade was right in the middle. Used a magnet to tell when it was done, and gave it a couple minutes to soak with the blower on.
Quenched in Canola that I heated with a hot railroad spike.
kevs phone 4-4-12 1055.jpgkevs phone 4-4-12 1060.jpgkevs phone 4-4-12 1061.jpg
I tempered in the toaster oven 2 times at 400f 1 hr each. you can see the little stands and foil I used to keep the radiant heat off the blade.
It got hard... real hard...
 
I etched the blade with hot vinegar and salt
Tools used:
9volt battery
aligater clips and wire
q-tips
nail polish
something to scrape the nail polish
my makers mark :) see the similarity to my user name...?
kevs phone 4-4-12 1069.jpgkevs phone 4-4-12 1070.jpgkevs phone 4-4-12 1079.jpg
 
Last edited:
Put a patina on the blade with spicy mustard, and put it in the toaster for a sec to heat the vinegar.
This ok? cause the blade is still a bit on the hard side...

kevs phone 4-4-12 1074.jpgkevs phone 4-4-12 1075.jpg
 
Finally, after about 35-40 man hrs its done. It's exactly what I wanted for a camp knife.
1084 steel
Apple scales
Drop point
Thick
3.5" blade 8" OA
Lanyard hole sized for a full-size carabiner
Slightly handle weighted
Comfortable to hold and use
Rustic
And made by ME! :D

kevs phone 4-4-12 1065.jpgkevs phone 4-4-12 1076.jpgkevs phone 4-4-12 1078.jpgkevs phone 4-4-12 1079.jpgkevs phone 4-4-12 1080.jpg
 
Last edited:
Cool, looks like you have been paying attention around here! :D

As far as the toaster oven goes that is fine as long as it was under the temperature you tempered at. I noticed the scales were attached so it must have been way below that temperature.

Thanks for sharing and keep up the good work.
 
I didn't see mention of any epoxy used to attach the scales. If you do this again, then force your patina before attaching handles because the heat can cause the epoxy to fail.

Other than that, great job. I really like how you etched your logo.
Jason
 
Well done! You gonna put a finish on the scales? I would hate to see them warp from temp and humidity swings. Looks like a very nice little knife you made!


-Xander
 
Yes I have been paying attention... ;)

Used gorilla glue, not epoxy, if that matters (never again, G-glue is a messy pain). toaster was at 200f.

prob not gonna finish them, if they warp I'll pry them off and put some stabilized/synthetic on....

I"m looking at grinders now... need the cheapest one that will work, suggestions? Is a craftsman 2x42 really worth 5 HF 1x30s?
 
Last edited:
I love my Craftsman 2x42...the belts are easy to find (a million different grits on ebay) and it gets used for all kinds of stuff, sharpening machetes, lawnmower blades, woodworking, deburring. I had to modify her a little for knifegrinding use, but she works good enough. Only problem I have is having to start her turning by hand sometimes, or the motor will just hum, but thats not a big deal to me seeing how much time it saves :D
 
Outstanding first effort! :thumbup: Yes, the Craftsman 2x42 is worth it.
 
fantastic job! im currently working on my first knife and you have set the bar high! i love how you etched your logo, i've been cringing looking at the 200 dollar etchers, could you explain a little more about how you did it? i think i get the premise, but more details would be great. i cant decide if i like your patina finish or the mirror finish better, they both look great.
 
Back
Top