What do you think of this burner design?

Joined
Dec 25, 2004
Messages
1,363
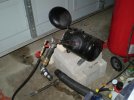
I'm making new vertical and horiz. propane forges these days. My old burner was just like IG's forced burner design but here there are lots of power cuts so when my blower dies so does the forge. I want to use forced air burner most of the time but when the electricity gone I want to get going...

So I made a sketch of a new venturi burner which can be used with forced air also. What do you think of it, will it work?

jfxcar.jpg
 
Yes that set up works. I know a glass blower who has his glass furnace rigged that
way. When the power does go out his burner is still lit so the tank full of glass does not freeze up.
 
Emre,
Yes that will work, but there are things you will have to play with.
The issues will be in the orifice ( gas jet) size. A typical venturi burner has an 0.030" ( approx. 0.75mm) orifice ( often a MIG tip is used.). A blown burner does not need a jet, and usually just runs 1/8-1/4" pipe (3-6mm) for the gas inlet.
With the smaller orifice needed to create the venturi, you will have to raise the gas pressure a lot to make it run on a blower.

An alternate design would be to forget the venturi option, and use a 12VDC blower. Run it off a truck/marine battery with a battery charger hooked to it. If the power fails, the blower will keep running for a long time on the battery power alone.
Stacy

Stacy, thanks for the warning.
Ok here is another option as I want to use my existing system (a very good squirrel cage motor) and I want to use this burner both with forge and melting furnace I guess the orifice may be interchangeable.
It will be something like that

vxbvhg.jpg


but when using forced air i can change the jet with a 3 mm (1/8") hole and when on venturi I can change that with a #57 holed jet.
Does it sound logical???
 
I live at 4000 ft and my forge was not reaching welding temps. Not knowing better I just rigged a squirrel cage blower I had to some 4" flexible tube and blew air to the venturi openings. Still have the #60 jet in both venturies and it reaches welding temp just fine now. May not be the correct way, but works for me.
 
I live at 4000 ft and my forge was not reaching welding temps. Not knowing better I just rigged a squirrel cage blower I had to some 4" flexible tube and blew air to the venturi openings. Still have the #60 jet in both venturies and it reaches welding temp just fine now. May not be the correct way, but works for me.
Oh, I live by the sea, I guess this won't need any forced air then ? :D


Seriously I did the same thing for my previous burner, it does reach very high temps that way.

BTW I started to build a wootz crucible furnace today, If the crucible furnace needs a bigger orrifice, then I'll make another burner just for that furnace...
 
Emre,
I did something similar recently and below is a pic of my result. It's a blown version of the 3/4" modified sidearm burner described on Larry Zoellers burner page. As Mr Apelt stated, the variable is the orifice size. I use a mig tip drilled to 1/8" orifice (as per IG's burner design). For regular venturi operation I'll use a .030 or .035 tip. With the 1/8" orifice I'm only running 2 to 3 pounds of pressure and it really rips.
Take care,
David
 

Attachments

  • P3110003a.jpg
    P3110003a.jpg
    43.3 KB · Views: 82
  • Forge at weld temp.JPG
    Forge at weld temp.JPG
    32.3 KB · Views: 60
Emre,
I did something similar recently and below is a pic of my result. It's a blown version of the 3/4" modified sidearm burner described on Larry Zoellers burner page. As Mr Apelt stated, the variable is the orifice size. I use a mig tip drilled to 1/8" orifice (as per IG's burner design). For regular venturi operation I'll use a .030 or .035 tip. With the 1/8" orifice I'm only running 2 to 3 pounds of pressure and it really rips.
Take care,
David

David, Thank you, I'll try to make the orifice interchangeable. Yours look really efficient surely...

Emre
 
Oh, I live by the sea, I guess this won't need any forced air then ? :D

Seriously I did the same thing for my previous burner, it does reach very high temps that way.

BTW I started to build a wootz crucible furnace today, If the crucible furnace needs a bigger orrifice, then I'll make another burner just for that furnace...
I live by the sea too. I just need to drive 150 miles.:D

Seriously, I don't have a choice for venturi only. I'm going to try the 1/8" and see what the difference is.
 
Last edited:
Emre,
Making interchangable jets will solve the entire problem. Good idea.
Stacy

I finally finished my burners :D:thumbup:

I had some problems of finding the right size materials thus the burners have become huge :eek: 
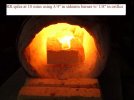
. Total length is 20" :eek:.

the burner orifice is totally interchangeable and protrusible. Hence I can tweak the venturi performance.

Now I tested these burners with 1 and 2 mm orifice holes. As Stacy stated 1 mm hole is really good for venturi mode, but for forced air style the 2 mm hole orifice performs better. I have also 1.5, 2.5 and 3 mm orifices to test. But atmospheric performance should be tweaked a little more by extending the orifice length, moving it to the reduction base about 15 cm...

The burner consists of 1 1/4" burner body and 1 1/2 to 2" reducer welded together.
The top portion is 1 1/4" coupling + 1 1/2 to 3" reducer and a 3" coupling welded together. If wanted a 3" to 1 1/2" flat reducer can be mounted to connect air hose...

Here are the pics:
DSC03459.JPG

DSC03460.JPG

DSC03461.JPG

DSC03462.JPG

DSC03465.JPG

DSC03466.JPG


I'll tweak those a little but as it is they are great performers as far as I see. A choke is to be made for those, but I mainly work on forced air...

Emre
 
Back
Top