-
The BladeForums.com 2024 Traditional Knife is available! Price is $250 ea (shipped within CONUS).
Order here: https://www.bladeforums.com/help/2024-traditional/
You are using an out of date browser. It may not display this or other websites correctly.
You should upgrade or use an alternative browser.
You should upgrade or use an alternative browser.
What the heck? A quick holiday build-along. Folder and hunter set.
- Thread starter Salem Straub
- Start date
This is fantastic, thanks so much for putting it up. I have two questions I was hoping I could bug you with...?
First, if you don't have your surface grinder there, how did you get the folder blade so close to parallel?
Second, how are you milling that back spacer nice and flat? Mostly I guess, how are you holding it on the mill while you use the end mill?
I have no surface grinder and am hoping to get a mill in my garage after the new year... Thanks again.
Jeremy
- Joined
- Oct 20, 2008
- Messages
- 5,547
Sandeggo, I made the knives all week, but am posting the pics that I saved during that time. Still, it was a lot to do in the time I had!
Jeremy, I keep digital calipers and sometimes a micrometer by the grinder. I hold the blade stock, at least small pieces, on a heavy welding magnet while grinding it on the platen. I keep checking the edges and center of the piece until I'm within .002", then go the rest of the way on granite by hand with paper. As long as you are careful at the grinder, measuring the stock and envisioning what pressure to apply and where when flat grinding, you can get pretty close. A disc is also handy for after the platen, but mine currently needs work.
The spacer was not yet profiled, and had one side hand-flattened on the granite slab. I grabbed a chunk of scrap iron in the milling vise, milled the top of it flat, and lightly sanded it. Thus, the top of the block was roughly trammed to the quill. I then tacked the micarta piece to the top of the iron block with a couple drops of super glue, and having already measured the thickness, I located the surface of the micarta with the end mill, did the math of how many thou to raise the knee, and milled the top off with the knee raised the correct amount to yield actually .192" now that I think about it. Just .002" to dust off on the surface block, or a little more should I get the blade polished and etched and find out that it plus the washers added up to less. In this case, .190" was the finished number. A bit of tapping got the micarta back off the mounting block.
I went back out and took a couple pics of my lock grinding setup, which I made out of scrap and odds and ends. I was asked about it recently and found I had no good pics of it. It gives a 4" hollow ground lock face at 8 degrees.
I used a protractor and scribe to make a 98 degree angle template out of some scrap mild steel.

Then, I used the old tracking wheel from my square wheel grinder for a contact wheel, since it's all steel and I wanted a hard contact wheel with a crisp edge. I use a 400 grit belt, start to finish. The angle plate is put on the tool rest, and adjusted until the relation of wheel to tool rest fits the guide.

With the lock face ground, I scribed the lock location on the liner, then cut out the lock bar.

The hunter blade after etching and a little bit of sanding. My new torch in circle mark for damascus blades, and irregular mark locations. This didn't etch quite at deep as normal, due to a new batch of ferric chloride that I have to tweak a bit.

Again, a lapse in continuity- here's the hunter all glued up and clamped overnight. The scales were scribed to the tang and routed on the mill.

The next morning, I roughed the handle and guard to shape.


All I can say is watch out for that stab maple burl, it can be crumbly inside. I opted for a super glue finish to toughen and seal the surface. I've had good results with Gorilla brand super glue, which penetrates ok and cures quickly.

Over to the grinder, I held the assembled knife without scales or bolsters up to the side of the platen, and flexed the lock bar out by hand, grinding until it engaged when pushed in. It's got a little angle to match the lock face. I ground the lock bar thinner toward the end, for relief of the detent ball when open. Then I bent the lock bar over, making sure to achieve a mild radius rather than a kink.

I drilled the detent ball hole, and then through that into the hardened blade a little past closed to make the detent. Ken Onion was nice enough to give me several #53 and #54 carbide twist drills last time I visited him- I've used other methods for the detent, but this is by far the smoothest in my opinion.
I pressed the ball in. Also, note here that the corner of the lock bar face is ground off a bit toward the spine side, so that only 40-50% engages the blade tang lock face. This is to reduce any feeling of rock that might happen in the open/locked position. I think Bob T. might even have ground off a bit more in his book.

Ready for handle shaping.


Stay tuned! Next time we'll finish them.
Jeremy, I keep digital calipers and sometimes a micrometer by the grinder. I hold the blade stock, at least small pieces, on a heavy welding magnet while grinding it on the platen. I keep checking the edges and center of the piece until I'm within .002", then go the rest of the way on granite by hand with paper. As long as you are careful at the grinder, measuring the stock and envisioning what pressure to apply and where when flat grinding, you can get pretty close. A disc is also handy for after the platen, but mine currently needs work.
The spacer was not yet profiled, and had one side hand-flattened on the granite slab. I grabbed a chunk of scrap iron in the milling vise, milled the top of it flat, and lightly sanded it. Thus, the top of the block was roughly trammed to the quill. I then tacked the micarta piece to the top of the iron block with a couple drops of super glue, and having already measured the thickness, I located the surface of the micarta with the end mill, did the math of how many thou to raise the knee, and milled the top off with the knee raised the correct amount to yield actually .192" now that I think about it. Just .002" to dust off on the surface block, or a little more should I get the blade polished and etched and find out that it plus the washers added up to less. In this case, .190" was the finished number. A bit of tapping got the micarta back off the mounting block.
I went back out and took a couple pics of my lock grinding setup, which I made out of scrap and odds and ends. I was asked about it recently and found I had no good pics of it. It gives a 4" hollow ground lock face at 8 degrees.
I used a protractor and scribe to make a 98 degree angle template out of some scrap mild steel.
Then, I used the old tracking wheel from my square wheel grinder for a contact wheel, since it's all steel and I wanted a hard contact wheel with a crisp edge. I use a 400 grit belt, start to finish. The angle plate is put on the tool rest, and adjusted until the relation of wheel to tool rest fits the guide.
With the lock face ground, I scribed the lock location on the liner, then cut out the lock bar.
The hunter blade after etching and a little bit of sanding. My new torch in circle mark for damascus blades, and irregular mark locations. This didn't etch quite at deep as normal, due to a new batch of ferric chloride that I have to tweak a bit.
Again, a lapse in continuity- here's the hunter all glued up and clamped overnight. The scales were scribed to the tang and routed on the mill.
The next morning, I roughed the handle and guard to shape.
All I can say is watch out for that stab maple burl, it can be crumbly inside. I opted for a super glue finish to toughen and seal the surface. I've had good results with Gorilla brand super glue, which penetrates ok and cures quickly.
Over to the grinder, I held the assembled knife without scales or bolsters up to the side of the platen, and flexed the lock bar out by hand, grinding until it engaged when pushed in. It's got a little angle to match the lock face. I ground the lock bar thinner toward the end, for relief of the detent ball when open. Then I bent the lock bar over, making sure to achieve a mild radius rather than a kink.
I drilled the detent ball hole, and then through that into the hardened blade a little past closed to make the detent. Ken Onion was nice enough to give me several #53 and #54 carbide twist drills last time I visited him- I've used other methods for the detent, but this is by far the smoothest in my opinion.
I pressed the ball in. Also, note here that the corner of the lock bar face is ground off a bit toward the spine side, so that only 40-50% engages the blade tang lock face. This is to reduce any feeling of rock that might happen in the open/locked position. I think Bob T. might even have ground off a bit more in his book.
Ready for handle shaping.
Stay tuned! Next time we'll finish them.
Last edited:
Thanks so much for taking the time to asnwer my questions. I have a flat platen, a disc, and granite. Should mean if I pay attention, maybe I can get a parallel blade ") . And here's one more wonderful application of super glue to get that back spacer the right thickness. Can't wait to see the finished pics.
. And here's one more wonderful application of super glue to get that back spacer the right thickness. Can't wait to see the finished pics.
Jeremy
. And here's one more wonderful application of super glue to get that back spacer the right thickness. Can't wait to see the finished pics. Jeremy
- Joined
- Feb 6, 2010
- Messages
- 1,427
Salem. I am in awe of your talent. I make my knives by stock reduction and I sometimes feel like I am cheating by starting with fairly flat piece of nice steel. I enjoy your photographs and the techniques you use as an artist and craftsman. You deserve and have earned the praise you get from myself and from others. Larry
Last edited:
Question on the hunter. It's a hidden tang, but on the glue up picture it looks like 2 piece scales. Is there any benefit to doing 2 piece instead of one? Do you router one side or both sides so that the glue joint is in the center?
In this pic you have radiuses where the tang meets the ricasso. Do you square them up to fit the guard or leave then as a radius?

In this pic you have radiuses where the tang meets the ricasso. Do you square them up to fit the guard or leave then as a radius?
Last edited:
- Joined
- Oct 20, 2008
- Messages
- 5,547
I leave them as radii. Makes the knife stronger. The guard slot has its corners filed to fit the tang shoulders.
Both sides of the grip wood are routed, so that the tang lies down the center. Sometimes I do it this way, sometimes I drill and broach the block without splitting it. It depends on the workflow, sometimes one makes more sense than the other. This method really shines when you have got a synthetic hidden tang handle, particularly G10, which sucks to drill and broach.
Both sides of the grip wood are routed, so that the tang lies down the center. Sometimes I do it this way, sometimes I drill and broach the block without splitting it. It depends on the workflow, sometimes one makes more sense than the other. This method really shines when you have got a synthetic hidden tang handle, particularly G10, which sucks to drill and broach.
- Joined
- Oct 20, 2008
- Messages
- 5,547
Ok, here's the hunter after a bit of sanding and cleanup. I used to mirror polish most of my fittings, but these days I prefer a 600-1000 grit hand sanded/satin finish on most things. Lower maintenance and more elegant IMO.

With the hunter pretty much done, it was time to make a simple pouch sheath. Here's the pattern made from the knife:

Sheath leather cut. I'm almost through this side of Hermann Oak, it's 12 oz. and I think next leather I order I'm going back to 9-10 oz. This stuff is great, but pretty darn thick.

Sheath folded up, glued, and ready to stitch.

Grooved and stitch marked.

Drilled and stitched.

Liner lock parts ready for assembly.

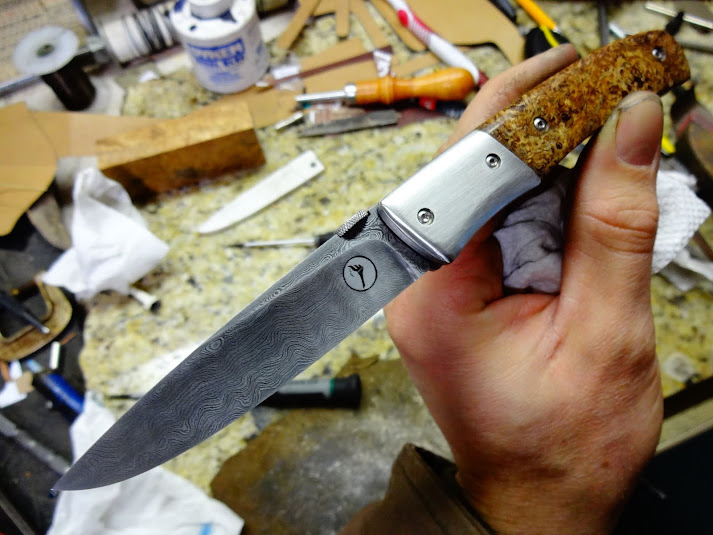
Liner lock assembled. Blade has obviously been ground, polished, and etched.
For a very reasonable price, Ernie Grospitch will make you a custom single image stencil to a customer's request. This is a meaningful phrase between my friend and his dad.

A few hastily shot glam pics of the set.


With the hunter pretty much done, it was time to make a simple pouch sheath. Here's the pattern made from the knife:
Sheath leather cut. I'm almost through this side of Hermann Oak, it's 12 oz. and I think next leather I order I'm going back to 9-10 oz. This stuff is great, but pretty darn thick.
Sheath folded up, glued, and ready to stitch.
Grooved and stitch marked.
Drilled and stitched.
Liner lock parts ready for assembly.
Liner lock assembled. Blade has obviously been ground, polished, and etched.
For a very reasonable price, Ernie Grospitch will make you a custom single image stencil to a customer's request. This is a meaningful phrase between my friend and his dad.
A few hastily shot glam pics of the set.
- Joined
- Dec 2, 2011
- Messages
- 913
Love them! Great job
- Joined
- Dec 7, 2008
- Messages
- 7,187
I really enjoyed this.
Thank You Salem
Thank You Salem
- Joined
- Aug 2, 2010
- Messages
- 1,611
Very nice! Thanks again for posting ") I have a question about the lockup on the liner lock.. do you worry that since you made the lock start out at past 50% , when it wears a little it will be almost to the other side? I'm just curious, I don't know anything about making folders but I know the whole "the earlier lockup the better" phase goin around, which I don't entirely agree with. Anyway, beautiful work man!
I have a question about the lockup on the liner lock.. do you worry that since you made the lock start out at past 50% , when it wears a little it will be almost to the other side? I'm just curious, I don't know anything about making folders but I know the whole "the earlier lockup the better" phase goin around, which I don't entirely agree with. Anyway, beautiful work man!
~Paul
My YT Channel Lsubslimed
I have a question about the lockup on the liner lock.. do you worry that since you made the lock start out at past 50% , when it wears a little it will be almost to the other side? I'm just curious, I don't know anything about making folders but I know the whole "the earlier lockup the better" phase goin around, which I don't entirely agree with. Anyway, beautiful work man! ~Paul
My YT Channel Lsubslimed
- Joined
- Oct 20, 2008
- Messages
- 5,547
Paul, indeed my goal is 50% lockup on a new knife. This ran a little past, but as the angle of the lock face increases, wear shouldn't make it loose for a very long time unless the guy cycles it all the time as a nervous habit!
In keeping with my warranty, should one of these actually develop this type of problem, I'd take it back and turn a slightly larger stop pin to repair it.
Good question!
In keeping with my warranty, should one of these actually develop this type of problem, I'd take it back and turn a slightly larger stop pin to repair it.
Good question!
- Joined
- Jan 4, 2013
- Messages
- 217
Turned out very nice. I like the slab handle hidden tang idea.
- Joined
- Feb 28, 2006
- Messages
- 3,494
Top notch as always Salem. Mahalo!
Mele Kalikimaka,
Phil
Mele Kalikimaka,
Phil