How To Why does this rocker bar sticking up so far?

Joined
Jul 27, 2017
Messages
727
The kit comes from Rough Ryder. It is my third knife-making experience. I love this.

However, the rocker bar sticks up too far and I cannot figure out why. All the pieces were made by the manufacturer and so were the holes. I can't tell if the spring should be cut shorter, the pivot pin hole raised, the width of the rocker bar reduced, or what.

Does anyone have an answer? It's probably obvious to all of you experts but I just don't see it.
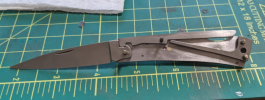
Screenshot_20210810-075549_1.png
Thanks.
 
I'd take a torch and heat the bar, and bend it down, make sure it will clear first. Test fit often.
 
The kit comes from Rough Ryder. It is my third knife-making experience. I love this.

However, the rocker bar sticks up too far and I cannot figure out why. All the pieces were made by the manufacturer and so were the holes. I can't tell if the spring should be cut shorter, the pivot pin hole raised, the width of the rocker bar reduced, or what.

Does anyone have an answer? It's probably obvious to all of you experts but I just don't see it.
View attachment 1617273
Thanks.
If you cut spring shorter lock will disengage from blade ?
 
Last edited:
I agree, the locking (rocker) bar has to be be bent down so the top will fit the back of handle. As the bar is being bent check to confirm it will works. Just shortening the spring is cut shorter the locking bar will drop down disengaging the blade. At least that's the way it looks to me.
 
Thanks for the advice, everyone.

Maybe this is naive but shouldn't those pieces be measured and cut right since Rough Ryder makes thousands of these?
 
Can you show a photo of the other side (scale side) of that assembly, please.

It looks like it needs bending, but it may be simpler to just file/grind it flush.
 
It's a "Kit" which means the Builder will have to make some modifications for proper fit. The Lockbar is also HIGH where it meets the spine of the Blade which needs to be Filed down flush with the blade. I would say put the other liner on and file or grind the lockbar flush with the liners and flat to the blade.
 
While Busto is correct that a kit still requires some finishing, this is way beyond normal. I think Steve is correct that the lock bar is wrong. It can be modified by a smith easily, but Erik may not have the equipment or skills. I would suggest contacting the seller first, and if there is no resolution, then seeing a nearby smith who can bend the bar as needed and grind it flush.
 
It's a "Kit" which means the Builder will have to make some modifications for proper fit. The Lockbar is also HIGH where it meets the spine of the Blade which needs to be Filed down flush with the blade. I would say put the other liner on and file or grind the lockbar flush with the liners and flat to the blade.
I have always said that one should know how to look..........:thumbsup:
Seems that would work .................I can t see , but probably spring also is little higher then liners ,so ......................
aLCPFXy.png
 
Bend it a little toward the end, and grind it the rest of the way.

Maybe one of the Northern California makers will help him out.
 
Last edited by a moderator:
Yes, that is what will be needed if the seller doesn't make it right. However, I don't think Erik has the equipment.
 
That small a piece should be able to be heated 'n bent with only a propane torch something like this: https://www.amazon.com/dp/B004FPZACE/

BUT - I would spend the few extra bucks for this one: https://www.amazon.com/dp/B07Z8QBJ55/ that burns in any position. For folks who think MAPP gas burns hotter, check what they say "flame burns at 3600F) or MAPP Gas (flame burns at 3730F)", only 130F hotter with MAPP gas. The Mapp gas of today isn't the same as it was years ago when it actually was a good bit hotter.
 
Thanks, guys.

Little update: I discovered a hardware store called Dale's and IT'S AWESOME!!!!!!!!! They have all the stuff I was unable to find at Lowe's and Home Depot, including brass rods of various diameters and some metal plates that I will use to cover the surface I am peening so I don't leave extra dents.

I removed the blade pivot pin and the rocker pivot pin and replaced them with fresh brass ones. That helped about 80% or better. Then I spent 15 minutes wearing out some 120 grit sandpaper on my (new) electric sander which brought the rocker lever down to a reasonable position.

This project won't turn out to be a masterpiece but I am learning a lot from making these errors and reading all of your ideas. Many thanks to all of you!
 
This project won't turn out to be a masterpiece but I am learning a lot from making these errors and reading all of your ideas. Many thanks to all of you!
These lessons are what Knife Makers do everyday when building custom knives from scratch. They are not Errors just the little Tweaks we have learned that have to be done to finish a knife. Enjoy the process and remember a "Masterpiece" is the sum of all the Small details of "Finishing" .
 
Back
Top