Why I havent been making many knives... My shoptime is going into this!

DAYUMN Justin!!!! :eek:

Now THAT is a project!!!!

Glad it's not in my shop, that looks like something I would truly never, ever finish. My hat's off to you for taking it on bud! :)

Talk about a score with the WoodCraft guys!!! I know just enough about that type of stuff to know that it would be really hard to get that job done optimally without a vacuum bag set-up.

Holy crap that was good timing dude. I don't know if you are a really consistent customer, or just worked some magic to sweet-talk them, but you positioned yourself for a completely professional job with that veneer. AWESOME!

Thanks for sharing Justin :)

I'm a pretty frequent customer, the store is only half an hour from my house, and the shoptime i've had that hasn't been working on the car has been turning pens actually. I'm about to hit the road to pick up the dash, I'll add photos of the finished dash.
 
I picked up the dash tonight after 5 hours under vacuum. In order to get it home without accidentally chipping / peeling the veneer, we taped the boards around the dash in place for the trip home.

dash19.jpg


At the back of the glove box you can see where just a little glue has seeped into the edge between the lid and the frame, the wax in here lets the glue peal right off. I scribed as deep a line as i could from behind with a razor blade between the two pieces.

dash20.jpg


I then trimmed with a razorblade as much excess material as I could from the edges, so that when handling the dash I would not catch a piece of loose veneer and damage it before it's finished. On this side you can see the veneer tape used to hold together the bookmatched pieces prior to adhering the veneer to the dash.

dash21.jpg


Using the lines that were visible with the dash flipped over, I finished cutting out the glove box door. I'll have to use more or less the same technique to cut out all the other holes as well, slowly and carefully. Once all the holes are cut out, I'll then go around the edges with sandpaper and round out and smooth out all the transitions, so that there's nothing that can catch and tear.

dash22.jpg


To remove the veneer tape, you need to apply water. I used a sponge to get the tape saturated so that it would pull away. The water will cause some warpage of the veneer where it's not attached to the dash and there's nothing supporting it behind, but that's ok because those areas will be cut out anyways.

dash23.jpg

dash24.jpg


The bookmatching was done so that there would be a whole lot of figure in the glove box area which is the largest unbroken surface on the dash. This is going to look wicked nice when finished.

dash25.jpg


The next steps I need to do are first finish cutting out all the cutouts and then sand all the corners to finish the fitting and shaping. When that's done i will paint on a light layer of wax-less shellac to fill in the pores of the wood, and then sand it down smooth with extra fine steel wool. Finally for the finish I picked up some marine varnish, designed for outdoor use with built in UV protection and completely waterproof.
 
I figured out it's a lot easier to use a small fine file from the top side to knock down the edges than sand paper, the paper grabbed and had the tendency to chip. The outside edge of the dash will not look that 'clean' when finished and rounded until I do what the original has, and mask the front and paint the sides to cover up any light color spots from the plywood that show up at the edge of the veneer. The glove box area looks a lot better though now that it's trimmed. I finished cleaning up the glove box (except I haven't cut out the lock hole yet) and it looks great, the figure on the burl is great, and the gap is small at the edges so it looks nice and continuous,with no edges to catch on anything. I've done enough work on it for today however, and need to crash in bed.

dash26.jpg
 
VERY COOL Justin! :)

That's gonna look awesome! :)

Couldn't you use a flush trim bit and a high speed router? Or is the razor the best approach to avoid tear-out?
 
Justin as my forum name implies I am a classic car fanatic but your skill, time and dedication are amazing.

I love Triumphs and I have always wanted a Stag....... Probably comes from living in London as a boy in the 70's

Your work on that dash is superb. I have always been in awe (and a little envious:o) of people who can turn their hand to anything with such skill and ease.

Those fenders and lower sills do look somewhat terminal. Are you fabricating new ones? if so i would love to see a WIP of that.

Please post pics of the build whenever you have chance! Thread subscribed to!

Thanks
Steven
 
WOW, Jason. That's a lot of work. I think I'd have tried to get on overhaulin and let them take a whack at it.
 
I continued cutting out the holes in the dashboard this weekend. Some of the holes were a bit tricky because of the shelf inside them for the gauges to sit against
dash27.jpg


It took a while, bit I got all the gauge holes cut out. Next were the air vent holes on the ends.
dash28.jpg


Once I reached this point however, I thought the dash looked great.. and that cutting any further holes in it would ruin the symmetry and hide more of the gorgeous wood figure than I really wanted to.

dash29.jpg


I probably should have thought about this earlier, but now I'm going with my lathe and turning pegs to fit all the holes and gluing them up / backing the veneer with solid wood. My plan now is to move all the switches that were in the dash to the center console area, the wiper, headlights, and hazard switches.

dash30.jpg


I'm looking at some push/pull switch replacements like
http://www.speedwaymotors.com/Universal-Headlight-Switch,2367.html
or
http://shop.advanceautoparts.com/we...E4&ci_src=14110944&ci_sku=16320040#fragment-1

I will then modify (sand off the lettering and then re-paint new lettering) some of the original square center console switch faces to put on the ends of them and put them on the ends of the new switches to match up with the original TR6 style.

I'm going to play with some of the veneer scraps and finishes before I continue, once I plug the last 3 holes in the dash backing.
 
I was going to lift the body off the frame this weekend, and i'm -> <- this close to doing it, but i've run into a little snag.

First, I had to get all the bolts off, this entailed using an angle grinder on most of the bolts in the floor pan as they were so rusted that not only could I not get them with a wrench, but I could not get them out by drilling through the head because there wasnt enough head for me to get a good start for the drill on.

I braced the door frames with angle bar.
DSCN1176.JPG


I made some braces that screw into the existing holes for the door latch
DSCN1177.JPG


I also had to pull off the header on the front side. As I found out after this photo, there were some bumper supports that I had to get off as well , which, although not bolted to the body, interfered with the body lifting up.
DSCN1178.JPG


They were just held on by these two bolts on each side... easy to remove, right? Not so much, after 2 hours I managed to get all 4 bolts off... and for the last one I had to remove the wheel and get an angle grinder in there to grind the nut off.

DSCN1179.JPG

DSCN1182.JPG

DSCN1183.JPG


After this, i was finally ready to lift the whole body ! Hooray! ... and then my major snag...

The rust at the top of the inside of the fenders on the tub has weakened the tub integrity... When I started to lift, the metal buckled and bent, tearing out at the rust and crunching in. This is a spot that was going to get serious re-welding and new metal once everything was off... but for the time being, I dropped the tub back down. I may need to find a new lifting point for the front and see if I can balance it to them, rather than using the lifting points welded to the frame from the factory.

DSCN1184.JPG


I'm going to have to go at it again tomorrow night after work and try to get the tub off and away from the chassis.
 
...And we have lift off!

I found a new grab point for up front and lifted the body up. I had to intentionally balance it towards the back so that I could clear the engine. Of course I forgot about one important thing... which is probably obvious in this photo... Yeah... where am I going to put that body down for now =D

DSCN1186.JPG


I spent the next half hour clearing out the portable garage on the side to make room for the TR6 for the immediate time being. The TR7 will go back in the garage once i get someone to help me roll the old rolling chassis and engine out into it, so i can do the building up on the new frame in the garage with the newly refurbed stuff.

DSCN1187.JPG


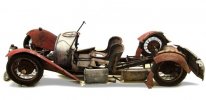
Once I was able to roll the engine hoist back and pull the tub away from the frame, the tub, for all that it's got bad rockers, bad floopans, and the tops of the inner fenders are rotted, isn't in that bad shape. You can see where the paint has been eaten away under the battery tray... but it's actually solid there, just surface rust. I'm lucky.

DSCN1188.JPG


Speaking of lucky, that's what I am, having put 1000 miles on the TR6 after getting it before starting this work. Here's the top of my trailing arms. They look ready to pull right off the frame at any moment.
DSCN1189.JPG

DSCN1196.JPG


In addition, my rear differential was only held on at 3 points. Here's the fourth, with both the pin ripped out of the frame, and the support itself torn in two. A differential mount this bad no longer clunks, it goes *Squeak squeak squeak* whenever there's no torque in the differential
DSCN1191.JPG

DSCN1197.JPG


The car was also in a rear end collision at some point, the frame is buckled in the back right. and has been hammered back into shape.

DSCN1192.JPG


It looks like the rubber around the stub axles is actually pretty new, and the bolts to the differential on the driveshaft and axles look much newer than everything else. So some work was done here at some point more recently in the past than other places
DSCN1193.JPG

DSCN1198.JPG


You cant really see it in this photo (or maybe in not seeing it, you're seeing what I saw) but on the front, the rubber bushing for the suspension are all but non-existent other than the ones at the top of the shock columns.

DSCN1190.JPG


The radiator will need replacing, this is the good side, and it's nto that good, teh bad side looks like a fan has been into it a few times.

DSCN1194.JPG


Overall I've got my work cut out for me. In this pic you can see the replacement frame behind the tub. It needs a little work, but nothing much. Also here's where I grabbed the front with hooks to lift it up since the normal factory lift points were causing that bending problem. (and hopefully it didnt bend /too/ bad)
DSCN1202.JPG

DSCN1201.JPG


All the rest of this is going to have to go on that "new" frame, and this will get rolled out into the tent garage, so i can get the TR7 back in the real garage
DSCN1203.JPG
 
Last edited:
This weekend I built myself a plywood rotisserie for my TR6 tub.

It cost me about 100 bucks to put together, but most of that was the casters which i can keep re-using forever.
Materials list was
14 - 2x4x 8 foot
2 - 4x4x 8 foot
1 - 4 foot x 4 foot 3/4" plywood
4 - 5" pivoting casters - 330 lb capacity
16 - 5/16th 1.5" lag bolts
20 - 5/16th washers
1 box - 3" screws
4 - 5/16 x 8" carraige bolts
4 - 5/16 nuts
1 - 10 foot length of 3/8 round bar

The first thing I did was cut the 4x4s to 5 feet 6 inches long and then drill holes and mount them to the front and rear body mounting holes. The front holes are at an angle, so in order to have a flat spot to screw the plywood, I cut a corner off.

rotisserie01.jpg


Next I cut the plywood into 12 inch wide strips 4 feet long, and then chopped the corners off 6" down each side.

rotisserie02.jpg


Here you can see how the plywood connects to the body crossbars

rotisserie03.jpg


I then proceded to screw in place supports across the backs of the plywood to stiffen it up, and give a place to screw in the cross supports to.

rotisserie04.jpg


Here the last support I need to add is the bottom support across at the floor so that I can put my 'cart' under it to move it around.
rotisserie05.jpg

rotisserie06.jpg


The "cart" was made by full length 2x4s side by side with cutoffs from the other supports between, then the casters lag bolted to the bottoms. In order to keep it so that i can move the sides in and out depending on which orientation the tub is, since it's wider than it is tall, i used 3/8" round bar through drilled holes so that i could slide the sides in and out for variable width.

rotisserie07.jpg


I used my engine hoist to pick up the tub and frame and drop it on the 'cart' all ready to roll out in the driveway and sandblast the heck out of it, and i'll be able to flip it on it's sides as well to get access to the bottom.

rotisserie08.jpg
 
So, I drove to Chicago and back to pick up parts. The rust on the fenders being a lot worse than originally thought, once you started getting under the surface, I got myself some new fenders... and this time rust will never be a problem with them ever again... they're fiberglass. I will still be restoring the steel fenders, but i'll be doing it at a later date, when I've got more experience welding sheet metal from repairing my tub.

This set of quarter panels was used, but never painted. The car that they were on was a white car, and the owner just put the fiberglass with white gelcoat on the TR6 as is, instead of painting to match. They've got some scuffs, and a few chips in the gelcoat, but being fiberglass, that's easily addressed and repaired. In fact, I'm planning on covering over completely the side mounting holes for the driving lights, and probably covering over and flattening out the holes for the rear bumper side-mount points, hiding where the frame supports mount to the fenders so that they're invisible from the outside. I also plan now to get the stainless 'towel rack' bumpers for the TR6. Purists may hate me for what I plan to do... but I really like the looks of cars that have had these things done.

Here are 3 photos of what is inspiring me to 'clean up the lines' Which will be much easier to do with fiberglass instead of steel.

blacktr6.jpg

towelrackfront.jpg

towelrackback.jpg


Here are the unpainted, needing slight gelcoat repair fenders, and the steel bonnet from the car they came off as well.
DSCN1217.JPG

DSCN1218.JPG

DSCN1219.JPG


I also went out there to pick up the set of 72 spoke wire wheels that the fellow had. He had just got them back from being newly powder-coated (the wire hangers from the powder-coater's shop were still around them even) The splines looked fine on the inside, the spokes are all solid and in great shape, the hub adapters , while dirty, and with one knock off nut missing (having been temporarily replaced by a 2 wing knock off nut) looked just right. The wheels had some dings on the rims but, for a driver and enjoyable car, looked like just what I wanted and for a good price.

DSCN1220.JPG


The fellow threw in an early radiator and gas tank, i think from a 69 TR6, as well.

DSCN1221.JPG


Then... today I ended up getting a fantastic deal on a set of KN Minators from the UK, with a set of Dunlop SP Sport A2 P185/65R15 tires that I couldn't pass up. Only between 1000 and 1100 miles on the rims and tires from when they were new a year or so ago... And I think they'll look even sharper than wire wheels with the 'modernizations' that I'm doing to the body..
DSCN1222.JPG


I even got little triumph branded valve stem covers with them
knminator.jpg

valvecap.jpg


So... now i've got a set of wire wheels, fresh from the powder-coater, with hub adapters for a TR6, and will not be using them. Guess you can look for them in the for-sale section soon, or on craigslist.
In the mean time, I went and got some wire wheels to knock the undercoat off the tub. Trying to sand blast it off wasn't very effective except for in the thinnest spots.
 
Last edited:
When you're finished your practice piece try this one. 1926 Bugatti ,a real fixer upper ,only needs body and engine !
 

Attachments

  • 500x_bonhams_1926_02.jpg
    500x_bonhams_1926_02.jpg
    20 KB · Views: 42
yeah but a 1926 Bugatti even in that condition with no upper body or engine is still probably a 50,000$ pile of scrap =D
 
Today I ran into my first big "OH CRAP" moment with the restoration.

I have a replacement frame which I want to get ready to go. I just ordered a full front suspension rebuild kit with everything from trunnions to ball joints etc with urethane bushings, and I will be ordering the rear shock in coil conversion kit from RATCO.

The frame looked great when I bought it, with the only real work needing to be done boxing in the rear differential mounts, and fixing the frame mounting spot for the front left flexible break line... or so I thought.

The whole thing had been media blasted, acid dipped and painted with a semi-gloss black, and the trailing arm attachment wings had already been professionally replaced with new metal. I had gone over it with a ballpein hammer before buying it. Well, I wanted to be extra sure that everything was going to be good... so I chopped off the bottom Tshirt... and found this =(

DSCN1230.JPG

DSCN1231.JPG

DSCN1232.JPG


The sidewalls of the frame there are fine and i can bang on them with a hammer all I want, but the bottom is rusted out under the Tshirt.

So I need advice here if anyone knows. Is this something that is repairable by chopping out the bottom wall with an air-cutter and welding in new metal for the bottom and replacing the Tshirt? Should I be getting professional help here? The rest of the frame is in great shape, and I've got 500$ invested into it already. As much as I would love a RATCO frame, it's just not in the budget after getting the money for TRick6's engine and drive train. I hope this is salvageable, because the rest of the frame is just fine, and WAY better than what I was driving with.

-Justin
 
I has a 73 cuda that the frame just behind the rear wheels was nearly rotted off. I could have bought new pieces to weld in, but I would have had to leave the patch bare for a safety inspector to see. I didn't see the missing frame bits till I pulled the trunk pan out because the spots were hidden by the mufflers and heat shields.

I think if you check your DMV safety check people they will be able to tell you how to properly and safely repair the frame.
 
I'd do a spark test just to see if the frame is high carbon or some crazy alloy, then cut the badly rusted sections out and reweld with the apropreate rods, probably 7018 or 8018. I'd also box the area for strength. After that, sand blast and repaint. Just go real slow on the welding, a couple inches at a time in one area to keep warping to a minimum. Just got done blasting and painting the frame on my 79 Scout II, didn't have any issues that bad, but did have a couple cracked welds from hitting rocks and rough handling.

Just out of curiosity, how would the safty inspector know unless you told him? Non of the ones around here would even likely to look at the undercarage.
 
I haven't updated the thread in a while, but I haven't been idle. I've been working on a lot of stripping of undercoating and paint, but havent taken any updated photos yet.

Today Tony Vigliotti from RatCo stopped by my house with his son as he was in the area visiting his son who lives the next town over. The good news is he said my replacement frame is really in excellent shape aside from the T-shirt area, and that the T-shirt area should be quite repairable. We also discussed other places where I can weld in reinforcements and other strengtheners to the frame to make it stiffer. He said it looks like there might be a very slight twist in the frame, that the right front looks a hair lower than the left, but nothing that cant be taken out, even by myself.

Here's Tony going over my frame with a pick hammer.

framecheck.jpg


I've got someone else locally who can do the structural welding on the frame that I need, and I should be able to do all the gusseting, differential mount boxing, etc myself with the mig welder I bought myself for Xmas.

In the mean time I've been accumulating the parts that I need to rebuild my front suspension completely, and cleaning off other parts. I need to look into getting my brake booster rebuilt, and my brake master cylinder rebuilt or replaced.

I've got to go place an order with Tony for the rear shock in coil conversion kit, he said the replacement frame is plenty strong where it needs to be for it. We also discussed springs, and driving styles. He actually recommended against any of the 'high performance' springs that are around 490 lb/in and suggested that an uprated spring in the 425 lb/in range or even just stock at the 360 lb/in range would be much more comfortable ride if I'm not planning on rallying with the car.

I'll get more photos of my progress and update this again sooner than the 3 week gap since my last update.
 
Completed refurbished and done up head lights, albiet there wasnt much refurbishing. AutoLoc Tribar headlights with built in turn signals, clear plastic rock guards in front of them.

DSCN1271.JPG


I purchased a pair of these headlights on good sale from amazon. When they arrived, the first thing that I wanted to do was to change the color-dots to match my car. Unfortunately this is much easier said than done. The color dot is held in the center of the tri-bar assembly. The dots themselves have a 3/8 inch allen-wrench hole in the back of them, and they twist lock into place with a spring to the center of the tri-bar assembly. This is all fine, except the metal the tri-bar is made from is very thin and bendable. I ended up spending over an hour per light to change the dot, and had to use needle nose pliers, locking forceps, and a various dental picks and hooks to re-bend the bars back into shape after getting first the factory installed color dots removed. The lights look nice, but the construction quality is only fair. The tri-bars really should have been made of stronger material, and the bars should have been held in place firmly, brazed or welded, not just glued in with silicon caulking. I'm not sure if I would recommend these based on the flimsiness of the tri bar assembly.

Also of note, the wiring and molding for the wiring for the built in turn signal sticks out quite a bit from the rear of the bulb, and far off center, you need to grind out a hole for them in the headlight backing for them to fit properly. Right now i've just got the H4 bulb that came with the headlights in them, but it'll be nice to be able to swap them for whatever bulb I want, quickly and easily.
 
Back
Top