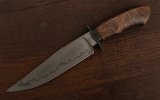
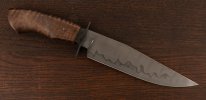
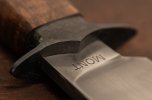
WIP a bowie-ish thingy-pic heavy

Yesterday I managed to injure my left hand with a hammer and I can't hold most tools safely today. I don't have much to report other than I started a bit of hand sanding.

Since I ground the blade to 800grit, I started hand sanding with 600. I could have gone straight to 800 but decided to play it safely.
View attachment 1750745View attachment 1750746View attachment 1750747

By going diagonally, it's easy to spot any leftover scratches from the grinder.
Afterwards, I moved up to 800 grit going parallel with the edge. I forgot to take a picture of this step but there is not much to it anyway.

This whole process took a bit less than an hour and my hand was not having it anymore.
I did a quick etch and clean up with 1200grit to see my progress before going home.

Right after a quick etch.
View attachment 1750748

And some clean up with 1200grit.

I hope tomorrow my hand will be better and do more work.
Have a beautiful day everybody!
 
Last edited:
You are taking me to the next level of my humble handle fittings to blade blanks projects. I am very grateful and inspired!
 
Good afternoon ladies and gentlemen!

Today's update is kinda awkward, I kept forgeting to take as many pictures as I would have liked, it's going to be a 2 part update.

First of all, I hand sanded the guard. Not much has happened here, the only advice I can give is to stick a piece of tape on the sand paper to keep it from tearing when sanding curves.
View attachment 1751726

And then I decided to do a scale finish. Generally, I'm a huge fan of different textures and have been experimenting a lot lately.
To achieve that, I simply used a blowtorch and a piece of firebrick. An important note here, when doing this kind of finish on fittings, you must account for the scale loss. If not, a perfectly fit guard will have gaps afterwards. My guard was a really tight fit (more than it should) and when finished to the process, it had a lovely press fit.
I did that 4 or 5 times and then quenched it in oil to give it a nice black finish.
View attachment 1751727

Next step was to bed the tang. To keep my lovely finish on the guard, I must do an heirloom fit on the handle. Bedding the tang is really easy, wrap the tang with some teflon tape, add vaseline and glue up the handle with 5 minutes epoxy. After 3-4 minutes while the glue is a bit gooey, simply remove the handle. This creates a perfect cast of the tang and the handle fits everytime at the same place afterwards.
View attachment 1751728

Clean up thoroughly any leftover vaseline and move into the pin. I've seen some guys measuring where the center of the big hole on the tang is to find it later on, personally, I find it easier to simply mark the big hole on the handle and then add the brass.
The handle is not going anywhere.

View attachment 1751729

Add a piece of brass/copper/bronze and peen it until it has expanded completely.
View attachment 1751730View attachment 1751731

Then simply grind it flush with the tang.
View attachment 1751732

To drill the pin hole, for me the easiest way is to use a big ass clamp.
View attachment 1751733

to be continued...
 
With the blade is clamped, re-check for any gaps against the light on both orientations. This is the reason I kept the butt of the handle flat, it's much easier to clamp it.

View attachment 1751754

Drill the hole and re-check with the pin in place against the light.
View attachment 1751755
View attachment 1751756
If for any reason you see a gap once you have drilled the pin hole, you can fix it by adding a spacer. Sometimes the spacer will need some thinning but it's a fixable mistake.

Bullseye!
View attachment 1751757

With my pin in place, I rough shaped the handle. Took most of the material on the grinder and then moved to files.
View attachment 1751758
View attachment 1751759

The pencil mark is my finished dimension to do the heirloom fit. Don't go there yet, more material will be removed while hand sanding.
View attachment 1751760

And here is our handle all roughed up.
View attachment 1751761

And this is the current state (don't mind me going bananas in the end). Not much left to do, hand sand the handle, finish the blade, add my maker's mark and the sharpenning!

Looking forward to your feedback!
 
I really appreciate your kind words guys, thank you!


What color are you going to stain the handle?
My plan is to do a dark brown but everybody knows what they say about the best-laid plans.

I will refer to this many time over, thank you.
This goes to anyone might be reading this message, don't hesitate to email me (email on my signature) if you have any questions! It's my pleasure to be of help!
 
Good afternoon everybody!

Today's update is going to be two parts. I didn't take pictures of every step of the way, mostly because it was getting repetitive.

Since the handle and the blade are almost complete, it's time to etch my logo.
With a sharpie, I traced the shape of the guard to avoid it while lining up my stencil.

View attachment 1754271

Lined up my stencil and etched it to the depth I wanted. Usually it takes 15-20 1 second touches.

View attachment 1754272
View attachment 1754273

After that, I moved back to the blade. I sanded to 1200 grit and cleaned up the blade for the etching cycles. To ensure there are not any smudges, I rub the blade with acetone and then clean it thoroghly with soap and water. My etching solution is ferric chloride, not sure about the concentration but it's really mild.

View attachment 1754274

With some 2000 grit paper I clean off the oxides. I don't do back and forth passes, nice steady passes are the key to avoid any ugly sanding marks.

View attachment 1754275

View attachment 1754276
View attachment 1754277

That's the outcome after 5 cycles each time with less time in the ferric. Now, depending on the desired finish, you can stop here. Even though I really like the white ghostly hamon, it takes certain angles to be visible. Therefore, I decided to do another cycle but instead of sanding paper, I used a metal polish cream like flitz.

Right before the polish. As you can see, this process is pretty much 2 steps forward, 1 step back until you get the desired finish.
View attachment 1754278

to be continued...
 
This is the outcome of the metal polish cream. To see all the details, certain angles are required but it keeps a nice overall contrast.

View attachment 1754300View attachment 1754301

With the blade now completed, I kept moving forward with the handle. Since the handle was 100% shaped, I simply rounded over the edges and glued it up.

View attachment 1754302View attachment 1754303

One final dry check up against the light and we can move to glue up. Not much to report here, glueing up is quite simple. Rough up the surface, clean up thorougly and go to town.
A little tip I can give is the following. Take a clean rug and apply some oil on every surface that you don't want glue. Even if some glue oozes out, it will not stick and can be peeled off.

Clamped the blade and inserted the pin.
View attachment 1754304

Keep the cup of the excess epoxy check whether the glue has dried properly.
View attachment 1754305

Not much left to do, grind down the pin and hand sand the handle.

To dye the handle, I use an alcohol based leather dye. I start the process at 400grit and dye the handle between every grit.
It's pretty much the following:
400grit->coat of dye->600grit->coat of dye->800grit->coat of dye->light buff on the buffer->coat of dye->hand buff with a rug and apply the finish.
The following picture was taken right after 400grit.
View attachment 1754306

Once the above process was complete, I sharpened the knife and it was finally done! I will not reveal the knife yet, tonight I'm going to have a proper photoshoot and do the final reveal with them.

Thank you guys for reading through! All feedback is welcome!
I will update with the final pictures soon.
 
Very well done and thank you again for all of your efforts my friend… :)
 
I’ve been admiring your work for a long time and this is a great look at/tutorial on your process. Thanks for taking the time to take so many pictures and explain so carefully.

This is one of my favorites of yours - this style generally and this knife in particular. Great work!!
 
Fantastic and that guard turned out famously my friend!!! :)

Each new knife better than the last….bravo 😎
 
Back
Top