WIP: Fiddleback machete customization by Jared Oeser

CapitalizedLiving

Gold Member
Basic Member
Joined
Dec 1, 2007
Messages
3,817
I bought a couple 18” Fiddleback Forge machete blanks from Ron Solomon (Devil Dog Knives) thinking they would make good training tools. I decided after getting them that I’d try to find a local knifemaker who was interested in customizing them. I contacted Jared Oeser, who liked the idea. A few PMs and we had an idea and a schedule.

Here are the blanks when they arrived.

JO 1.jpgJO 2.jpg

They have been precut and heat-treated to the mid-50s on the Rockwell scale, as evidenced by the small divot in the tang, next to the middle pin hole.
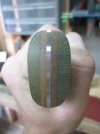
JO 3.jpg

When I arrived at Jared’s house he had the handle slabs precut and ready for fitting. We had decided on linen micarta for both - black linen over bone for one and olive drab over natural for the other.

JO 4.jpg

I like the idea of pins that match the underlayer, so using natural linen pins for the OD/natural machete was an easy pick. Jared suggested that we use natural linen pins for the black/bone machete, and we went with that. He then suggested natural linen tubes for the lanyards.

JO 5.jpg
 
I’d never seen micarta used as lanyard tubes, but he was interested in trying it out and I was interested in seeing the result. So it was decided, and off we went.

Jared clamped the slabs to one side of the tang and drilled the holes. He then traced the shape of the tang onto the handle slabs and we cut them out on his bandsaw. The jagged ones are obviously my doing, but I stayed in the safe area so it was all good.

JO 6.jpgJO 7.jpg

The finishing touches were put on the tops of the handle slabs to avoid having to work on them after they have been affixed to the tang.

The pins and tubes were then fitted into the tang holes. The pins were sanded a bit to give them adequate clearance so the epoxy had room to fill. Also, for the purpose of giving the epoxy places to go to avoid pushing it all out when he glued the handles to the tang, shallow divots were drilled into the underlayers of the handle slabs, roughly sanded them, and roughly sanded the tangs also.

The handles were then ready to be glued and clamped.

JO 8.jpg

Jared mixed the epoxy (G/flex) and applied it. He scraped the epoxy thin at the tops of the handles and cleaned off any excess that leaked out the top when he clamped them to the tangs. 24 hours was needed to allow the glue to dry, so I left for the day.

The next morning I arrived at Jared’s shop, and he had gotten a head start. He ground off the excess pin and tube material to prepare for handle shaping.

JO 9.jpg
 
Jared then ground the front, back, and butt of the handles down to the tang.

JO 10.jpgJO 11.jpgJO 12.jpg

Contours were put on the butts and finished them at a fairly high grit (400 I think?).

JO 14.jpgJO 15.jpg
 
The handles were then hand-shaped on a 120 grit belt.

JO 18.jpgJO 19.jpgJO 20.jpg

The first finger area was ground deep for ergonomics.

JO 21.jpg

Uniformity was taken very seriously…

JO 22.jpg
 
Now the handles were ready for filework. Jared watched the contours closely, ensuring they stayed uniform and that the peaks of the handles stayed on a line a bit above the pins. This created a shallower contour at the back for the palm and a deeper contour in the front for the fingers.

JO 23.jpgJO 24.jpg

The end result was a rough finish on both machete handles that only needed a bit of refinement on the 120 grit belt to get them to their finished state.

JO 26.jpgJO 27.jpg
 

Attachments

  • JO 25.jpg
    JO 25.jpg
    26.7 KB · Views: 59
The scale on the spine was then removed.

JO 29.jpg

Jared scored a line down the center of the edge-side of the blade to prepare for sharpening.

JO 31.jpg

First the initial grind was applied using a 60 grit ceramic belt.

JO 32.jpgJO 33.jpg

The edges were cleaned up on a 120 grit belt, and we had ourselves some good looking and seriously sharp machetes.

JO 34.jpg
 
Now it was time to put a swedge on the black/bone machete…

JO 35.jpgJO 36.jpg

And here are the finished products.

JO 37.jpgJO 38.jpg
 
In conclusion, Jared did a fantastic job and made the best pair of machetes I've ever owned.

Sales Info removed by Moderator
 
Last edited by a moderator:
Great stuff, still have not decided what to do with mine yet. Want to also make some sheaths for them as well. Just gotta find the time.

Those handles came out looking very nice, great shape.
 
Thanks Quint. The handles came out extremely refined - something which is hard to appreciate when not seen in person.

Heber Elsworth is making a sheath for the machete I'm keeping. The other one is up to the buyer, although I'm sure Heber will take care of it should he be asked to do so.
 
You will have to post some pics of the sheath when its finished if you dont mind.
 
I always enjoy a visit with J. Oeser. I always feel less talented, for some reason, after seeing his work.
 
Jared has been making knives for less than a year, but is bent on perfection. I forgot to mention a couple things - the edges were hand-ground (as you can see above) into scandi convex edges and the swedge is not sharp. When he was doing the swedge he turned to me and said "this is going to look cool" and when he was done the machete looked like a completely different blade. Sleeker and meaner, in my opinion.
 
Very nice work! Great photos too, thanks for sharing!

The scales are just too cool and I really like the swedge. I did a lot of clearing this year with a machete, I bet the swedge helps it pass through the smaller stuff with ease.
 
Thanks for posting this thread Dan, it's really cool. It was a lot of fun to put these machete's together. Now the next pics I wanna see are of you cutting something up. :D
 
I'm on it, Jared... I'll always remember what you said to me (and I will paraphrase as my memory is crap): "I take a few glamor shots when I am selling a knife, and hope that's the last time I ever see it look like that."

The next thread will be on how to use an insanely sharp machete without cutting your own fingers off. Wish me luck!
 
Back
Top