WIP- Post Anvil Build

Joined
Sep 26, 2004
Messages
574
I decided to document my post anvil build.
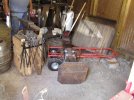
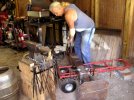
Pic #1 and#2
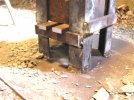
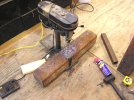
I wanted some lifting lugs, just in case I decide to heat treat the face. There was no way to get a 206# piece of steel on the table of my floor model drill press. Sat my little 5 speed table top Clarke in the floor and used it to drill two 27/64" holes, 1 1/4" deep. Had to go very slow or the little Clarke would stall. Tapped for 1/2"-13 bolts 1" long.
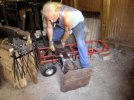
Pic #3
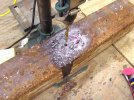
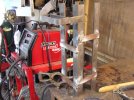
For the stand, I used the stock I had on hand. The base is 1/2" plate, 16" square. The frame is 1 1/2"x3/16" angle. The cross braces are 3/8"x1" bar. With the cross brace spacing I have now, the anvil face height can be adjusted from 32" TO 34" IN 1/2" increments.
I will post more pics as the build continues.
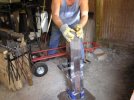
 

Attachments

  • PA-1.jpg
    PA-1.jpg
    57.6 KB · Views: 158
  • PA-2.jpg
    PA-2.jpg
    50 KB · Views: 157
  • PA-3.jpg
    PA-3.jpg
    54.4 KB · Views: 176
Looks like it will be good and solid i have to make a new stand thanks for the look.

Bob
 
Looking good Mike. Keep us posted. I am thinking of doing the same thing since anvils are so hard to find.
 
Finished all the welding and added some tool holders. Had to figure out how to get the anvil into the rack. Wasn't that bad. All that's left is grinding off the saw marks.
 

Attachments

  • PA-5.jpg
    PA-5.jpg
    44.1 KB · Views: 71
  • PA-7.jpg
    PA-7.jpg
    59.1 KB · Views: 71
  • PA-8.jpg
    PA-8.jpg
    55 KB · Views: 80
  • PA-9.jpg
    PA-9.jpg
    50.7 KB · Views: 85
  • PA-10.jpg
    PA-10.jpg
    48.7 KB · Views: 106
Last edited:
Mike is your rack holding the square stock up in the air, or is it just a stand for to keep it upright? I can't tell very well from the pic. Other than trying to manhandle it, it does not look like it was to hard to put together. :) Looks good, I think you did a great job with it. It will be interesting to see how it compares to the anvil beside it.
 
It's looking really good Mike.

How are you thinking of using the lugs heat treating it (if you do)? During my brief
fantasy of making an anvil from the bit of 4 x 6 L6 that Aldo found a couple of things
occurred to me:

1. You only want to HT the face of the anvil to a small number of inches depth.

2. Carpenter L6 can be air quenched and much industrial quenching of large pieces
involves water spray.

This led me to think that "all" the support needed for the post was a cart of the
right height to roll the end of the anvil into a correctly sized forge mouth then back
out for quenching. Of course that "all" does assume a forge that can be configured
to have the right size mouth with sufficient temperature control, such as one of
Stacy's PID setups.

Is all of this complete nonsense?
 
Dan I think that would be the easy part, tempering would be the hardest. Sam said that there was a video for it, but I have not seen it or bought it. Maybe someone who has can clear it up, because that was bothering me to.
 
WadeH, the stand actually supports the steel. The height is adjustable. Here's a pic.
 

Attachments

  • PA-12.jpg
    PA-12.jpg
    51.2 KB · Views: 63
Hey Wade,
Others might know better, but there seems to be no need to temper some of the lower carbon steels.

Take care, Craig
 
Mike great work on the stand! You are gonna love it, nice to have one flat side close to the other.
 
Back
Top