Work in Progress............heavy on pics.

Joined
May 27, 2003
Messages
456
We wanted to share a wip, and was told this is the place we should do it. I know that some of you are familiar with Todd's work, but there are a whole lot of you who are not! So, hopefully this thread will give you a little peak into our shop, and how Todd made this particular knife....the Yautja.

This particular knife was built in five days...Todd was given 120hrs from start to finish which includes posting final pics, to build a knife. Luckily for Todd, I am his shop lackey so I took the pics and posted for him, allowing him to maximize his time in the shop. The materials to be used were limited to the following: stainless, carbon, Damascus if forged in alloted time by maker, wood of choice, g10 any color,micartas or Titanium. That is it.

I tend to post a lot of detailed shots, I try to make the reader feel like they are in the shop with Todd, so hopefully you will enjoy and learn.

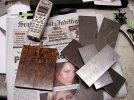
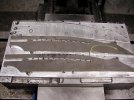
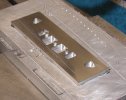
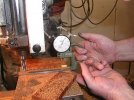
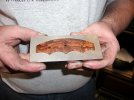
The first pics are of the materials we started with, cpm 154, D-2, and Ironwood.
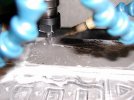
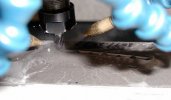
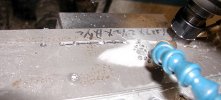
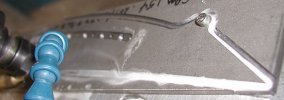
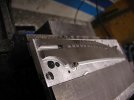
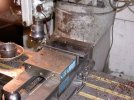
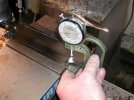
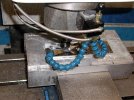
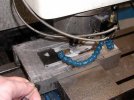
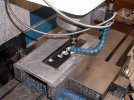
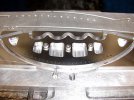
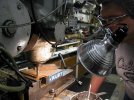
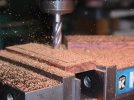
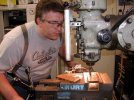
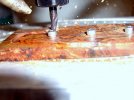
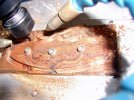
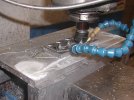
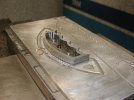
We have a cnc, and Todd spent about 8 hrs programming the geometry and tool paths.This knife required six programs, and five fixtures that Todd had to make specifically for this knife, before he could start making chips fly.
 

Attachments

  • P1010003.JPG
    P1010003.JPG
    69.5 KB · Views: 137
  • P1010006.JPG
    P1010006.JPG
    35.1 KB · Views: 121
  • P1010007.JPG
    P1010007.JPG
    27.4 KB · Views: 83
  • P1010010.JPG
    P1010010.JPG
    32.4 KB · Views: 94
  • P1010014.JPG
    P1010014.JPG
    22.2 KB · Views: 148
The two primary blades are machined out and then Todd is preparing to mill down the thickness of the mid blade, the back bone of the knife.
 

Attachments

  • P1010018.JPG
    P1010018.JPG
    31 KB · Views: 70
  • P1010019.JPG
    P1010019.JPG
    60.7 KB · Views: 134
  • P1010025.JPG
    P1010025.JPG
    55.5 KB · Views: 62
  • P1010028.JPG
    P1010028.JPG
    49.4 KB · Views: 66
Profiling the mid blade and milling out the weight reducing pockets.
 

Attachments

  • P1010035.JPG
    P1010035.JPG
    62.2 KB · Views: 49
  • P1010037.JPG
    P1010037.JPG
    50.6 KB · Views: 37
  • P1010038.JPG
    P1010038.JPG
    66.7 KB · Views: 39
  • P1010041.JPG
    P1010041.JPG
    48.6 KB · Views: 57
  • P1010045.JPG
    P1010045.JPG
    57.1 KB · Views: 102
Here Todd is,milling down the thickness of the Ironwood on the Bridgeport mill.
 

Attachments

  • P1010051.JPG
    P1010051.JPG
    63.8 KB · Views: 49
  • P1010053.JPG
    P1010053.JPG
    55.6 KB · Views: 43
  • P1010058.JPG
    P1010058.JPG
    58 KB · Views: 64
  • P1010057.JPG
    P1010057.JPG
    63.1 KB · Views: 126
Now he is machining the Ironwood handle inlays, and the handle frames.

This is it for day one, about 12 hrs of actual shop time, this does not include the programming hours. Tune in tomorrow for day two.
 

Attachments

  • P1010059.JPG
    P1010059.JPG
    36.4 KB · Views: 61
  • P1010063.JPG
    P1010063.JPG
    64.6 KB · Views: 70
  • P1010013.JPG
    P1010013.JPG
    52.4 KB · Views: 40
  • P1010016.JPG
    P1010016.JPG
    36.2 KB · Views: 69
  • P1010010.JPG
    P1010010.JPG
    45.9 KB · Views: 174
Tanya - thanks for this.

If I may give a small piece of feedback, it would be much easier if you uploaded those pictures on a separate server and then link to them directly in the message. The way it is we have to click on each pic one after the other to open them, and that's slow and tedious.
 
Joss, I would be happy to do that, but alas....I dont know how! I tried to do a search here..but the server keepscoming up overloaded or something?
 
Tanya,

The server is struggling right now, not sure why.

The way it works is that you first upload your pic to a server - maybe a folder on the server used for Todd's site, but there are also some free services where you can upload your pic.

Then each picture will have a URL address - e.g.: http://servername.com/foldername/photo1.jpg

Then you can directly embed the photo in your message by surrounding the URL with the relevant tags, e.g.:
[img]http://servername.com/foldername/photo1.jpg
[/img].

That would show the image directly in the post, full size.
 
Tanya,

No problem. This will not work to embed the photo in the message, although the slide show is nice. To be able to embed, you need to get the url of each picture, which ends with ".jpg", and then surround the url with the tags "img" and "/img" in square brackets.

Let me see if I can link directly to the image on Picasa - can you guys see that:

P1010001.JPG.jpg
 
By Joss!!! I love it when I learn something new!!!! thank you so very much!!!!!
 
Man it's good to hear y'all are back into the swing of things and that Todd's back to health!!!
Any chance y'all are gonna be in Eugene this month?

Keep up the pics, Tanya - this is great seeing the guy in action! :thumbup:
 
Hi Joe!! Long time no speaking! yes we will be in OKCA, see you there!

So we have day 2's work starting out with using an EDM stone to polish out the flutes
Fixed0821

P1010008.JPG.jpg

P1010009.JPG.jpg

P1010011.JPG.jpg

P1010013.JPG.jpg

He is grinding off the tool tabs here.
P1010015.JPG.jpg
 
Using a 220 belt to get the machining marks off the periphery.
P1010017.JPG.jpg

P1010018.JPG.jpg

P1010021.JPG.jpg

Using a black marker so he can see his scribe lines better.
P1010023.JPG.jpg

scribing his center line
P1010025.JPG.jpg

P1010026.JPG.jpg

using his handy dandy height gauge for the scribing.
P1010028.JPG.jpg

Todd likes to keep a close eye on things.....:D
P1010031.JPG.jpg

Todd is setting up the table to grind on the two inch wheel.....he is making a special riser block with that micarta.
P1010034.JPG.jpg

riser block is working great, he is grinding the top bevel.
 
P1010035.JPG.jpg

a pic of the riser block...it raises the work rest to the wheel.
P1010001.JPG.jpg

satin finishing the grinder marks out of the top bevel with a two inch wheel.....Todd is against belt finishes in principle...he believes they are the knifemaking equivalent of a comb-over.
P1010003.JPG.jpg

P1010004.JPG.jpg

grinding the top swedge on the back of the blade
P1010006.JPG.jpg

P1010009.JPG.jpg

one blade down, one more to go
P1010018.JPG.jpg

P1010014.JPG.jpg

surface grinding the blade.
P1010033.JPG.jpg

reaming the holes in the d-2 handle scales.
P1010034.JPG.jpg
 
P1010036.JPG.jpg

surface grinding the mid blade....our surface grinder is a POS...I expect the wheel to explode one of these days....
P1010038.JPG.jpg

he doesn't enjoy surface grinding...and under normal circumstances(ie. not in a buildoff) I might be doing this operation!
P1010046.JPG.jpg

Here are all the parts, before ht.
P1010048.JPG.jpg

this is the first assembly of all the parts....everything seems to fit! Thats it for day two's progress...it may not seem like a lot was accomplished but there was. This was a 13 hr day. Some of you may remember Todd was diagnosed with a serious disease a couple years ago, nearly killed him. We are happy to report he has been in remission, but he can not put in the 16-18 hr days he used to.....even still a 13 hour day in the shop is a long day!!!
 
Back
Top