you couldn't ask for a better hamon

Last Visible Canary

actively parsing hurf durf
Joined
Nov 28, 2006
Messages
4,577
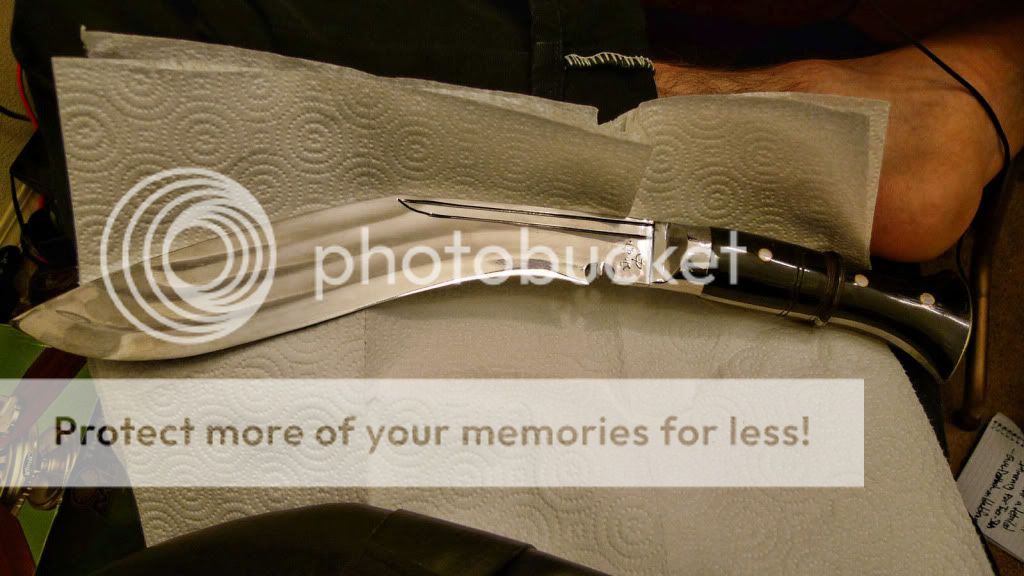
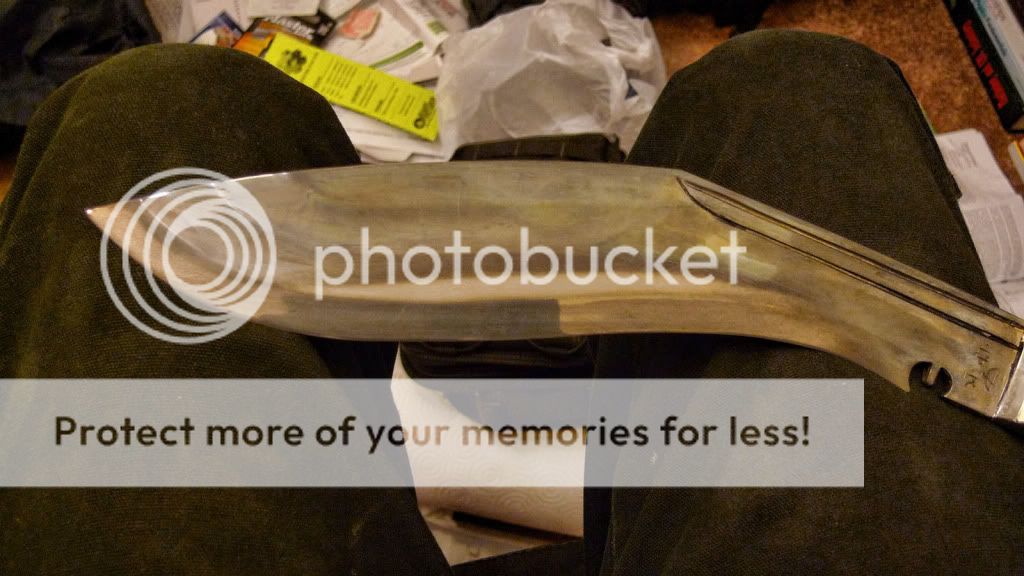
With any khukuri that I plan on using, I like to etch it to see just where the hamon is. It can give some indication of where problem areas are likely to arise, and where you can really wail on it and not worry about excessive rolling. Occasionally you'll get a hamon that only covers the sweet spot, other times you'll get one that covers too much of the blade and may cause lines of stress from edge to spine.

Every now and then, you get what I consider to be a perfect khukuri hammon line. In this case, the hamon is crisp and clear from the tip to within 2 inches of the cho. The sweet spot has an inch of depth, and the tip section has at least 1/2" of depth.

I've been out of the loop for a while, so I'm not sure of the kami who made this. The symbol appears to be a bow and arrow.

P1040114.jpg

P1040117.jpg

P1040120.jpg

P1040121.jpg
 
I couldn't find a "bow and arrow" on mine; but hopefully there will be a sticky of the various marks soon.
 
hi:)

is the blades only hardened on the area where the hamon shows? would it not be better to have a inch deep hamon along the whole edge? mine grs 22 only have a ca 3" long and about 1/4 " deep hamon just on the sweet spott:)

thanks
 
boerboel84, have you etched the edge areas to see just how "big" the hardened area is? The visible hamon on these blades is pretty hard to see since the kami's are going for a hard edge to "use" not a hamon for "display". Depending on the finish of your GRS is you put a tea towels or paper towels on the edge area then let it soak in white vinegar for an hour or so you will see (the darker area) the full size of the hardened area. All of mine run from just infront of the cho to the tip and varies in depth. Downside is that this will pretty much destroy a mirror polish.
If you did manage to resharpen enough to use up a 1/4" hardened edge and get into "softer" steel I'd say you definitely got your moneys worth out of the Khukuri:p These are not like fully hardened mass produced blades where you can re-profile them down to dagger dimensions and still be working with hardened steel. The "first" knife I ever made was a Khukuri Like Object in stainless that I had fractured the tip off of and hacked away till I had a small fixed blade knife out of what would have been from the chirra area of a traditional Khukuri.
 
I'm glad you like the blade. I haven't received yours yet but it says it's coming today. I'm so excited!
 
hi:)

is the blades only hardened on the area where the hamon shows? would it not be better to have a inch deep hamon along the whole edge? mine grs 22 only have a ca 3" long and about 1/4 " deep hamon just on the sweet spott:)

thanks

Ideally you'd want not only a consistent depth but also a consistent known rockwell hardness. Given that these are hand hardened and done by eyeballing the temperature by metal color, this is a really good hamon line.

The desirable depth of the hardened edge is dependent on the hardness and the type of steel. You want the hardened potion deep enough that if you should take on a minor chip or the edge should be damaged it won't eat past the hardened area. You also want it deep enough that it will take many sharpening before you eat past. However, since knives often bend while being batoned and shoved through knotted and twisted wood, you don't want it to be so wide that you have a nearly through hardened blade that might crack when flexed. You also don't want there to be lines of hardness that run from the edge to the spine (where the water or cooling agent ran across the blade when it was being quenched) because that can create a stress line for the blade to snap at.

I consider having the tip hardened a nicety, but not a necessity with a large khukuri like this. There are reasons why you wouldn't want it hardened - namely if you go to far with your batoning or you miss your target and slam the tip into the ground where rocks may be present. The softer tip will roll and mash but be less likely to take on serious fractures and chips that can eat away much more of the blade. Likewise having the edge hardened all the way to the cho isn't necessarily a good thing because the cho's tend to be pretty jagged, a prime spot for stress risers in hardened blades (but not so much when it's left soft).


I always forget that you need to stop just as the blade is coming into looking perfect because the metal etchant will continue to work after you wipe it off. I always get it perfect, then wipe it off only to have it get a little to dark. My goal with etching is definitely not to make a show finish, it's just to know where everything is at.
 
Last edited:
I don't suppose I could ask you to post a clear picture of the Kami's Bow and Arrow Kami mark area for me?

I do like the way that shows the differential hardening or hamon of the blade. I have tried to do this a couple of times myself but I guess I do something wrong because all I get is a nice, uniform etch. The blade is clearly made correctly since it performs as it should be but I seem to over etch the thing or something. :)


I'm using undiluted jasco metal etch. A big part of getting a really good etch is completely avoiding leaving the acid/etchant in one place. if you wrap a towel full of vinegar around the blade, you won't be able to see anything. I wet a towel/paper towel and run it over the blade back and forth on all sides the entire time it's etching, so that no one spot becomes darker than another. That said, I have no idea how the guys who do finish quality hamon etches do it. every time I sand mine with 2500 grit sandd paper the etching completely comes off.

P1040124.jpg
 
Thanks for the picture! That completes the catalog BTW. :) for me at least...

Thanks also for the etching tips, that is what I am doing wrong. I put it all over and just leave it for a while.
 
Back
Top