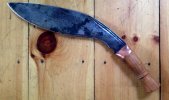
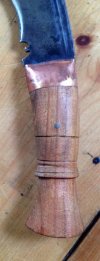
Restoring an Atlanta Cutlery Longleaf Khukuri Blade.

Bubbles bought me a Bhojpure from AC about ten years ago.
Paid extra for special select.

Blade & handle both beat to spit. Chunks missing from edge. Blade wavy, not flat. Tip gone. Loose steel bolster.

Been sitting here in the office ever since, waiting for somebody to knock on the door & say the magic words: "Hi. I'm the best person on the planet for old khukuri restoration, and I want to do yours."

So far, hasn't happened & I am NOT a DIY kinda guy.
Always envy those who are, but there's no hope whatever of anything good coming of any attempts by me. :)
Good luck on the project.
Denis


Now you are someone that I can relate to Denis. I really love talking with all these super craftsman-y types we have around here. I love seeing how they do all the glorious things they do. But no one wants to see what would happen if I tried it LOL. Probably scare even the ones that know what they are doing away from wanting to try after they see how I would do. :D

When I was setting some rat-tailed scandinavian blades into homemade wooden handles, I was a little concerned with security. I filed some notches into the rat tails, and then set them into the handle holes with epoxy. I haven't had any issues with the blades coming loose. They may have been just fine without such notches.

It's something (non traditional) to think about with a rat-tailed khukuri that won't be peened at the end of the handle.

Wow great idea Howard. Just adds that extra retention grasp against the tail sliding loose.
 
Sounds like that's what I'll do then! It obviously won't be my primary chopper (got that Thamar Mk. 1 for that!) but I hope to use it every now and again.
 
Shavru,
Truth be told, as de-coordinated as I am, I probably shouldn't even be allowed access to sharp edges, much less tools. :)
Denis
 
I'll take everythig off of your hands, out of genuine concern for a fellow forumite's safety. Let me know how big your collection is, so I'll be able to estimate shipping costs. Thanks.
 
When I was setting some rat-tailed scandinavian blades into homemade wooden handles, I was a little concerned with security. I filed some notches into the rat tails, and then set them into the handle holes with epoxy. I haven't had any issues with the blades coming loose. They may have been just fine without such notches.

It's something (non traditional) to think about with a rat-tailed khukuri that won't be peened at the end of the handle.
You can file your notches into the corners, and it will affect the strength of the tang a little less. This one is just burned in tight and pinned, and while I haven't gone wild with it it has held up to some chopping.image.jpg
image.jpgIf I epoxy them, i pin them too. I know what happens if it gets loose.
Knives under 7" or so, I think epoxy is plenty-but I like to pin thise in case someone unwittingly gets the thing hot (left a knife on a cold woodstove long ago, friend started woodstove unthinkingly, epoxy became shall we say...relaxed)
 
i've seen bare blades from scandinavia that come with tang notches already in them. if i epoxy a handle, i generally rough up & gouge the area on both parts to aid in the grabbing. old burmese/thai battle proven dha usually have stub tangs some as short as 3 in. they generally have a thickening at the end if the tang, almost a blob of metal to aid in preventing it from pulling thru the resinous cement. i use a black high strength structural epoxy that has titanium and carbon fibres (for added tensile strength), and boro-silicate glass micro-spheres (for compressive strength) as fillers.
 
.... i use a black high strength structural epoxy that has titanium and carbon fibres (for added tensile strength), and boro-silicate glass micro-spheres (for compressive strength) as fillers.

I'd like to buy some of that stuff. What's it called?

I have T-88, but I don't know if it has titanium and carbon fibres, etc.
 
Here's how I used to make hilts for blades with short rat tail tangs:

1: Take a plastic straw and jam it on the end of the tang. Wrap the area where the straw meets the hilt with tape to make it water tight.
2: Cut the plastic straw down to a little longer than the length you want your hilt to be
3: Pour epoxy down the straw and fill the straw up.
4: Wait for the epoxy to dry. Cut off the straw and tape.
5: Cut up a lot of strips of cotton fabric, about a half inch in width, into strips
5: Soak the fabric in epoxy
6: Wrap the fabric around the hilt and the epoxy hilt extension, keep wrapping it around until it's maybe a quarter inch thicker than you want your hilt to ultimately be.
7: Congratulations! You just made a Micarta or "Mycarta" hilt. Wrap your new hilt as tightly as you can with electrician or duct tape.
8: Put something really heavy on top of the hilt. Like a car battery. Or squeeze the hilt with a vice. Your goal here being to compress the hilt as tightly as you can
9: Wait 24 hours for the whole thing to dry
10: Whittle and file and sandpaper your new hilt into the shape you want.
11: Once the hilt is in the exact shape you want, seal it with superglue. If you don't the material will absorb dirt and oil from your hands.
 
Last edited:
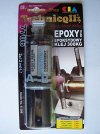
davidf99, it's called technicqll 7706 (it was graphite, not carbon fibre), it's from poland.

51TeeF5GcqL.jpg

found it on amazon - the '300kg' i think means the strength is 300kg/sq. cm., not the weight of the tubes. ;)
(that's 4267 psi in real units, not metric :D)

TECHNICQLL - Epoxy Adhesive METAL 300kg

Industrial specialist technical adhesive to highly-durable repairs metal parts damaged by corrosion, cavitation, friction, breaking, cracks in machinery and equipment in very difficult conditions. It is a two component adhesive compositions based on epoxy resins and hardener. In contrast, the addition of properly selected materials to modify the (metal powder, graphite, glass) allows to obtain a weld having excellent match physical and mechanical parameters of the material to be repaired. Weld characterized by resistance to water, petrol, oil, acids, weather conditions and elevated temperature.

APPLICATION:

Repair metal parts, filling cavities and welded connections.
Sealing of cast iron, cast steel, non-ferrous metals.
Removing leaks in central heating, plumbing.
The reconstruction of the broken seats of bearings, splines, threads and guides.
Sealing fuel tanks, heat exchangers (eg. Coolers), oil pans, engine housings.
Regeneration of worn pump housings, valves and gate valves surfaces, components exposed to erosion and cavitation.

HOW TO USE:

Bonding surface should be roughened, eg. With sandpaper and then clean and degrease. Before using the product is heated to the temperature. RT. Cut the nozzle tip knife, holding a syringe in an upright position push the remains of the air, and then a plastic plate put the desired amount of adhesive and mix thoroughly to a uniform color. Glued items should be fed to a complete cure to weld for example. Tying tape. The crosslinking begins inside the weld by exothermic reaction and is not dependent on air access, or moisture. It is highly advantageous to heat surfaces to be joined, eg. An electric dryer. Higher temperatures shortens repair time and increases the strength of the weld. Store at temperatures between + 5 ° C to + 25 ° C (note dispenser with cleaning adhesive residue) to break the cap and close the nozzle of the syringe.
 
Last edited:
I actually forgot about the Blade (and this thread). When recently cleaning off the bench, I found it and remembered I was actually supposed to do something with it. I roughed out a cherry handle last night but didn't drill deep enough and the tang was too cold when burning the handle in so I maybe kind of sort of...popped the handle in half. Only maybe kind of sort of. Roughed out one out of maple with my Deer Creek Force Kephard and KLVUK this morning before work.
12654156_1092520600768378_4138584963790267943_n.jpg
 
Looks like you got the hard part done, it's looking really nice.
 
For me the hard part is going to be fabricating and fitting the bolster. Still need to clean up the handle fit and do some more file work as well.
 
I wound up using cherry again, I love how it smells when I burn the tang in.
12654461_1093193740701064_6092385354130927588_n.jpg
I may take a quarter inch off the top of the handle before I do anything else with it tomorrow, but I already like how it feels in the hand.
 
Last edited:
DT:

If you haven't already epoxied the handle onto the blade, I suggest that you take a triangle file and file some backward-pointing notches along the edges of the tang to help hold it on the handle during swings.

Alternatively, drill a hole through the handle near the fatter end of the tang and drive a pin through the tang.

Or both.

Just in case. :)
 
Nope! Haven't epoxied yet but I filed small notches into the tang. Dunno if I'll pin it, though I suppose I always can at a later date. I still need to fabricate and fit the bolster as well.
 
Back
Top